Defining Attributes
Define attributes on users, tenants, resources, and roles in Permit.io, and set their values in the dashboard, through the API, or in permit.check(). This page is for developers who build attribute-based access control (ABAC) policies and need to supply the attribute data those policies evaluate.
An attribute is a key-value pair that describes a user, a tenant, a resource, or a role, such as department: "finance". ABAC policies use attributes in the conditions of user sets and resource sets.
Prerequisites
- A Permit.io account with a project and an environment. See the Quickstart.
- Your environment API key for the API requests on this page. See Get your API key.
- The project ID or key and the environment ID or key for the request paths. See Get the project ID and environment ID.
Types of attributes
Permit supports attributes on four types of objects:
| Attribute type | Describes | Used for |
|---|---|---|
| User attributes | The user who performs an action | Conditions in dynamic roles (user sets). See Define stored user attributes. |
| Resource attributes | The resource the action is performed on | Conditions in dynamic resources (resource sets). See Define resource attributes. |
| Tenant attributes | The tenant that contains the user and the resource | Conditions in user sets, for users in that tenant. See Define stored tenant attributes. |
| Role attributes | A role-based access control (RBAC) role | Tagging roles with metadata such as tier, geography, or product area, and filtering roles through the API with attr_ filters. See List tenant roles filtered by role attributes. |
Ways to set attribute values
Before you set values, create the attribute definitions. User, tenant, and role attributes are defined in the Settings of the Directory screen, as Step 1 of Building your first ABAC policy shows. Resource attributes are defined with the resource, as Define resource attributes shows.
You can supply attribute values in three ways:
| Method | Attribute types | When to use |
|---|---|---|
| Store the values in Permit, from the dashboard or the API | User, tenant, resource instance, and role attributes | Values that change less often than your checks run |
Pass the values in the permit.check() call | User and resource attributes | Values your application knows at request time, such as the current time or a resource that isn't synced to Permit |
| Generate the values with custom Rego code | Any attribute | Values computed from other data, such as whether user and resource attributes intersect. See ABAC design patterns. |
Attribute values you pass in the check call apply to that check only. To pass them, see Pass just-in-time (JIT) attributes. To store values in Permit instead, use the dashboard or the API.
Define stored user attributes
After you create the user attribute definitions, set the values for each user in the dashboard or through the API.
In the dashboard:
- On the Directory screen, click Settings and select User Attributes to create or edit attribute definitions.
- On the Users tab of the Directory screen, open the three-dot menu of a user and select Edit Attributes.
- Edit the user's attribute values as JSON.
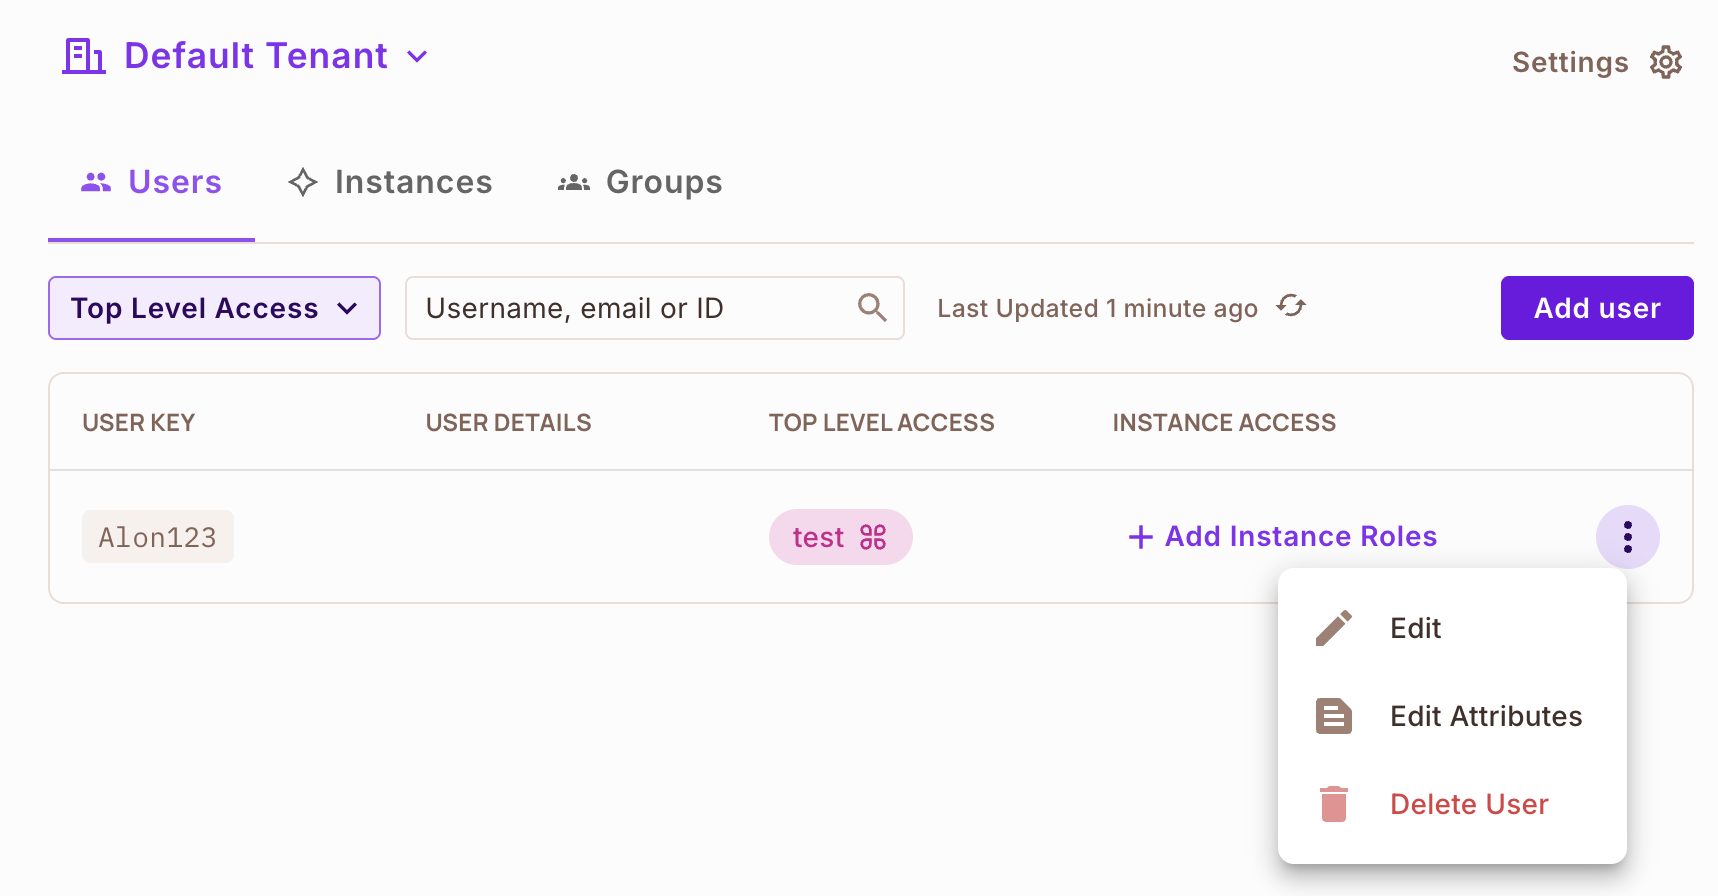
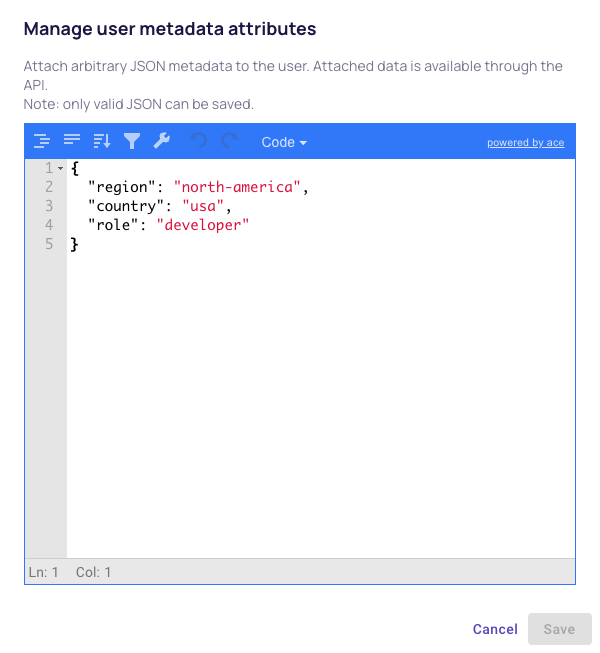
Through the API or an SDK: include an attributes object when you create, update, or sync a user, for example with permit.api.users.update(...) or permit.api.users.sync(...).
Define stored tenant attributes
After you create the tenant attribute definitions, set the values for each tenant in the dashboard or through the API.
In the dashboard: On the Directory screen, click Settings and select Manage Tenants under General. Choose the tenant and edit its attributes. You can also open the Tenants tab of the Directory screen, open a tenant, and click Edit Tenant Attributes.
Through the API: send a PATCH request to the tenant with the attribute values in the attributes object. Replace {project_id}, {env_id}, and {tenant_key} with your project, environment, and tenant keys or IDs, and <YOUR_API_KEY> with your environment API key.
curl -X PATCH 'https://api.permit.io/v2/facts/{project_id}/{env_id}/tenants/{tenant_key}' \
  -H 'Authorization: Bearer <YOUR_API_KEY>' \
  -H 'Content-Type: application/json' \
  -d '{
        "attributes": {
          "tier": "enterprise",
          "plan_version": "2026-01"
        }
      }'
The attributes object holds any tenant data your policy decisions need.
Define resource attributes
Resource attributes belong to a resource type, and you define them with the resource instead of in the Directory settings:
- Open the Policy screen and select the Resources tab.
- Create a resource, or open an existing one.
- Under ABAC Options, click Add attribute, then enter the attribute name and select its type.
- Click Save.
You can then use the attribute in a resource set condition, such as resource.time greater-than 17. See Create the Bicycle available after 5pm resource set.
Supply resource attribute values in one of two ways:
| Where the values come from | How to supply them |
|---|---|
| Your application, at request time | Pass an attributes object in the resource argument of permit.check(). See Check permissions with permit.check(). |
| Data you sync to Permit, per resource instance | Create a resource instance with an attributes object. See Sync resource instances and their attributes. |
You can't use type as the key of an attribute. type is a reserved keyword, and the resource argument of permit.check() already uses it for the resource key.
Define role attributes
Set role attributes in the dashboard or through the Roles API.
In the dashboard: On the Directory screen, click Settings and select Role Attributes (EAP) to tag roles with metadata.
Through the API: include an attributes object when you create or update a role. Replace the placeholders as in the tenant example, and {role_key} with the role key.
curl -X PATCH 'https://api.permit.io/v2/schema/{project_id}/{env_id}/roles/{role_key}' \
  -H 'Authorization: Bearer <YOUR_API_KEY>' \
  -H 'Content-Type: application/json' \
  -d '{
        "attributes": {
          "tier": "gold",
          "department": "finance"
        }
      }'
After you store role attributes, filter roles by attribute value (for example, ?attr_tier=gold) or read the metadata through the role APIs. Use role attributes when you delegate role management to tenants, or when you automate tasks by role category.
Verify the stored attribute values
Read the object back through the API and look for your keys in the attributes object of the response. Use the same placeholders as in the requests above.
Read a tenant with its attributes:
curl 'https://api.permit.io/v2/facts/{project_id}/{env_id}/tenants/{tenant_key}' \
  -H 'Authorization: Bearer <YOUR_API_KEY>'
The response holds the values you set, next to the tenant's key and name:
{
  "key": "acme-corp",
  "name": "Acme Corp",
  "attributes": {
    "tier": "enterprise",
    "plan_version": "2026-01"
  }
}
Read a role with its attributes:
curl 'https://api.permit.io/v2/schema/{project_id}/{env_id}/roles/{role_key}' \
  -H 'Authorization: Bearer <YOUR_API_KEY>'
To read a user with its attributes, send a GET request to https://api.permit.io/v2/facts/{project_id}/{env_id}/users/{user_key}.
An empty attributes object means the values didn't reach Permit. Confirm that the request used the environment API key of the environment you are reading, and that the attribute keys in the body match the definitions you created.
Next steps
- Building your first ABAC policy: use attributes in a user set and a resource set.
- Load custom data: load attribute data from the dashboard, the check call, or OPAL.
- Sync application data into Permit: sync users, tenants, and resource instances with their attributes.