Sync Attributes, Tenants, Roles, and Relationships
Sync the application data your Permit.io policies evaluate: user attributes, tenants, role assignments, resource instances, and relationship tuples. This page is for developers who have a policy and a first synced user, and need their real data in Permit. It shows the SDK call for each kind of data and where to edit the same data in the Permit dashboard.
For creating users and the sign-in sync flow, see Sync users. This page covers the data you add around those users.
Prerequisites
- A policy with roles and resources (Configure your first RBAC policy)
- An initialized Permit SDK and your environment API key (Use the Permit API and SDK)
- A synced user (Sync your first user with the API)
Data you can sync to Permit
A permission check can pass some data in its arguments. Most data that a policy evaluates is synced to Permit before the check runs. The policy models are role-based access control (RBAC), attribute-based access control (ABAC), and relationship-based access control (ReBAC).
| Data | Used by | Node.js SDK call | Python SDK call |
|---|---|---|---|
| Users and user attributes | RBAC, ABAC, ReBAC | permit.api.users.sync() | permit.api.users.sync() |
| Tenants and tenant attributes | RBAC, ABAC, ReBAC | permit.api.tenants.create() | permit.api.tenants.create() |
| Role assignments | RBAC, ReBAC | permit.api.roleAssignments.assign() | permit.api.role_assignments.assign() |
| Resource instances and their attributes | ABAC, ReBAC | permit.api.resourceInstances.create() | permit.api.resource_instances.create() |
| Relationship tuples | ReBAC | permit.api.relationshipTuples.create() | permit.api.relationship_tuples.create() |
In the Python SDK, each call is async, so await it. The code samples on this page show Node.js and the equivalent REST API request.
The samples use these placeholders and example values:
| Value | Meaning |
|---|---|
PERMIT_API_KEY environment variable, YOUR_API_KEY | Your environment API key. |
{proj_id}, {env_id} | The key or ID of your project and environment. |
john@permit.io | The user key. |
acme-corp | The tenant key. |
dashboard, repository, organization | Resource keys. Replace them with resources from your policy. |
The first Node.js sample creates the permit client. The other Node.js samples on this page reuse that client.
To load data from your own service as it changes, instead of calling the SDK, use Open Policy Administration Layer (OPAL) data sources. See Use an external data source.
Sync user attributes (ABAC)
User attributes describe a user, for example a subscription tier or a department. ABAC policies use them in user set conditions.
For example, a SaaS platform has Free, Pro, and Enterprise tiers. When a user upgrades, your backend syncs the new attribute value, for example tier: "pro", to Permit. The next permission check for that user evaluates the new value, so the user gets the Pro features without a manual step.
To set attributes, pass an attributes object to users.sync. The call creates the user if the key doesn't exist, and replaces the user if it does. The REST equivalent is PUT on the user's URL.
- Node.js
- cURL
import { Permit } from "permitio";

const permit = new Permit({
  token: process.env.PERMIT_API_KEY,
  pdp: "https://cloudpdp.api.permit.io",
});

const { user, created } = await permit.api.users.sync({
  key: "john@permit.io",
  email: "john@permit.io",
  first_name: "John",
  last_name: "Smith",
  attributes: {
    department: "marketing",
    age: 30,
    subscription: {
      tier: "pro",
      expired: false,
    },
  },
});
console.log(user.key, created);
curl 'https://api.permit.io/v2/facts/{proj_id}/{env_id}/users/john@permit.io' \
  --request PUT \
  --header 'Authorization: Bearer YOUR_API_KEY' \
  --header 'Content-Type: application/json' \
  --data '{
  "key": "john@permit.io",
  "email": "john@permit.io",
  "first_name": "John",
  "last_name": "Smith",
  "attributes": {
    "department": "marketing",
    "age": 30,
    "subscription": {
      "tier": "pro",
      "expired": false
    }
  }
}'
The Node.js sample prints john@permit.io true when users.sync creates the user, and john@permit.io false when the user already exists. The REST API returns HTTP 201 for a created user and 200 for a replaced one.
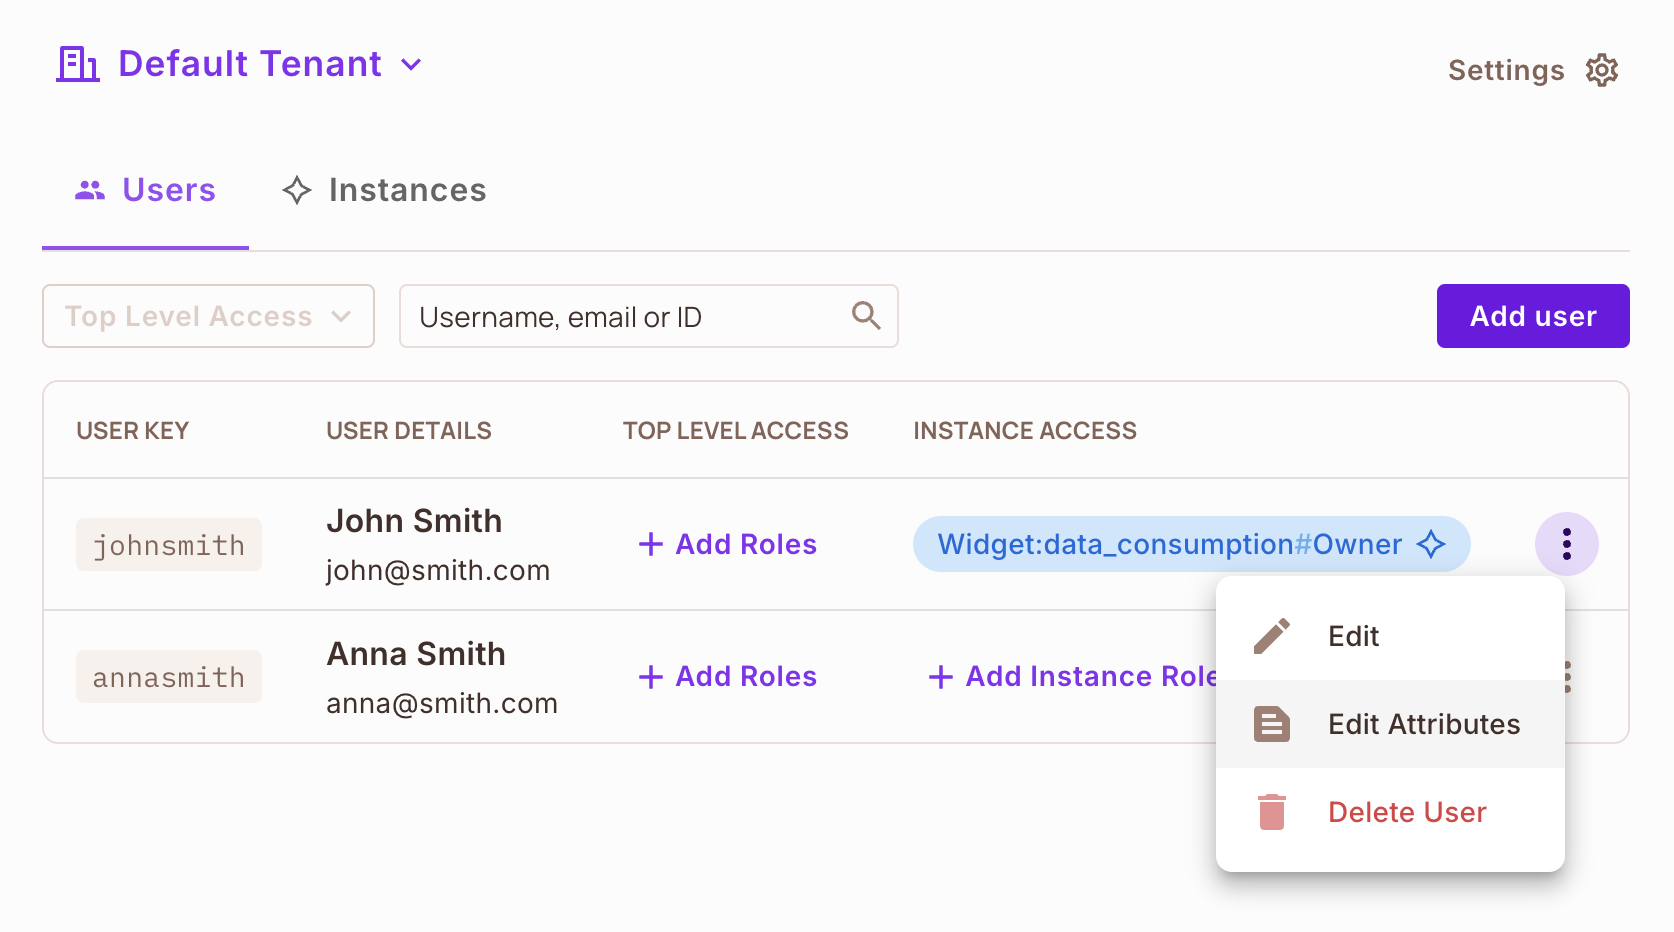
Go to Directory, find the user, click the three-dot menu, and select Edit Attributes.
Sync tenants and tenant attributes
A tenant usually represents one customer organization or account in a multi-tenant application. Tenant attributes describe that organization, so policies can treat tenants differently.
For example, in a multi-tenant e-commerce application, each merchant is a tenant. When a merchant signs up and picks an industry and a region, your backend syncs those values as tenant attributes. Policies then show the merchant's users only the features allowed for that region and industry.
Common tenant attributes:
| Attribute | Example values |
|---|---|
| Region | North America, Europe, Asia |
| Subscription level | Basic, Pro, Enterprise |
| Industry | Healthcare, Finance, Retail |
A policy on tenant attributes can say: "Allow access to advanced analytics only for tenants with a Pro or Enterprise subscription."
To create a tenant with attributes, call tenants.create with the tenant key, name, and attributes:
- Node.js
- cURL
await permit.api.tenants.create({
  key: "acme-corp",
  name: "Acme Corp",
  attributes: {
    allowed_locations: ["US", "CA"],
  },
});
curl 'https://api.permit.io/v2/facts/{proj_id}/{env_id}/tenants' \
  --request POST \
  --header 'Authorization: Bearer YOUR_API_KEY' \
  --header 'Content-Type: application/json' \
  --data '{
  "key": "acme-corp",
  "name": "Acme Corp",
  "attributes": {
    "allowed_locations": ["US", "CA"]
  }
}'
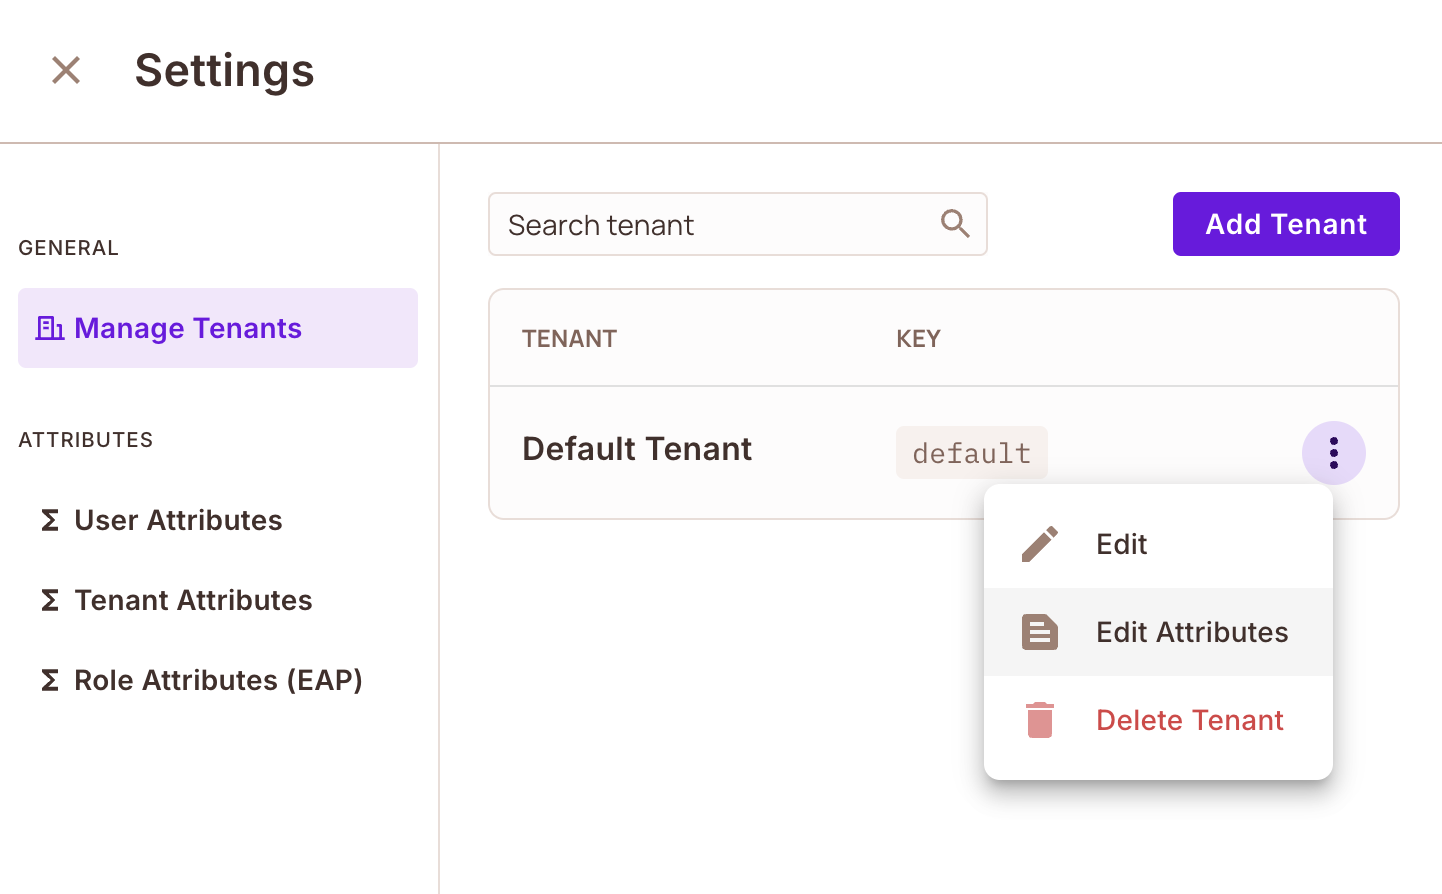
Go to Directory, click Settings, and select Manage Tenants. Find the tenant, click the three-dot menu, and select Edit Attributes. Enter the attributes as a JSON object of names and values.
Sync role assignments (RBAC and ReBAC)
A role assignment gives a user a role. A top-level role applies across one tenant (RBAC). An instance role applies to one resource instance (ReBAC).
For example, a project management tool has Admin, Manager, and Contributor roles. When a user becomes Manager of one project, your backend syncs that instance role assignment. The user can assign tasks and view reports in that project, and the user's roles in other projects don't change.
To assign a role, call roleAssignments.assign with the user, role, and tenant. Add resource_instance, in the format resource_key:instance_key, to assign an instance role. You can also assign roles when you create the user, with the role_assignments field of users.sync. A user can have several roles, in several tenants.
- Node.js
- cURL
await permit.api.roleAssignments.assign({
  user: "john@permit.io",
  role: "admin",
  tenant: "acme-corp",
});
curl 'https://api.permit.io/v2/facts/{proj_id}/{env_id}/role_assignments' \
  --request POST \
  --header 'Authorization: Bearer YOUR_API_KEY' \
  --header 'Content-Type: application/json' \
  --data '{
  "user": "john@permit.io",
  "role": "admin",
  "tenant": "acme-corp"
}'
With instance roles, one user can have different roles on different instances of the same resource. For example, with a dashboard resource that has admin and viewer instance roles, john@permit.io can be admin of dashboard:dashboard-a and viewer of dashboard:dashboard-b. The following Node.js sample makes both assignments. The cURL sample shows the first one. To create the dashboard instances with their own keys and attributes, see Sync resource instances and their attributes.
- Node.js
- cURL
// admin of dashboard-a
await permit.api.roleAssignments.assign({
  user: "john@permit.io",
  role: "admin",
  tenant: "acme-corp",
  resource_instance: "dashboard:dashboard-a",
});

// viewer of dashboard-b
await permit.api.roleAssignments.assign({
  user: "john@permit.io",
  role: "viewer",
  tenant: "acme-corp",
  resource_instance: "dashboard:dashboard-b",
});
curl 'https://api.permit.io/v2/facts/{proj_id}/{env_id}/role_assignments' \
  --request POST \
  --header 'Authorization: Bearer YOUR_API_KEY' \
  --header 'Content-Type: application/json' \
  --data '{
  "user": "john@permit.io",
  "role": "admin",
  "tenant": "acme-corp",
  "resource_instance": "dashboard:dashboard-a"
}'
Sync resource instances and their attributes
A resource instance is one object of a resource type, for example one repository of the repository resource. You define attributes on the resource type in the Policy Editor. Each instance then stores its own values for those attributes, and policies use the values.
For example, a learning management system has a course resource with a difficulty_level attribute (Beginner, Intermediate, Advanced) and a category attribute (Math, Science). When a course is created, your backend syncs the course instance with its attribute values. A policy can then give some users access only to Advanced Math courses.
To create a resource instance, call resourceInstances.create with the instance key, the resource type, the tenant, and the attributes:
- Node.js
- cURL
await permit.api.resourceInstances.create({
  key: "react",
  resource: "repository",
  tenant: "acme-corp",
  attributes: {
    private: "false",
    owner: "acme-corp",
  },
});
curl 'https://api.permit.io/v2/facts/{proj_id}/{env_id}/resource_instances' \
  --request POST \
  --header 'Authorization: Bearer YOUR_API_KEY' \
  --header 'Content-Type: application/json' \
  --data '{
  "key": "react",
  "resource": "repository",
  "tenant": "acme-corp",
  "attributes": {
    "private": "false",
    "owner": "acme-corp"
  }
}'
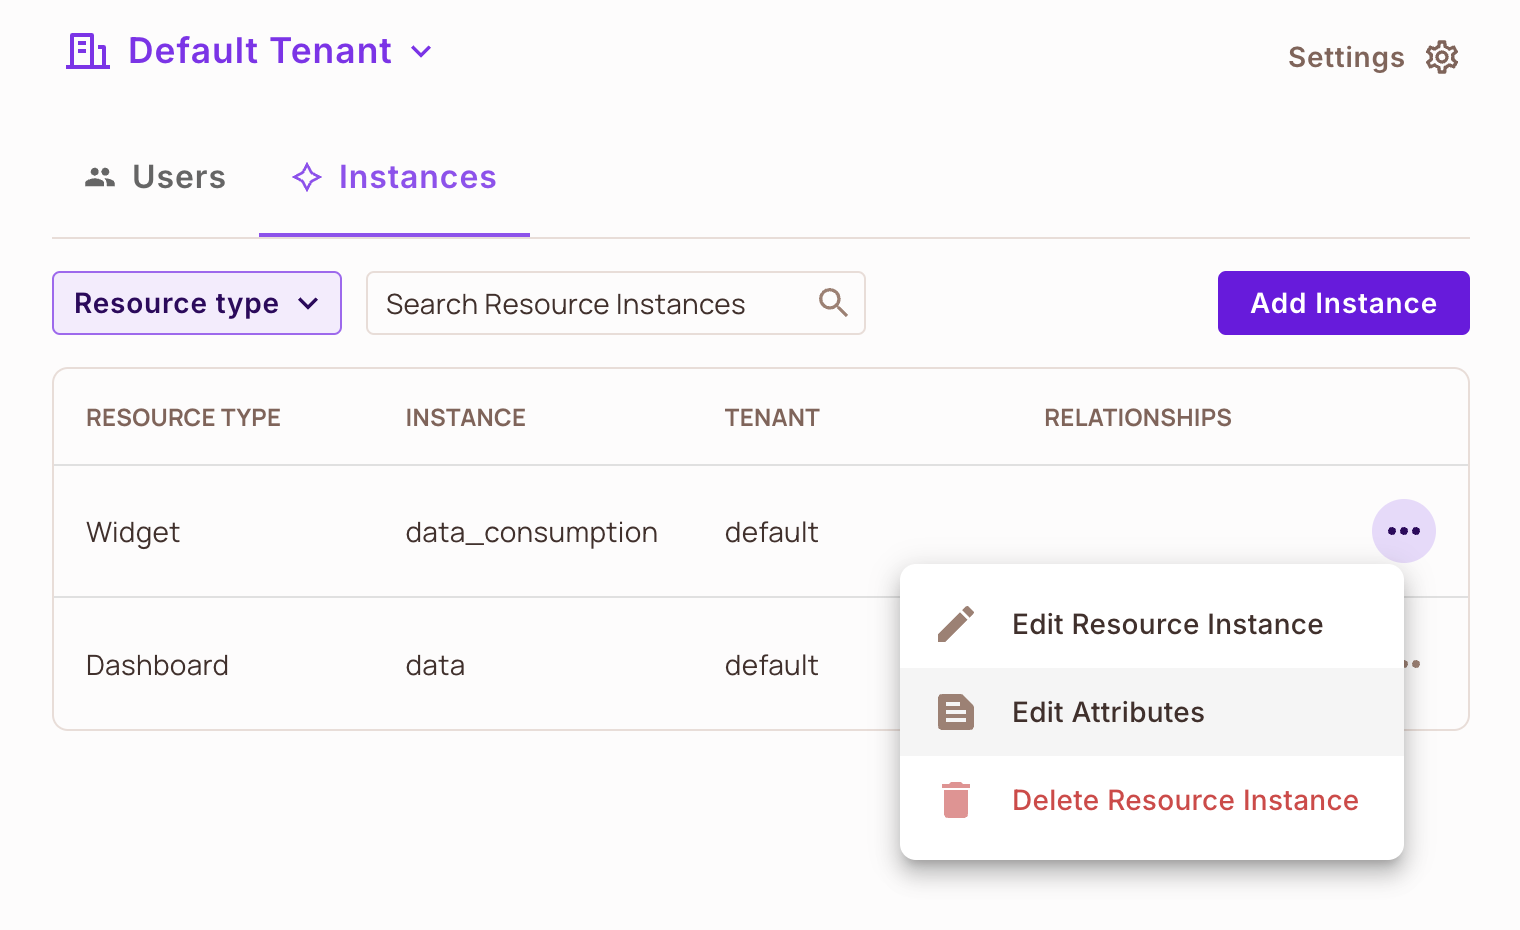
Go to Directory and open the Instances tab. Find the resource instance, click the three-dot menu, and select Edit Attributes.
Sync relationship tuples (ReBAC)
A relationship tuple says how two resource instances relate, for example that a document belongs to a project. Users get instance roles through role assignments. Relationship tuples, with the role derivations in your policy, extend those roles to related instances.
For example, a collaboration platform has projects and documents. A tuple says that a document belongs to a project. When a user becomes Project Manager of that project, the user gets access to every document in the project. You sync one tuple per document, instead of assigning roles on every document.
Each tuple has the format subject : relation : object. To create one, call relationshipTuples.create with these fields:
| Field | Required | Description |
|---|---|---|
subject | Yes | The resource instance that gets the relation, as resource_key:instance_key. |
relation | Yes | The relation between the subject and the object, as defined on the resource in the Policy Editor. |
object | Yes | The resource instance the relation points to, as resource_key:instance_key. |
tenant | When neither instance exists | The tenant of both instances. Permit creates missing instances in this tenant. When both instances exist, Permit uses their stored tenant. |
- Node.js
- cURL
await permit.api.relationshipTuples.create({
  subject: "organization:acme-corp",
  relation: "owner",
  object: "repository:react",
  tenant: "acme-corp",
});
curl 'https://api.permit.io/v2/facts/{proj_id}/{env_id}/relationship_tuples' \
  --request POST \
  --header 'Authorization: Bearer YOUR_API_KEY' \
  --header 'Content-Type: application/json' \
  --data '{
  "subject": "organization:acme-corp",
  "relation": "owner",
  "object": "repository:react",
  "tenant": "acme-corp"
}'
Go to Directory and open the Instances tab. Find the resource instance, click the three-dot menu, and select Edit Resource Instance. Under Relationships, choose the relation and the related instance, then save.
Verify the synced data
List the role assignments of john@permit.io with the same permit client:
const assignments = await permit.api.roleAssignments.list({ user: "john@permit.io" });
for (const a of assignments) {
  console.log(a.role, a.tenant, a.resource_instance ?? "(top-level)");
}
After you run the role assignment samples on this page, the output lists the admin role in acme-corp as top-level, and the admin and viewer instance roles with their dashboard instances.
You can also check the data in Directory in the Permit dashboard:
- The Users tab lists each user with its top-level roles and instance roles.
- The Instances tab lists each resource instance with its tenant and the number of relationships.
- Settings > Manage Tenants lists each tenant.
Then run a permit.check() that depends on the synced data, for example a check on a resource instance, and confirm the result matches your policy.
What's next?
Next: query permissions across many resources and users.