Check permissions with the .NET SDK
Connect a .NET application to Permit.io and call permit.Check() to allow or deny a request. This quickstart is for backend developers who have a Permit.io policy and want to enforce the policy from C# code.
Prerequisites
- A Permit.io account with at least one policy. If you don't have a policy yet, complete the Quickstart.
- Docker, if you run the policy decision point (PDP) as a container. See Install Docker.
1. Get your environment API key
The SDK and the PDP authenticate with Permit using an environment API key. Each API key belongs to one environment.
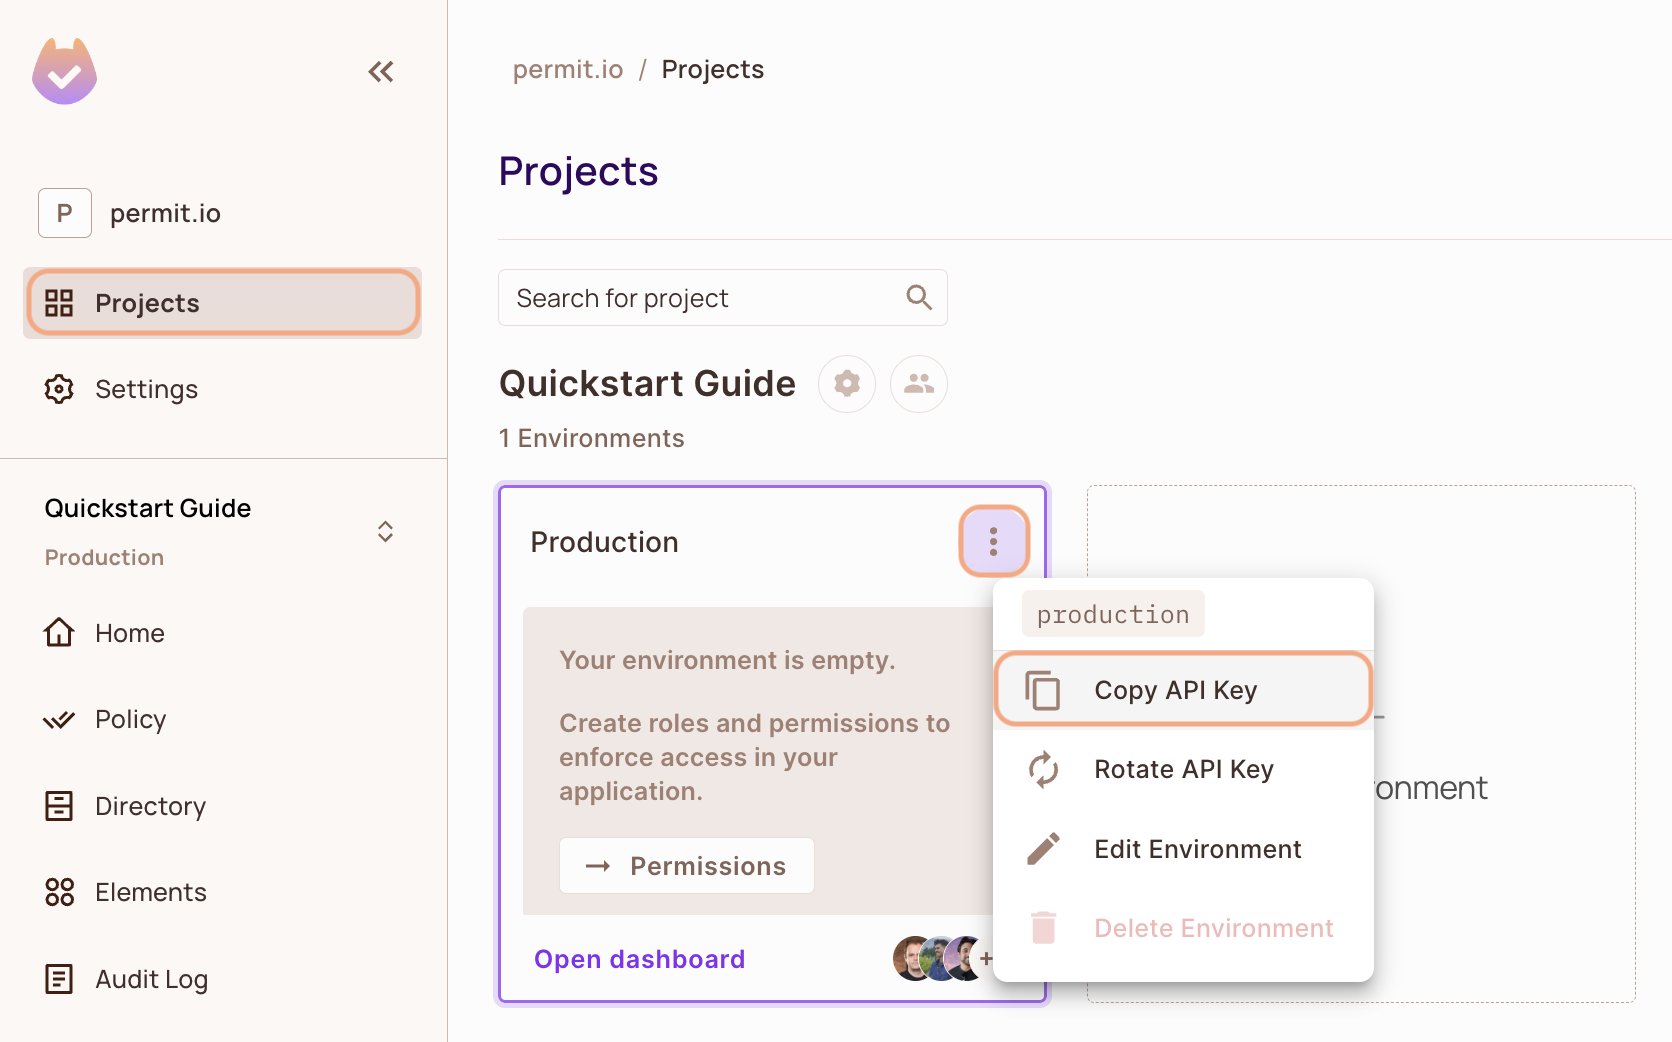
- In the Permit dashboard, open the Projects screen.
- Find the project and the environment you want to connect to.
- On the environment card, click the
 icon in the top-right corner.
 - Click Copy API Key.
You can also copy the API key of the active environment from User Menu > Copy Environment Key.
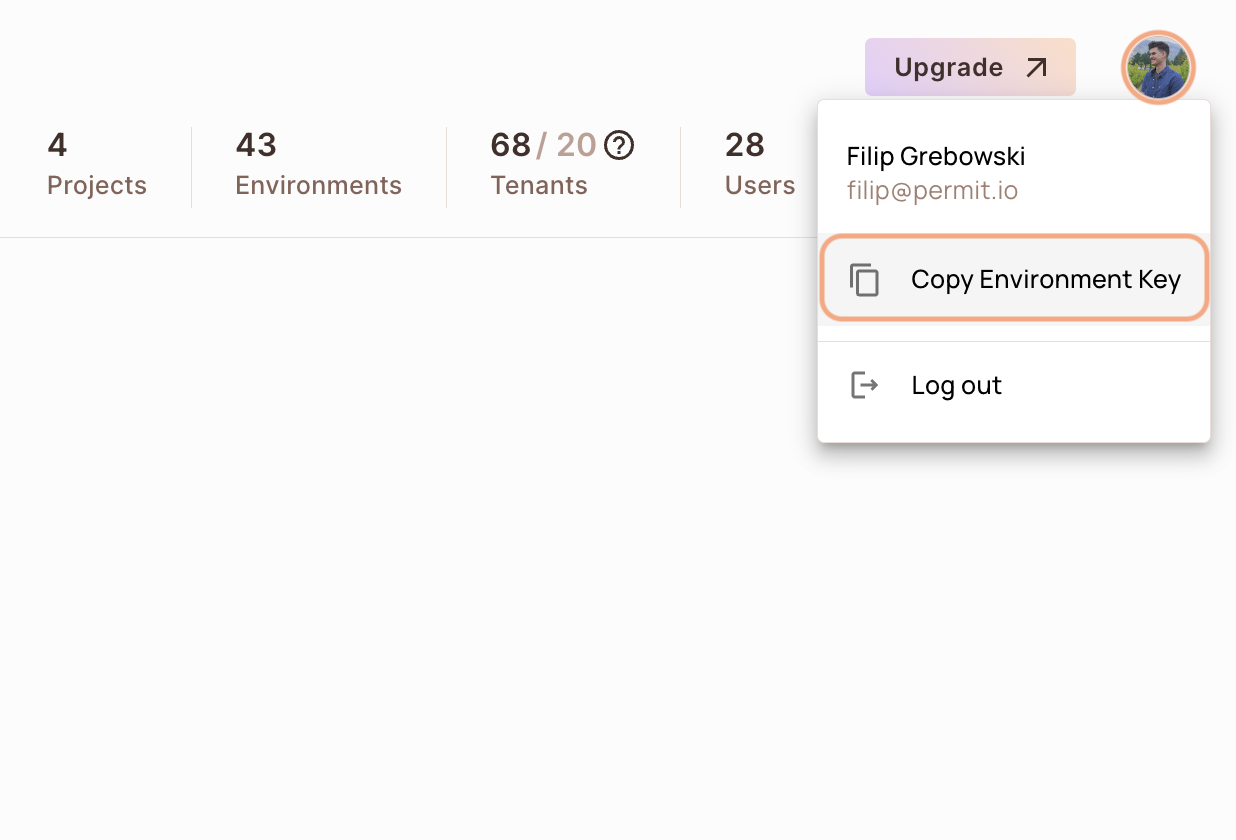
The API key you copy from the user menu belongs to the active environment in the sidebar. If you switch the active environment and click Copy Environment Key again, you copy a different API key: the key of the newly active environment.
Anyone with your environment API key can change that environment's policy and data through the Permit API. Load the API key from an environment variable or a secret store, and don't commit the API key to your repository.
2. Set up your policy decision point (PDP)
Your application sends each permission check to a policy decision point (PDP), the service that evaluates the check against your policy. Use the managed Cloud PDP that Permit.io runs, or run the PDP as a Docker container on your machine.
The SDK examples on this page connect to a container PDP at http://localhost:7766. To use the Cloud PDP, set the SDK's PDP URL to https://cloudpdp.api.permit.io instead.
- Cloud PDP
- Container PDP
The Cloud PDP needs no installation. Pass the Cloud PDP URL when you initialize the Permit SDK. The following Node.js example shows the shape. The SDK install step further down shows the same setting in this page's language. Replace [YOUR_API_KEY] with your environment API key:
// This line initializes the SDK and connects your app
// to the Permit.io Cloud PDP.

const permit = new Permit({
  pdp: "https://cloudpdp.api.permit.io",
  // your API Key
  token: "[YOUR_API_KEY]",
});
The Cloud PDP is a managed service that Permit.io runs. The Cloud PDP supports RBAC (role-based access control) and ReBAC (relationship-based access control) policies. The Cloud PDP does not support ABAC (attribute-based access control) policies, so the ABAC examples on this page need a container PDP.
For capabilities, limits, and when to choose each PDP type, see Cloud PDP capabilities.
Pull and run the permitio/pdp-v2 container image. Docker must be installed and running.
1. Pull the PDP container from Docker Hub
docker pull permitio/pdp-v2:latest
2. Run the PDP container
Replace <YOUR_API_KEY> with the environment API key you copied in 1. Get your environment API key, then run:
docker run -it -p 7766:7000 --env PDP_DEBUG=True --env PDP_API_KEY=<YOUR_API_KEY> permitio/pdp-v2:latest
| Option | Meaning |
|---|---|
-p 7766:7000 | Maps port 7766 on your machine to port 7000 inside the container. The SDK sends checks to http://localhost:7766. |
PDP_API_KEY | The environment API key. The PDP uses the API key to load that environment's policy and data from Permit. |
PDP_DEBUG=True | Turns on debug logging in the container output. |
To confirm the PDP container is running, run docker ps in a second terminal. The output lists a container from the permitio/pdp-v2:latest image with 0.0.0.0:7766->7000/tcp in the PORTS column.
For more PDP options, see Run the PDP.
3. Install the .NET SDK and check permissions
Install and initialize the .NET SDK
Create a .NET console project, install the Permit NuGet package, and create a Permit client that connects to your PDP. The full example app on this page uses HttpListener to serve HTTP requests.
- Create a directory with an empty .NET console project:
mkdir hello-permissions-dotnet && cd hello-permissions-dotnet && dotnet new console
-
Install the Permit.io .NET SDK:
dotnet add package Permit -
Import the SDK namespaces into your code:
using PermitSDK;using PermitSDK.Models; -
Create a
Permitclient. Replace[YOUR_API_KEY]with your environment API key, and pass the URL of your PDP as the second argument:// Connect the SDK to the PDP that evaluates permission checks.Permit permit = new Permit("[YOUR_API_KEY]","http://localhost:7766");To set more options, pass them as named arguments:
// you can also set more config optionsPermit permitClient = new Permit(// the API key to usetoken: "[YOUR_API_KEY]",// the URL of the Permit.io PDP containerpdp: "http://localhost:7766",// the tenant to use if the tenant is not provideddefaultTenant: "default",// whether to use the default tenant if the tenant is not provideduseDefaultTenantIfEmpty: true,// should run in debug modedebugMode: true,// set the log levellevel: "info",// set the log labellabel: "Permitio-sdk",// should log as JSONlogAsJson: false,// the URL of the API (relevant for EU customers)apiUrl: "https://api.eu-central-1.permit.io",// should raise errors (instead of the default behavior of returning false for network errors in permit checks)raiseErrors: false,// Optional: manual set the environment_id and project_id for the SDK client (to avoid `scope` api call)envId: "[YOUR_ENVIRONMENT_ID]",projectId: "[YOUR_PROJECT_ID]");
The Permit constructor accepts these parameters. Parameter names are case-sensitive.
| Parameter | Default | Description |
|---|---|---|
token | Required | Your environment API key. |
pdp | http://localhost:7766 | The URL of the PDP: http://localhost:7766 for the container PDP, or https://cloudpdp.api.permit.io for the Cloud PDP. |
defaultTenant | default | The tenant key to use when a check doesn't pass a tenant. |
useDefaultTenantIfEmpty | true | Whether to use defaultTenant when a check doesn't pass a tenant. |
debugMode | false | Whether to log debug messages. |
apiUrl | https://api.permit.io | The URL of the Permit API. |
level, label, logAsJson | info, permitio-sdk, false | Log level, log label, and JSON log output. |
projectId, envId | None | The project ID and environment ID. Set both to skip the API call that looks up the scope of the API key. |
raiseErrors | false | Whether a failed check request throws an error instead of returning false. |
Check permissions with the .NET SDK
Call await permit.Check() with three arguments: the user key, the action key, and the resource key. permit.Check() returns true when the policy allows the action, and false otherwise.:
UserKey user = new UserKey("userId", "John", "Smith", "john@permit.io");
bool permitted = await permit.Check(user.key, "create", "document");
if (permitted)
{
Console.Write("User is PERMITTED to create a document");
}
else
{
Console.Write("User is NOT PERMITTED to create a document");
}
If the user has a role that grants create on document, the example writes User is PERMITTED to create a document. Otherwise, the example writes User is NOT PERMITTED to create a document. Use the user ID from your authentication provider as the user key. To add users and assign roles, see Sync users.
In a multi-tenant application, pass a ResourceInput with a tenant argument as the resource, as in the ABAC example below. To look up the keys of your tenants, call the list tenants API.
permit.Check() sends each check to the PDP URL you configure. A container PDP evaluates checks on your machine, using policy and data that the PDP loads from Permit. Users, roles, and attributes that you create in the dashboard or sync through the Permit API are stored in the Permit control plane.
Check ABAC permissions with the .NET SDK
An attribute-based access control (ABAC) policy grants permissions based on user and resource attributes, grouped into user sets and resource sets. See ABAC policy components. ABAC checks need a container PDP.
To check an ABAC policy, pass a UserKey and a ResourceInput with attributes. In this example, replace userId, resource, tenant, and action with a user key, resource key, tenant key, and action key from your environment:
UserKey user = new UserKey("userId", "John", "Smith", "john@smith.com");
var resourceInput = new ResourceInput(
"resource",
tenant: "tenant",
attributes: new Dictionary<string, dynamic>
{
{"hasApproval", "True"}
}
);
bool permitted = await permit.Check(user, "action", resourceInput);
For more check options, see Check permissions with permit.check().
Run a full .NET example app
This single-file .NET console app listens on http://localhost:4000/ and runs a permission check on each request.
- Replace the contents of
Program.csin the project you created with the following code. - Replace
[YOUR_API_KEY]with your environment API key, anduserIdwith the key of a user in your environment.
using System;
using System.Text;
using System.Net;
using System.Threading.Tasks;
using PermitSDK;
using PermitSDK.Models;
namespace PermitOnboardingApp
{
class HttpServer
{
public static HttpListener listener;
public static string url = "http://localhost:4000/";
public static string pageData ="<p>User {0} is {1} to {2} {3}</p>";
public static async Task HandleIncomingConnections()
{
bool runServer = true;
while (runServer)
{
HttpListenerContext ctx = await listener.GetContextAsync();
HttpListenerResponse resp = ctx.Response;
// in a real app, you would typically decode the user id from a JWT token
UserKey user = new UserKey("userId", "John", "Smith", "john@permit.io");
// init Permit SDK
string clientToken = "[YOUR_API_KEY]";
Permit permit = new Permit(
clientToken,
"http://localhost:7766",
"default",
true
);
// permit.Check() identifies the user by the key. The user must exist in your
// environment: create users with permit.Api.SyncUser(new UserCreate { ... }).
// A user key can be any string (an email, a database id) that is unique for each user.
bool permitted = await permit.Check(user.key, "create", "task");
if (permitted)
{
await SendResponseAsync(resp, 200, String.Format(pageData, user.firstName + user.lastName, "Permitted", "create", "task"));
}
else
{
await SendResponseAsync(resp, 403, String.Format(pageData, user.firstName + user.lastName, "NOT Permitted", "create", "task"));
}
}
}
public static async Task SendResponseAsync(HttpListenerResponse resp, int returnCode, string responseContent)
{
byte[] data = Encoding.UTF8.GetBytes(responseContent);
resp.StatusCode = returnCode;
await resp.OutputStream.WriteAsync(data, 0, data.Length);
resp.Close();
}
public static void Main(string[] args)
{
// Create a Http server and start listening for incoming connections
listener = new HttpListener();
listener.Prefixes.Add(url);
listener.Start();
Console.WriteLine("Listening for connections on {0}", url);
Task listenTask = HandleIncomingConnections();
listenTask.GetAwaiter().GetResult();
listener.Close();
}
}
}
- Run the app:
dotnet run
The terminal prints Listening for connections on http://localhost:4000/.
- Open
http://localhost:4000in a browser.
The app checks whether the user can create a task. If the policy allows the action, the page returns HTTP 200 with User JohnSmith is Permitted to create task. Otherwise, the page returns HTTP 403 with User JohnSmith is NOT Permitted to create task.
4. Confirm the check in the audit log
Open the Audit Log screen in the Permit dashboard. Each permission check from your application appears as an entry with the user, the action, the resource, and the decision.
If the check doesn't appear in the audit log, see Troubleshoot audit logs.
Next steps
- Sync users and assign roles so checks evaluate your real users.
- Check permissions with permit.check() with tenants, attributes, and relationships.
- Deploy the PDP to production.
- Compare SDK features by language.