Check permissions with the Python SDK (sync)
Connect a Python application that doesn't use asyncio to Permit.io and call permit.check() to allow or deny a request. This quickstart is for backend developers who have a Permit.io policy and want to enforce the policy from synchronous Python code, for example a Flask app. At the end, a Flask app returns an allow or deny result for each request, and the check appears in the Permit audit log. If your code uses asyncio, see Check permissions with the Python SDK (asyncio).
Prerequisites
- A Permit.io account with at least one policy. If you don't have a policy yet, complete the Quickstart.
- Docker, if you run the policy decision point (PDP) as a container. See Install Docker.
1. Get your environment API key
The SDK and the PDP authenticate with Permit using an environment API key. Each API key belongs to one environment.
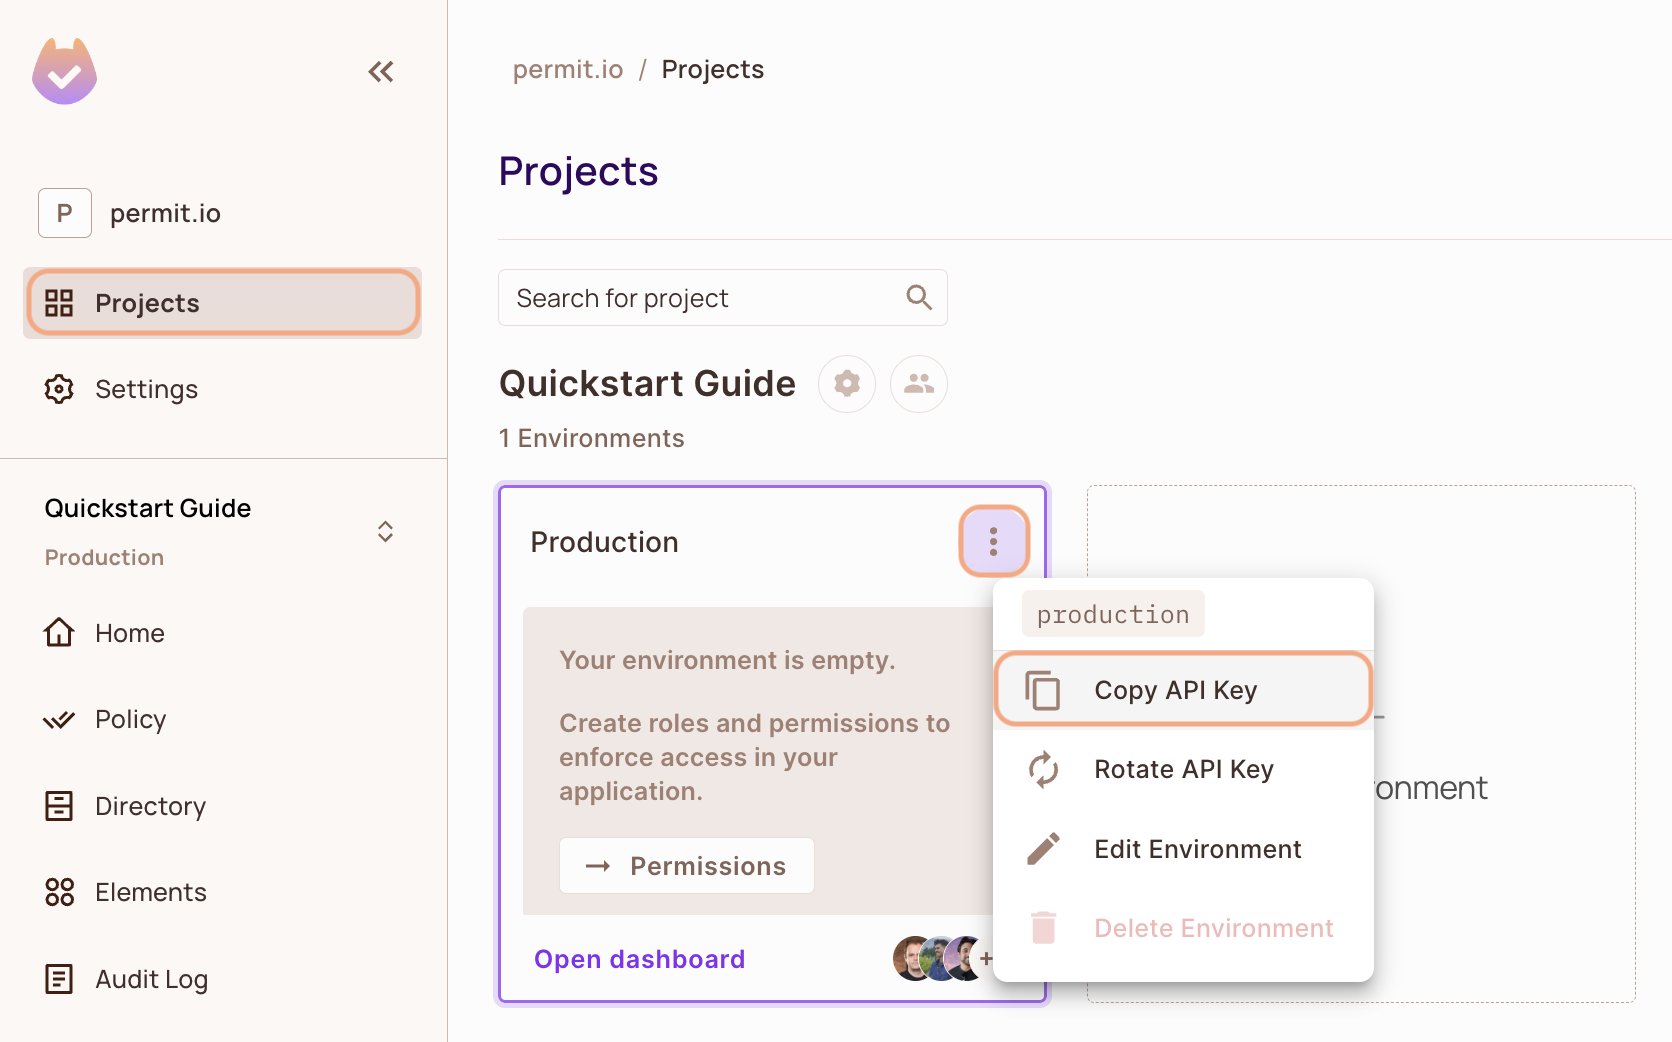
- In the Permit dashboard, open the Projects screen.
- Find the project and the environment you want to connect to.
- On the environment card, click the
 icon in the top-right corner.
 - Click Copy API Key.
You can also copy the API key of the active environment from User Menu > Copy Environment Key.
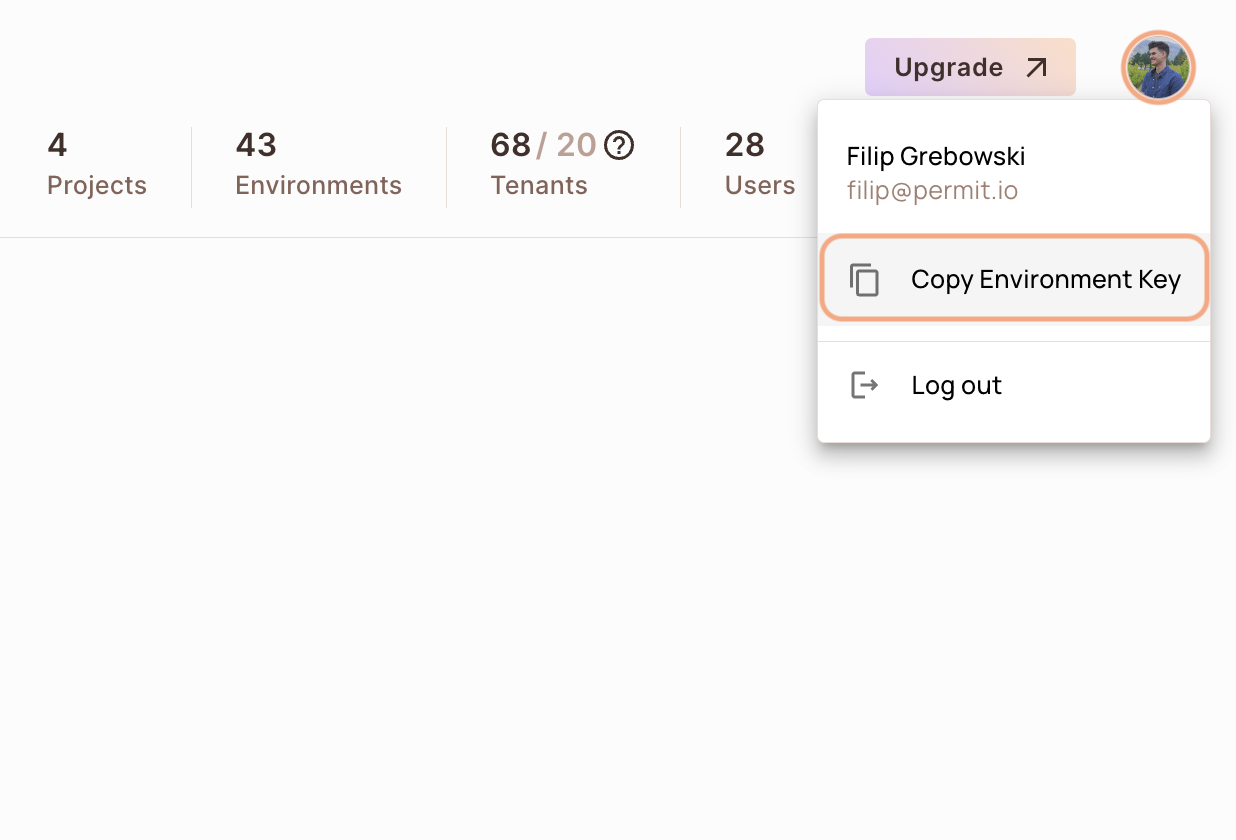
The API key you copy from the user menu belongs to the active environment in the sidebar. If you switch the active environment and click Copy Environment Key again, you copy a different API key: the key of the newly active environment.
Anyone with your environment API key can change that environment's policy and data through the Permit API. Load the API key from an environment variable or a secret store, and don't commit the API key to your repository.
2. Set up your policy decision point (PDP)
Your application sends each permission check to a policy decision point (PDP), the service that evaluates the check against your policy. Use the managed Cloud PDP that Permit.io runs, or run the PDP as a Docker container on your machine.
The SDK examples on this page connect to a container PDP at http://localhost:7766. To use the Cloud PDP, set the SDK's PDP URL to https://cloudpdp.api.permit.io instead.
- Cloud PDP
- Container PDP
The Cloud PDP needs no installation. Pass the Cloud PDP URL when you initialize the Permit SDK. The following Node.js example shows the shape. The SDK install step further down shows the same setting in this page's language. Replace [YOUR_API_KEY] with your environment API key:
// This line initializes the SDK and connects your app
// to the Permit.io Cloud PDP.

const permit = new Permit({
  pdp: "https://cloudpdp.api.permit.io",
  // your API Key
  token: "[YOUR_API_KEY]",
});
The Cloud PDP is a managed service that Permit.io runs. The Cloud PDP supports RBAC (role-based access control) and ReBAC (relationship-based access control) policies. The Cloud PDP does not support ABAC (attribute-based access control) policies, so the ABAC examples on this page need a container PDP.
For capabilities, limits, and when to choose each PDP type, see Cloud PDP capabilities.
Pull and run the permitio/pdp-v2 container image. Docker must be installed and running.
1. Pull the PDP container from Docker Hub
docker pull permitio/pdp-v2:latest
2. Run the PDP container
Replace <YOUR_API_KEY> with the environment API key you copied in 1. Get your environment API key, then run:
docker run -it -p 7766:7000 --env PDP_DEBUG=True --env PDP_API_KEY=<YOUR_API_KEY> permitio/pdp-v2:latest
| Option | Meaning |
|---|---|
-p 7766:7000 | Maps port 7766 on your machine to port 7000 inside the container. The SDK sends checks to http://localhost:7766. |
PDP_API_KEY | The environment API key. The PDP uses the API key to load that environment's policy and data from Permit. |
PDP_DEBUG=True | Turns on debug logging in the container output. |
To confirm the PDP container is running, run docker ps in a second terminal. The output lists a container from the permitio/pdp-v2:latest image with 0.0.0.0:7766->7000/tcp in the PORTS column.
For more PDP options, see Run the PDP.
3. Install the sync Python SDK and check permissions
Install and initialize the Python SDK (sync)
Install the permit package, import the sync Permit class, and create a Permit client that connects to your PDP. Use the sync SDK when your code doesn't use asyncio. The sync SDK and the asyncio SDK ship in the same permit package.
- Install the Permit.io Python SDK:
pip install permit
- Import the
Permitclass frompermit.sync. ThePermitclass in the top-levelpermitmodule is the asyncio version.
from permit.sync import Permit
- Create a
Permitclient. Replace<YOUR_API_KEY>with your environment API key, and setpdpto the URL of your PDP:
# Connect the SDK to the PDP that evaluates permission checks.
permit = Permit(
    # in production, change this URL to the address of your PDP
    pdp="http://localhost:7766",
    # your environment API key
    token="<YOUR_API_KEY>",
)
| Option | Description |
|---|---|
token | Your environment API key. |
pdp | The URL of the PDP that evaluates checks: http://localhost:7766 for the container PDP, or https://cloudpdp.api.permit.io for the Cloud PDP. |
To send checks to the managed Cloud PDP instead of a container PDP, set pdp to the Cloud PDP URL:
permit = Permit(
    pdp="https://cloudpdp.api.permit.io",
    token="<YOUR_API_KEY>",
)
The Cloud PDP supports RBAC (role-based access control) and ReBAC (relationship-based access control) policies. ABAC (attribute-based access control) checks need a container PDP. See Cloud PDP capabilities.
Check permissions with the Python SDK (sync)
Call permit.check() with three arguments. With the sync SDK, permit.check() returns True or False directly, so you call permit.check() without await. permit.check() returns True when the policy allows the action, and False otherwise.
| Argument | Description |
|---|---|
user | The key that identifies the user in Permit, typically the user ID from your authentication provider. To pass attributes, use a dictionary with key and attributes. |
action | The action key, for example create. |
resource | The resource type key, for example document, or a dictionary with type, tenant, and attributes. |
This example checks whether the user john@smith.com can create a document:
permitted = permit.check("john@smith.com", "create", "document")

if permitted:
    print("John is permitted to create a document")
else:
    print("John is NOT PERMITTED to create document!")
If john@smith.com exists in your environment and has a role that grants create on document, the example prints John is permitted to create a document. Otherwise, the example prints John is NOT PERMITTED to create document!. To add users and assign roles, see Sync users.
Check a permission in a specific tenant
In a multi-tenant application, pass the tenant key in the tenant field of the resource dictionary. To look up the keys of your tenants, call the list tenants API. In this example, replace userId, action, resource, and tenant with a user key, action key, resource key, and tenant key from your environment:
permitted = permit.check("userId", "action", {"type": "resource", "tenant": "tenant"})
permit.check() sends each check to the PDP URL you configure. A container PDP evaluates checks on your machine, using policy and data that the PDP loads from Permit. Users, roles, and attributes that you create in the dashboard or sync through the Permit API are stored in the Permit control plane.
Run a full Python example app (Flask)
This single-file Flask app syncs a user and a tenant to Permit when the app starts, then runs a permission check on each request. The app is safe to restart: permit.api.users.sync() updates a user that already exists, and the app catches PermitAlreadyExistsError when the tenant2 tenant already exists.
- Create a directory for the project:
mkdir hello-permissions && cd hello-permissions
- Optional: create a virtual environment for the project. The following command needs
pyenvandpyenv-virtualenv.
pyenv virtualenv permissions && pyenv activate permissions
- Install the Permit.io SDK and Flask:
pip install permit flask
- Create a file called
test.py:
touch test.py
-
Copy the following code into
test.py. Replace<YOUR_API_KEY>with your environment API key.The first part of
test.pycreates the Flask app and the Permit client:
import json

from permit.sync import Permit
from permit.exceptions import PermitAlreadyExistsError

from flask import Flask, Response

app = Flask(__name__)

# Connect the SDK to the PDP that evaluates permission checks.
permit = Permit(
    # in production, change this URL to the address of your PDP
    pdp="http://localhost:7766",
    # your environment API key
    token="<YOUR_API_KEY>",
)
Append sync_objects(), which creates the user, the tenant2 tenant, and the two role assignments when the app starts:
def sync_objects():
    # create the user, or update the user when the key already exists
    permit.api.users.sync({
        "key": "john@smith.com",
        "first_name": "John",
        "last_name": "Smith",
        "email": "john@smith.com",
    })
    permit.api.users.assign_role({"user": "john@smith.com", "role": "admin", "tenant": "default"})

    # create the tenant2 tenant. Creating a tenant that already exists raises
    # PermitAlreadyExistsError, so this app keeps the existing tenant and continues.
    try:
        permit.api.tenants.create({"key": "tenant2", "name": "Second Tenant"})
    except PermitAlreadyExistsError:
        pass
    permit.api.users.assign_role({"user": "john@smith.com", "role": "viewer", "tenant": "tenant2"})

sync_objects()
Append the / route handler, which checks the default tenant and answers 403 when the policy denies the action:
@app.route("/")
def check_permissions():
    # permit.check() identifies the user by the key that sync_objects() synced to Permit.
    # A user key can be any string (an email, a database id) that is unique for each user.
    permitted = permit.check("john@smith.com", "retrieve", "task") # default tenant is used
    if not permitted:
        return Response(json.dumps({
            "result": "John Smith is NOT PERMITTED to retrieve task!"
        }), status=403, mimetype='application/json')

    return Response(json.dumps({
            "result": "John Smith is PERMITTED to retrieve task!"
        }), status=200, mimetype='application/json')
Append the /tenant2 route handler, which sends the same kind of check to the tenant2 tenant:
@app.route("/tenant2")
def check_permissions_tenant2():
    # the resource dictionary sends the check to the tenant2 tenant instead of the default tenant
    permitted = permit.check("john@smith.com", "create", {"type": "task", "tenant": "tenant2"}) # tenant2 is used
    if not permitted:
        return Response(json.dumps({
            "result": "John Smith is NOT PERMITTED to create task (tenant 2)!"
        }), status=403, mimetype='application/json')

    return Response(json.dumps({
            "result": "John Smith is PERMITTED to create task (tenant 2)!"
        }), status=200, mimetype='application/json')
The example needs a task resource with retrieve and create actions, and admin and viewer roles, in your environment. If those objects don't exist, the role assignments in sync_objects() fail with PermitApiError when the app starts. To create them, see Build an RBAC policy.
- Start the app:
FLASK_APP=test flask run --host=0.0.0.0
- Open the app URL that Flask prints (
http://127.0.0.1:5000by default) in a browser, then open the/tenant2path.
The / route checks whether john@smith.com can retrieve a task in the default tenant. The /tenant2 route checks whether john@smith.com can create a task in the tenant2 tenant. Each route returns HTTP 200 with a JSON result message that contains is PERMITTED, or HTTP 403 with a message that contains is NOT PERMITTED. With the admin role assigned in the default tenant, / returns:
{"result": "John Smith is PERMITTED to retrieve task!"}
If a route returns is NOT PERMITTED and you expect an allow, check that the role you assigned in the Permit dashboard grants the action on the task resource, and that the container PDP is running with an API key from the same environment.
Check ABAC permissions with the Python SDK (sync)
An attribute-based access control (ABAC) policy grants permissions based on user and resource attributes, grouped into user sets and resource sets. See ABAC policy components. ABAC checks need a container PDP.
To check an ABAC policy, pass the user and the resource as dictionaries that carry the attributes the policy compares. In this example, replace check@permit.io, action, resource, and tenant with a user key, action key, resource key, and tenant key from your environment:
permitted = permit.check(
	# the user, with just-in-time attributes that user set conditions evaluate
	{
		"key": "check@permit.io",
		"attributes": {
			"location": "England",
			"department": "Engineering",
		},
	},
	# the action
	"action",
	# the resource, with just-in-time attributes that resource set conditions evaluate
	{
		"type": "resource",
		"attributes": {
			"hasApproval": "true",
		},
		"tenant": "tenant",
	}
)
For more check options, see Check permissions with permit.check().
4. Confirm the check in the audit log
Open the Audit Log screen in the Permit dashboard. Each permission check from your application appears as an entry with the user, the action, the resource, and the decision.
If the check doesn't appear in the audit log, see Troubleshoot audit logs.
Next steps
- Sync users and assign roles so checks evaluate your real users.
- Check permissions with permit.check() with tenants, attributes, and relationships.
- Python SDK examples
- Deploy the PDP to production.
- Compare SDK features by language.