Admin Dashboard Reference
This reference is for admins of Permit MCP Gateway. It describes each page and setting in the admin dashboard at app.agent.security, and links to the guide that owns each task.
| Task | Guide |
|---|---|
| Create a host and import MCP servers | Set up hosts for your organization |
| Grant, change, and revoke access for humans and agents | Manage humans and agents |
| Configure sign-in methods and SSO | Authentication methods reference |
| Review approval requests | Human-in-the-loop approvals |
Prerequisites
- A Permit account.
- An organization-scoped API key from Permit Settings > API Keys. You use the API key to connect your Permit organization to the admin dashboard.
Navigation
The admin dashboard has two navigation areas: the header and the sidebar.
Header
| Control | What it does |
|---|---|
| Organization selector | Switches between connected Permit organizations. |
| Host selector | Switches between hosts in the current organization, and opens the host's Settings. |
Sidebar
| Page | What it does |
|---|---|
| Dashboard | Shows the host's gateway MCP URL and client configuration snippets. |
| MCP Servers | Imports and manages upstream MCP servers. |
| Approvals | Lists pending human-in-the-loop approval requests and approval history, and configures notifications. |
| Agents | Lists the MCP clients that connected through the gateway, and manages their access. |
| Humans | Manages user access to MCP servers and shows each user's connected agents. |
| Settings | Configures authentication methods, domain restrictions, SSO, and Dynamic MCPs. |
| Get Help | Links to support resources. |
Multi-organization support
One admin dashboard account can connect several Permit organizations. Each organization has its own hosts, MCP servers, users, and policies. Use the organization selector in the header to switch between them.
To connect another organization:
- Open the organization selector in the header.
- Select Connect Organization.
- Enter an organization-scoped API key from Permit Settings > API Keys.
Hosts management
A host is a named instance of Permit MCP Gateway with its own subdomain, policies, users, and sessions. Each host maps to one Permit environment, and each environment can be linked to only one host.
Creating a host
Create a host from the Dashboard with Create Host. For the fields and the full procedure, see Create a host.
Each host's gateway URL has this format:
https://<prefix>-<adjective>-<color>-<number>.agent.security/mcp
You choose the prefix: lowercase letters, numbers, and hyphens, up to 33 characters, with no hyphen at the start or the end. The dashboard appends the generated suffix (an adjective, a color, and a number) so that the subdomain is unique, and the suffix can't be changed after the host is created. A host with the prefix acme gets a URL such as https://acme-brave-coral-37.agent.security/mcp. Other pages write this URL as https://<your-subdomain>.agent.security/mcp, where the subdomain is the prefix and the suffix together.
Viewing host details
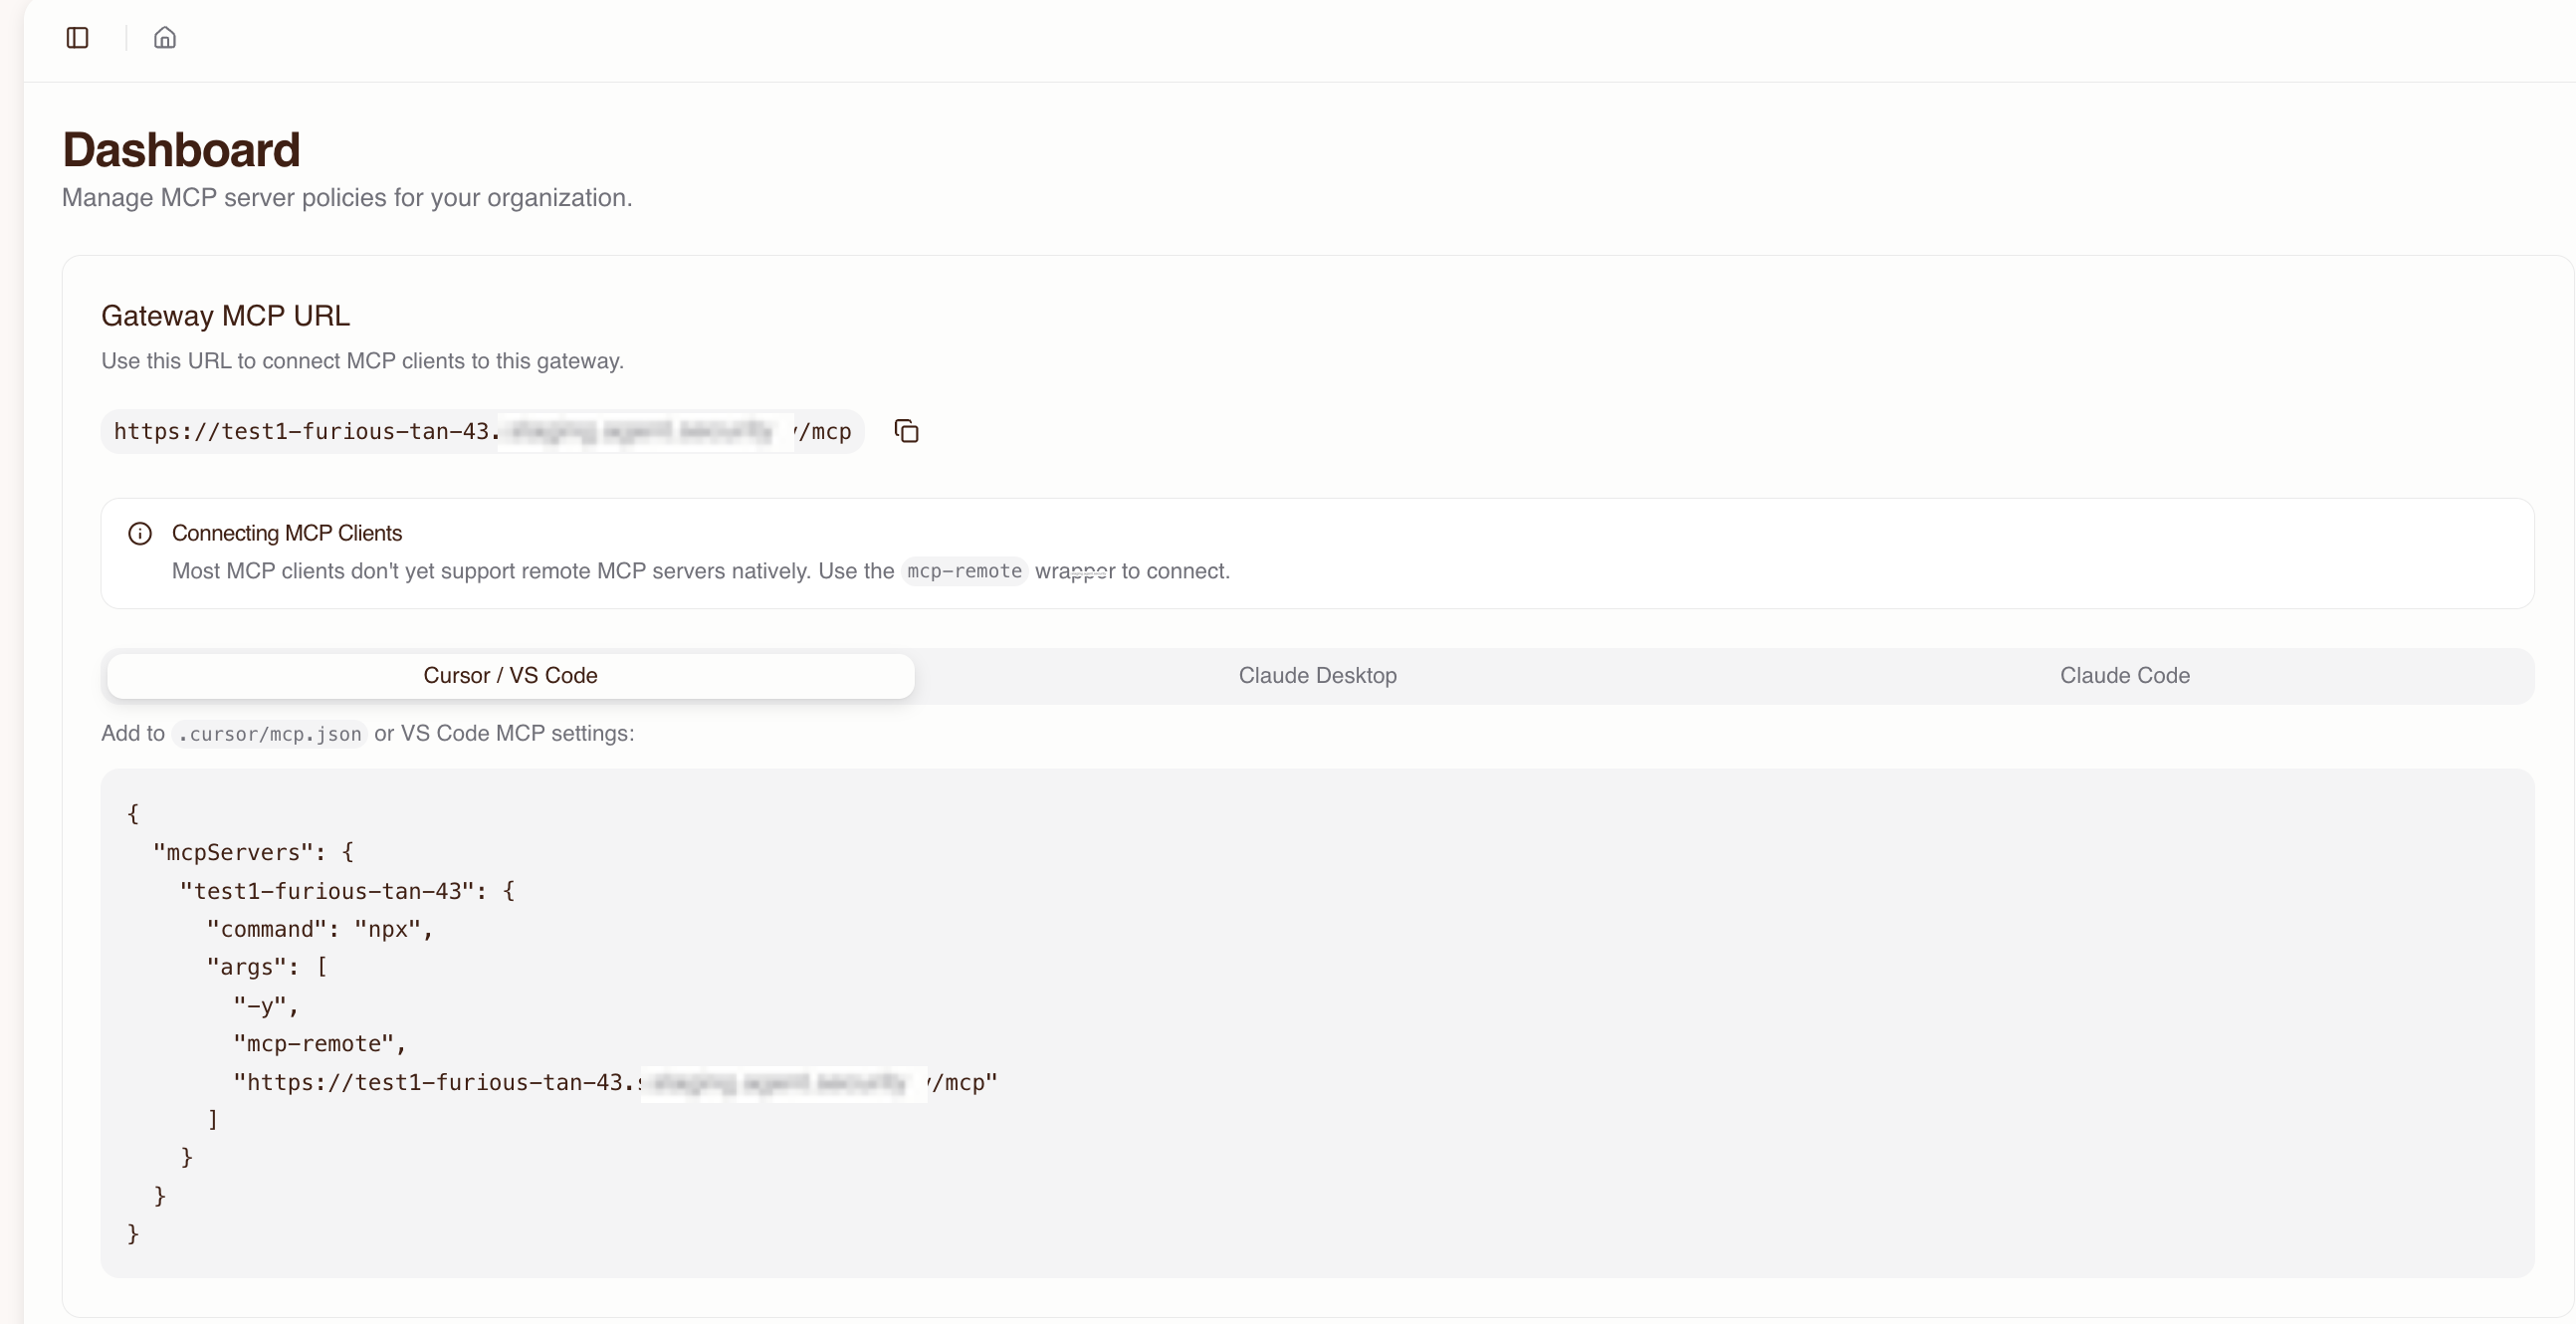
The Dashboard page shows the current host's details:
- The full MCP URL for the gateway.
- Configuration snippets for MCP clients (Cursor, VS Code, Claude Desktop, and Claude Code).
- Connected MCP servers and their status.
- Active users and sessions.
Switching between hosts
Use the host selector in the header to switch between hosts in the current organization.
Deleting a host
To delete a host, open the host's Settings page and select Delete Host. Deleting a host removes the gateway subdomain, the host's sessions, and its user access grants. The Permit environment linked to the host isn't deleted.
Deleting a host can't be undone. Active sessions end, and MCP clients configured with the host's gateway URL can no longer connect.
MCP server management
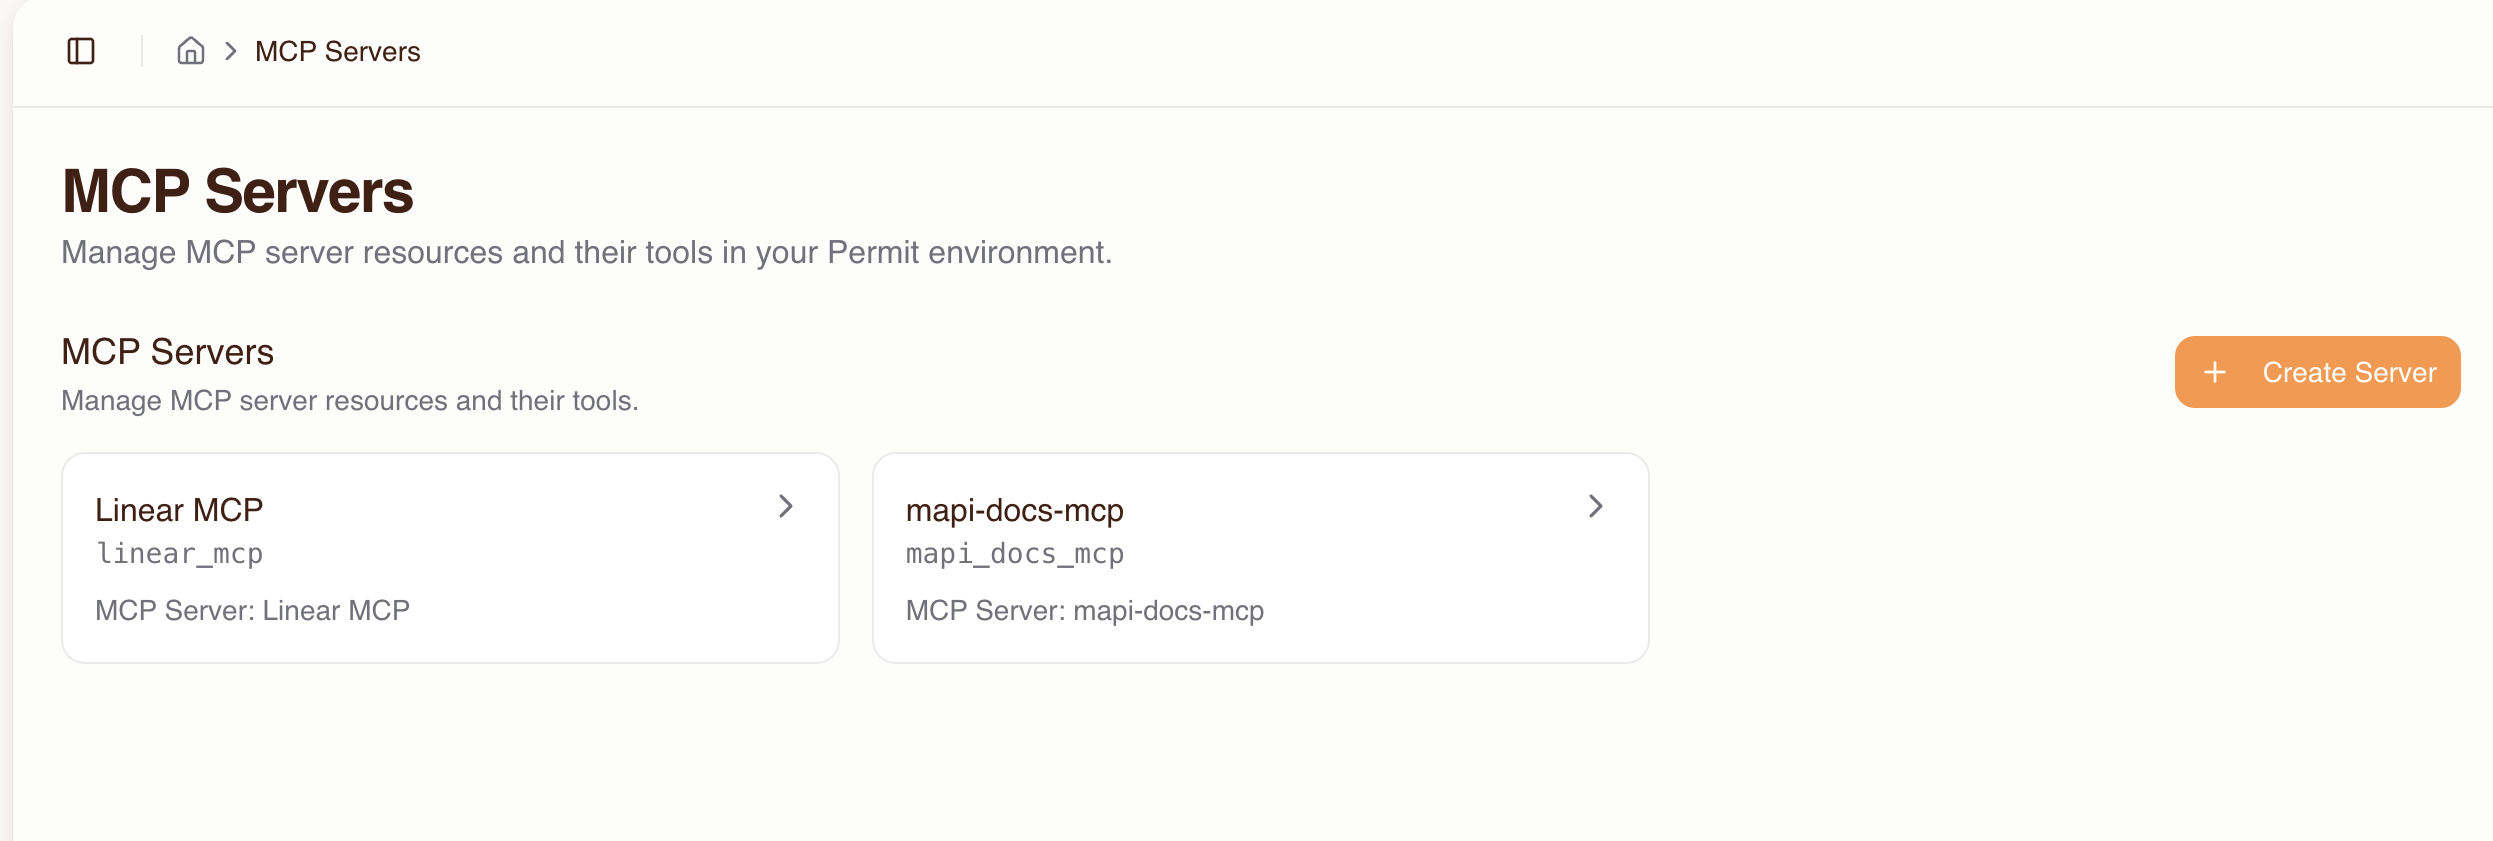
The MCP Servers page lists the MCP servers imported into the current host. From the page, you import servers, open server details, and manage tools.
Import wizard
The import wizard connects to an upstream MCP server, discovers its tools, and creates the matching resources and permissions in Permit. Start the wizard with Create Server. For the procedure, see Import MCP servers.
Tool auto-discovery and trust level classification
During import, the gateway discovers every tool the upstream MCP server exposes and classifies each tool into a trust level by keywords in the tool name:
| Trust level | Classification | Naming patterns |
|---|---|---|
| Low | Read-only operations (default) | Tools not matching medium or high patterns |
| Medium | Write operations | create, write, update, set, modify, edit, put, post, insert, add, send, execute, run, invoke, submit, push, publish, deploy, apply, patch |
| High | Destructive operations | delete, remove, destroy, drop, purge, erase, truncate, terminate, kill, revoke |
Trust levels are hierarchical. High includes all Medium and Low permissions, and Medium includes all Low permissions.
Overriding trust levels
You can change the classified trust level of any tool during import or after import:
- Open the MCP server's detail page.
- Find the tool in the tool list.
- Select a trust level in the tool's dropdown.
Change a tool's trust level when its name doesn't reflect its risk. For example, a tool named get_sensitive_data is classified as Low because its name contains no Medium or High keyword, but it may need a higher trust level.
Server detail view
The server detail page shows:
| Section | Contents |
|---|---|
| Tool list | Every discovered tool, with its trust level and enabled or disabled status. |
| Connected users | The humans who have access to the server. |
| Server status | Connection health and the upstream URL. |
| Server name and description | Editable metadata. |
From the server detail page, you can also add or remove tools, change trust levels per tool, edit the server name and description, and remove the server.
Human management
The Humans page lists every user who has been granted access or has signed in to the gateway. On a user's detail page, you can:
- Add a user by email before the user signs in.
- Grant access to MCP servers and set a max trust level for each server. The max trust level is the highest trust level the user can grant an agent during consent.
- Change or revoke the user's access to a server.
- See the agents (MCP clients) connected for the user, their servers, their trust levels, and recent tool calls.
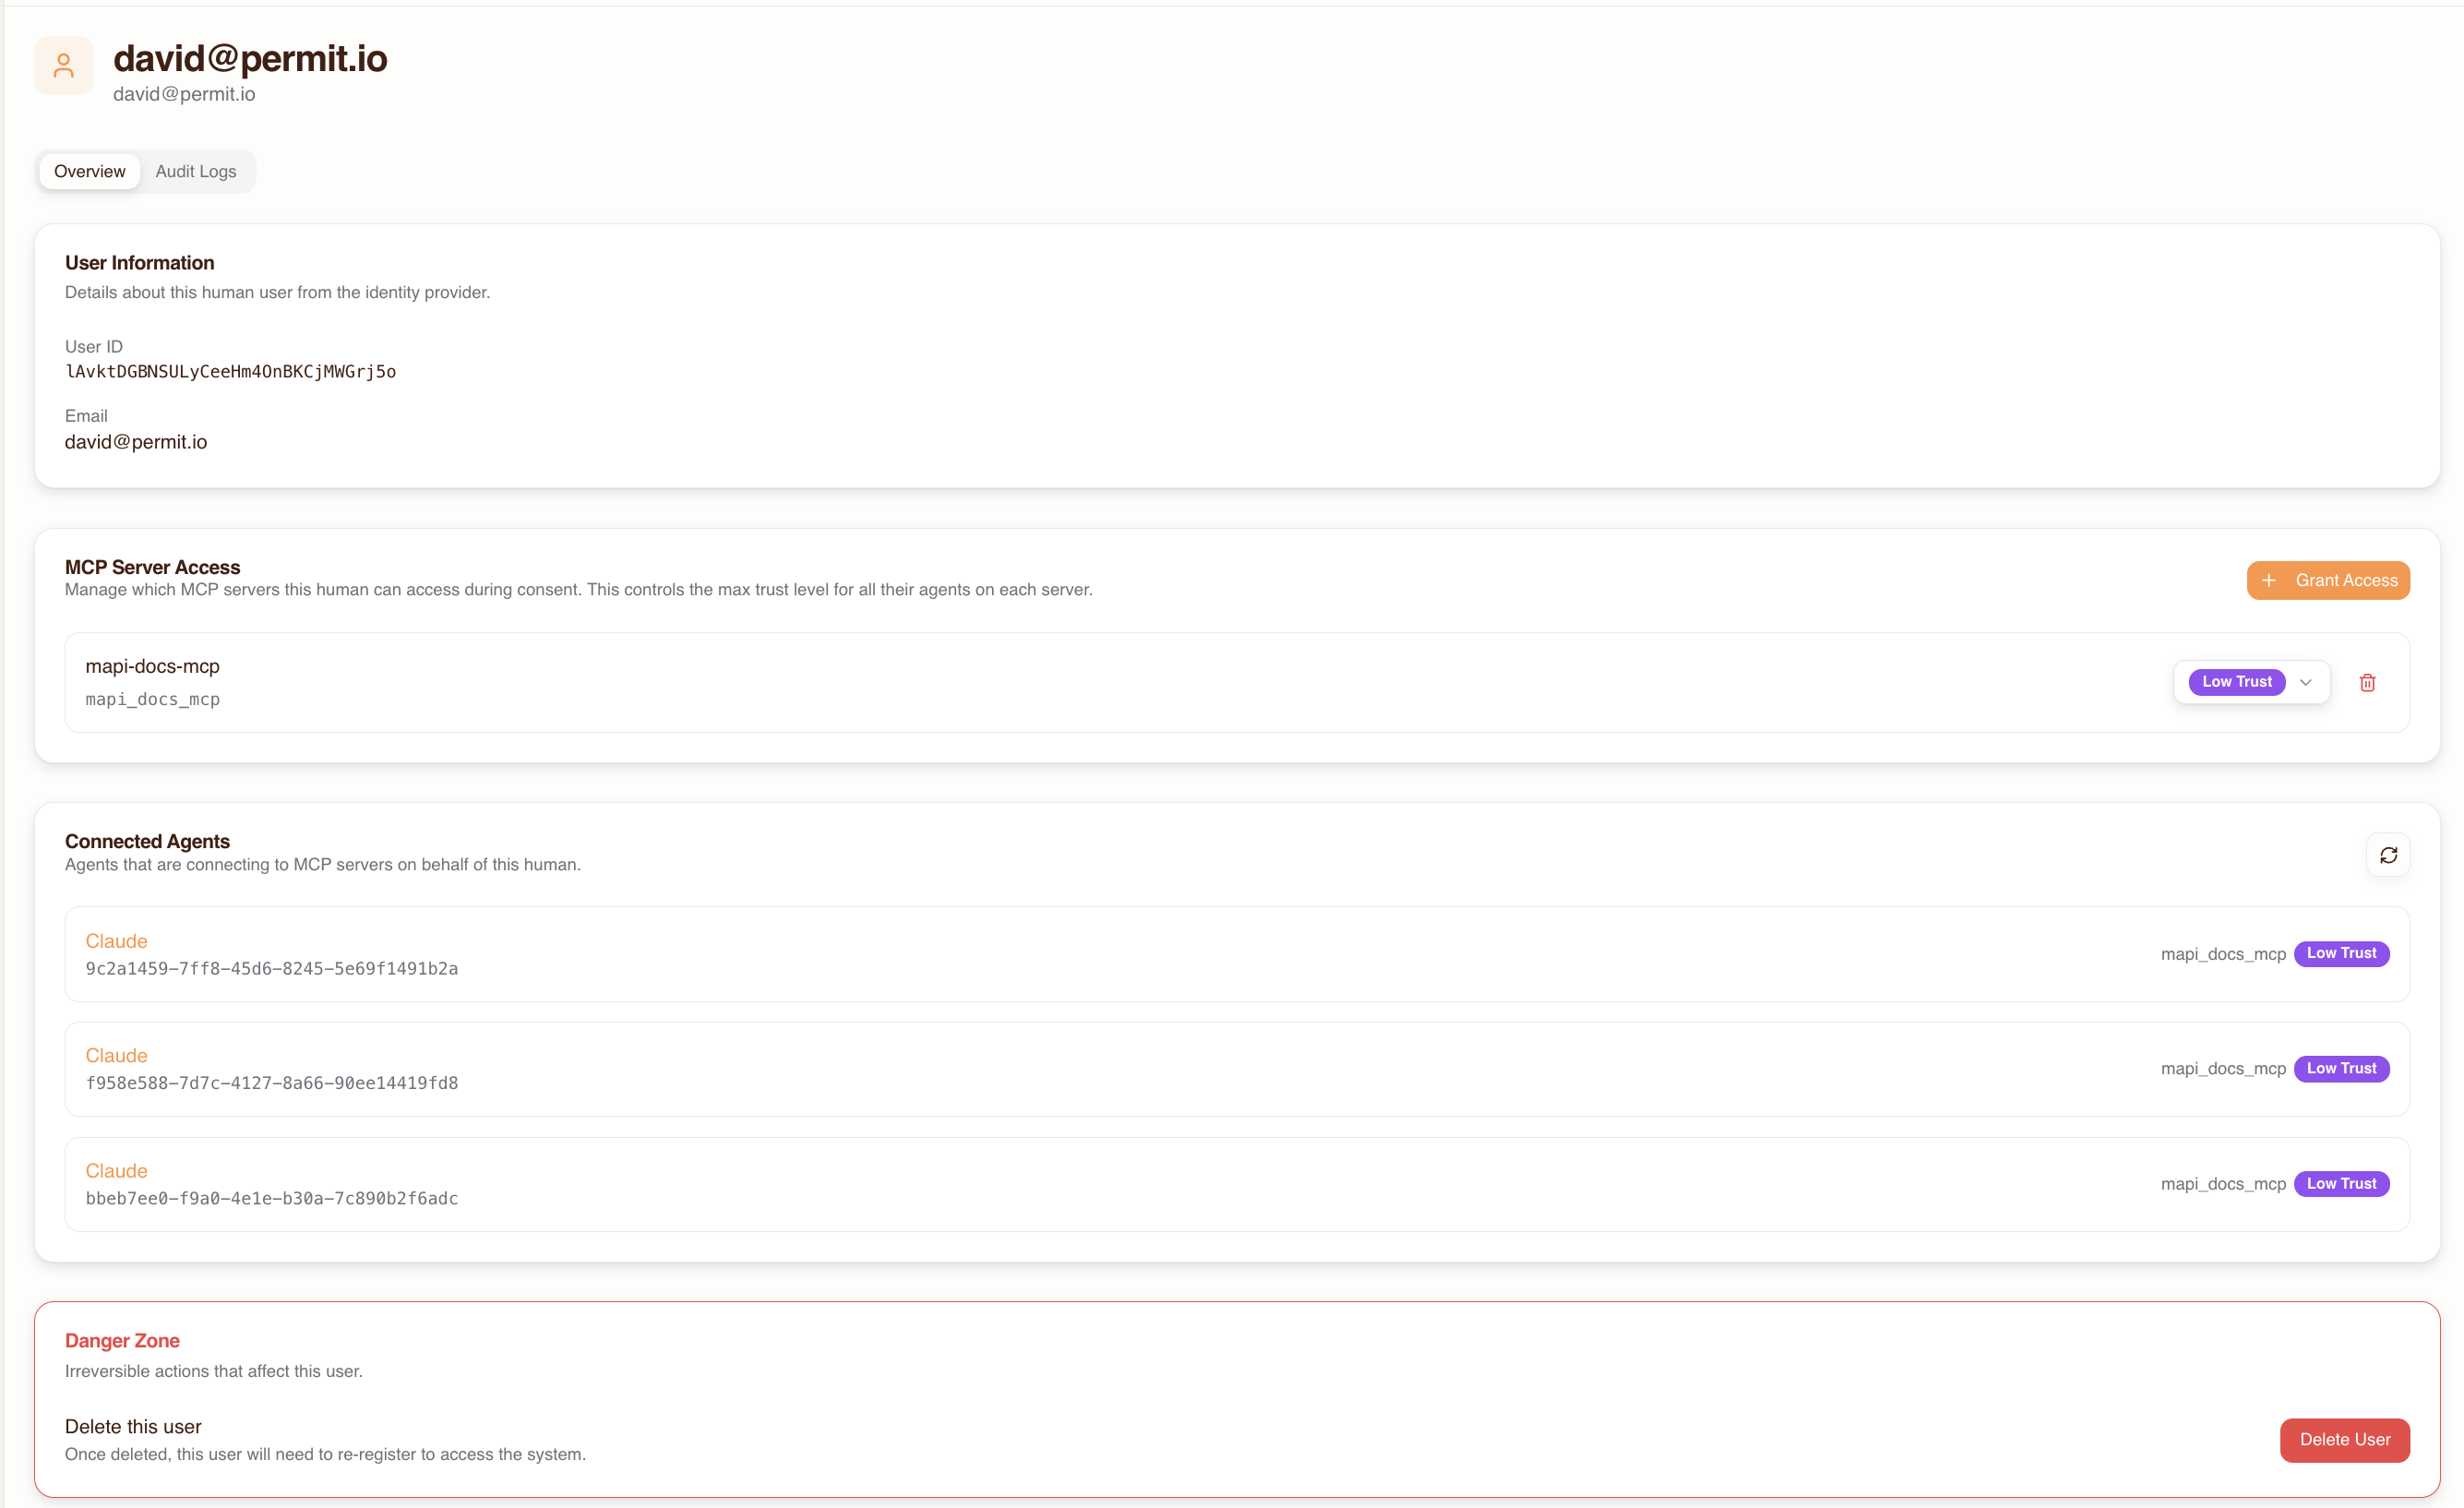
Users have no access to any MCP server until an admin grants it. Revoking a user's access to a server denies all of that user's agents on their next tool call to the server. For procedures and how revocation cascades to agents, see Manage humans.
Agent management
The Agents page lists the MCP clients that connected through the gateway. An agent appears after a user completes the consent flow.
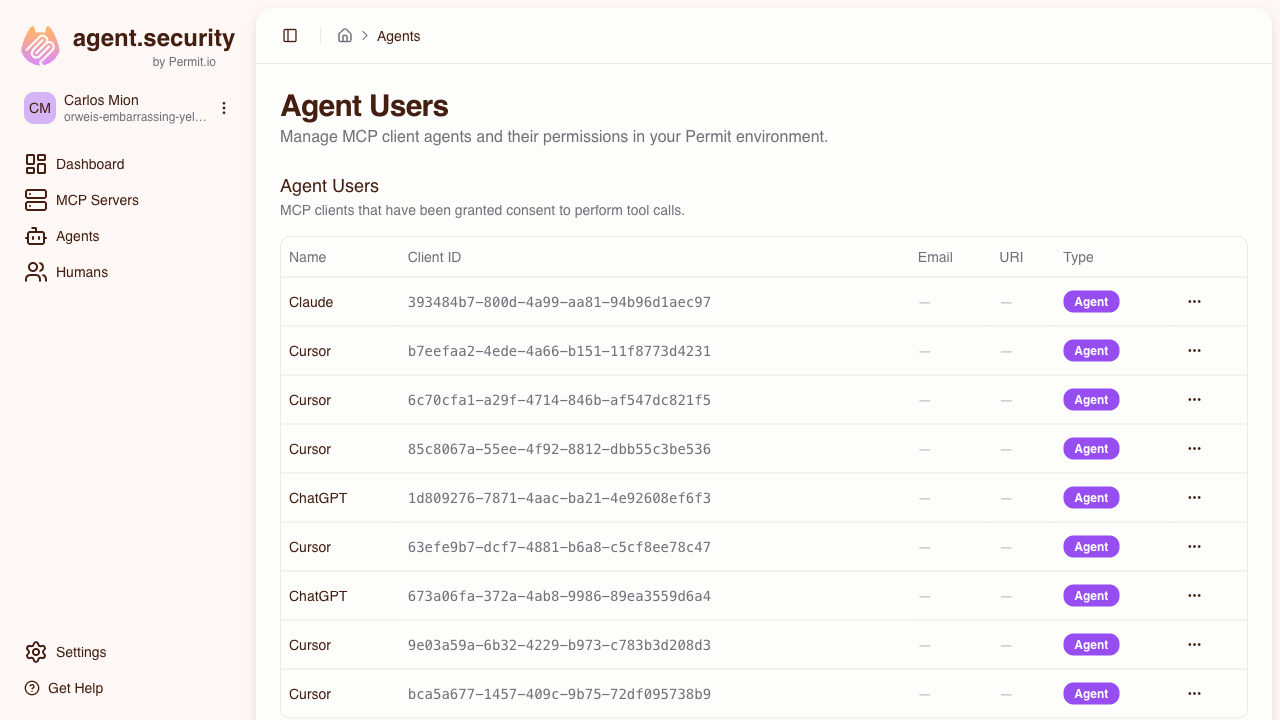
Each agent entry shows:
| Field | Contents |
|---|---|
| Agent identifier | The MCP client that connected, such as Cursor or Claude Desktop. |
| Associated user | The human who authorized the agent. |
| MCP server access | The servers the agent can reach, and the trust level for each. |
| Activity log | Recent tool calls, each marked allowed or denied. |
On an agent's detail page, you can change the agent's trust level for a server or revoke the agent's access to a server. A trust level change applies to the agent's next tool call. After you revoke an agent's access, the agent's tool calls to that server are denied until the user completes the consent flow again. For procedures, see Manage agents.
Settings
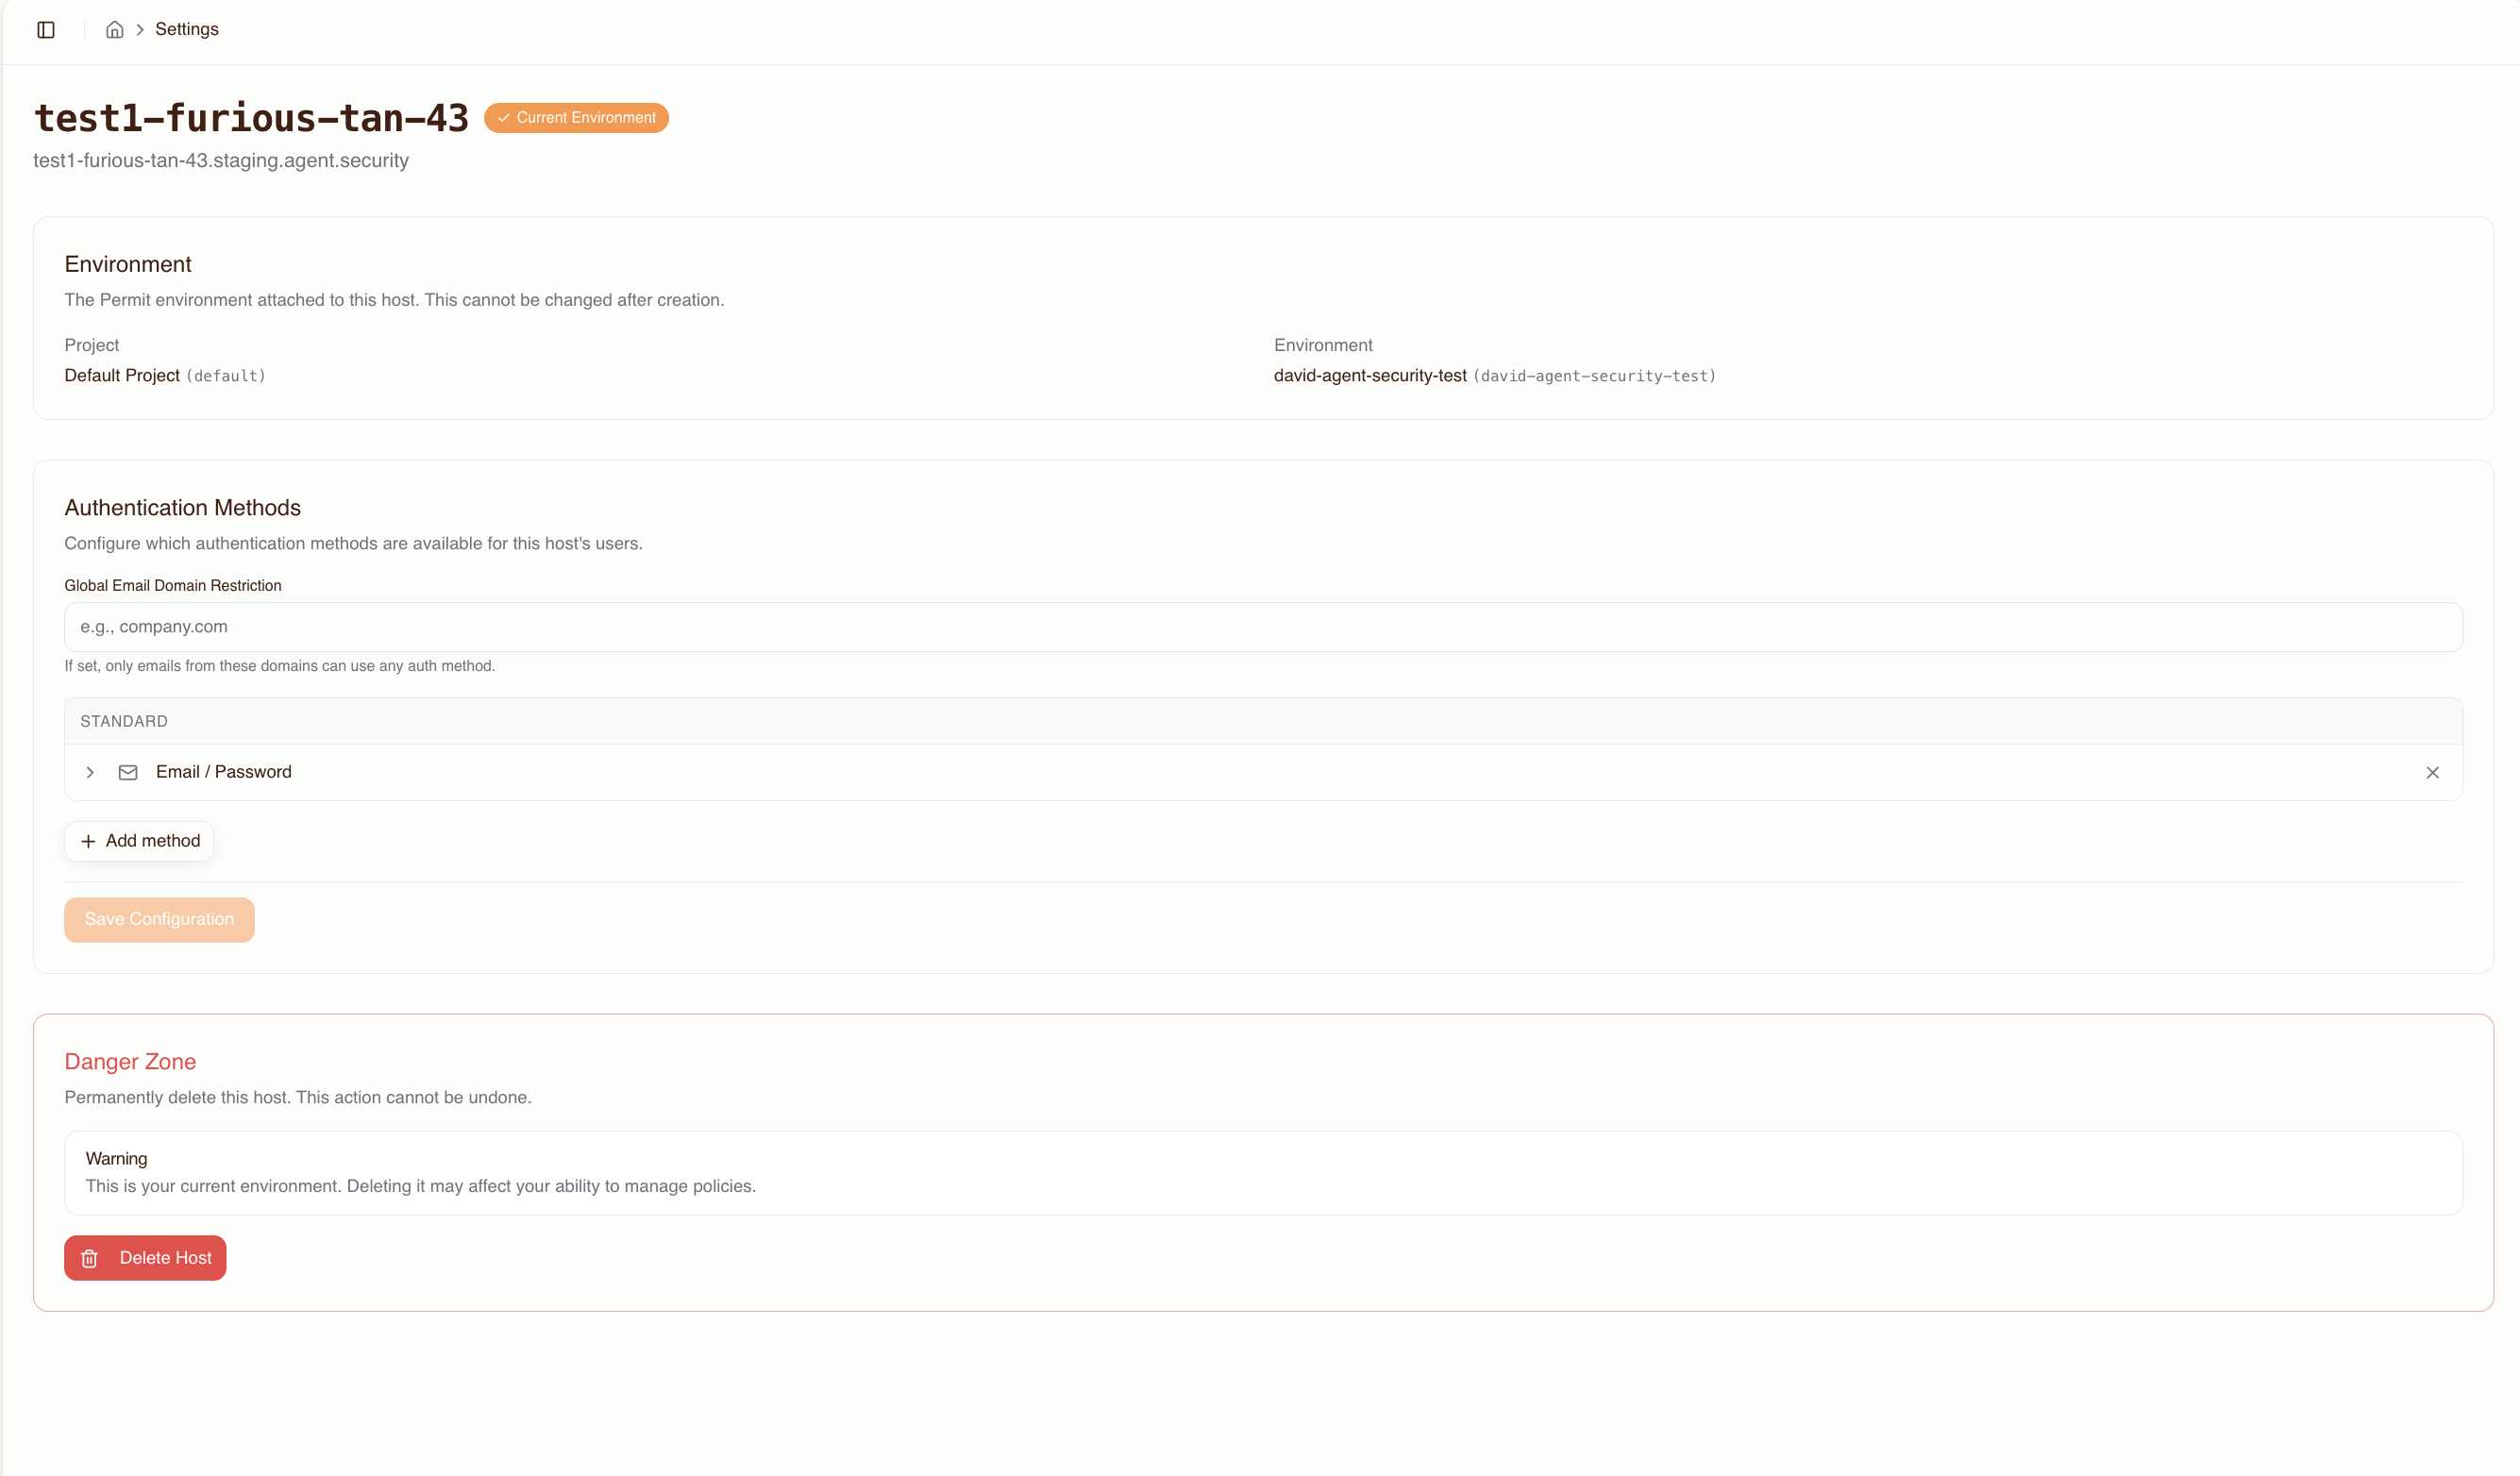
Open host settings from the host selector in the header. Host settings control how users sign in during the consent flow, and whether users can add their own MCP servers.
Dynamic MCPs
By default, users can connect only to MCP servers an admin imported. When Allow Dynamic MCPs is on, users can also enter any MCP server URL during the consent flow.
To turn on Dynamic MCPs:
- Open the host's Settings from the host selector in the header.
- Turn on Allow Dynamic MCPs.
With Dynamic MCPs on, the consent flow shows an option to enter a custom MCP server URL next to the admin-provisioned server list. Users set their own trust level for a dynamic server. The gateway still authorizes every tool call with Permit and records it in the audit log.
With Allow Dynamic MCPs on, users can connect agents to MCP servers you haven't imported or reviewed. Turn the setting on only if your organization accepts connections to arbitrary MCP servers. You can turn the setting off at any time.
Authentication methods
Each host has its own set of authentication methods. Email / Password is enabled by default. For setup instructions, identity provider examples, and callback URLs, see the Authentication methods reference.
Available methods
| Method | Description | Configuration required |
|---|---|---|
| Email / Password | Database-backed credentials | None (enabled by default) |
| Email OTP | One-time passcode sent by email (6-digit code, 5-minute expiry) | None |
| Passkeys | WebAuthn/FIDO2 credential management | None |
| Google OAuth | Sign in with Google | Google OAuth client ID and secret |
| GitHub OAuth | Sign in with GitHub | GitHub OAuth client ID and secret |
| Microsoft OAuth | Sign in with Microsoft (supports multi-tenant through the tenant ID) | Microsoft OAuth client ID and secret |
| SAML 2.0 SSO | Enterprise single sign-on (SSO) through SAML | Identity provider (IdP) entry point URL, entity ID, X.509 signing certificate |
| OIDC SSO | Enterprise SSO through OpenID Connect (OIDC) | Issuer URL, client ID, client secret |
Domain restrictions
Each authentication method can restrict sign-in to allowed email domains. For example, you can limit Google OAuth to @acme.com addresses. You can set domain restrictions:
- Globally: for all authentication methods.
- Per method: for a single authentication method.
For how global and per-method restrictions combine, see Domain restrictions.
SAML / OIDC SSO setup
For SAML 2.0, the host settings page shows the service provider (SP) details to enter in your identity provider: the SP Entity ID, the ACS URL, and a downloadable SP Metadata XML file. For OIDC, you enter your identity provider's Issuer URL, Client ID, and Client Secret. The exact SP URLs and identity provider walkthroughs are in the Authentication methods reference.
Force-redirect domains
For SAML and OIDC SSO, you can set force-redirect domains. A user whose email matches a force-redirect domain goes straight to the SSO provider instead of the sign-in screen.