Building ReBAC Policies
Build a relationship-based access control (ReBAC) policy in the Permit.io dashboard and enforce it with permit.check(). This guide is for developers who know their application's resource hierarchy and want to model it in Permit. For the concepts (resource roles, role derivations, and relationship tuples), read the ReBAC overview first.
Prerequisites
- A Permit.io account with a project and an environment. See the Quickstart.
- A map of your resources and the relationships between them. Draw each resource type as a node and each relationship as an edge, for example: a
Folderis the parent of aFile. Mark which relationships are hierarchies (parent and child) and which are groupings (members of a team). - A list of the permissions each relationship grants, for example: the owner of a folder can edit every file in it.
Permit's implementation of relationship-based access control (ReBAC) follows the tuple convention of Google's Zanzibar system. Tuples describe resources, instances, and roles with the keys of the objects:
| Form | Means |
|---|---|
resource:instance | One instance of a resource type, such as room:general |
resource#role | A role on a resource type, such as room#moderator |
resource:instance#role | A role on one instance, such as room:general#moderator |
The Zanzibar system is described in the paper "Zanzibar: Google's Consistent, Global Authorization System". Read the paper on USENIX's site.
Build the policy in the Policy Editor
Create the schema on the Policy screen in this order: resources, relations, resource roles, and role derivations. Then add instance data on the Directory screen.
1. Create resources
A resource is a type of object users act on, such as a folder, a module, or a project.
- Open the Policy screen and select the Resources tab.
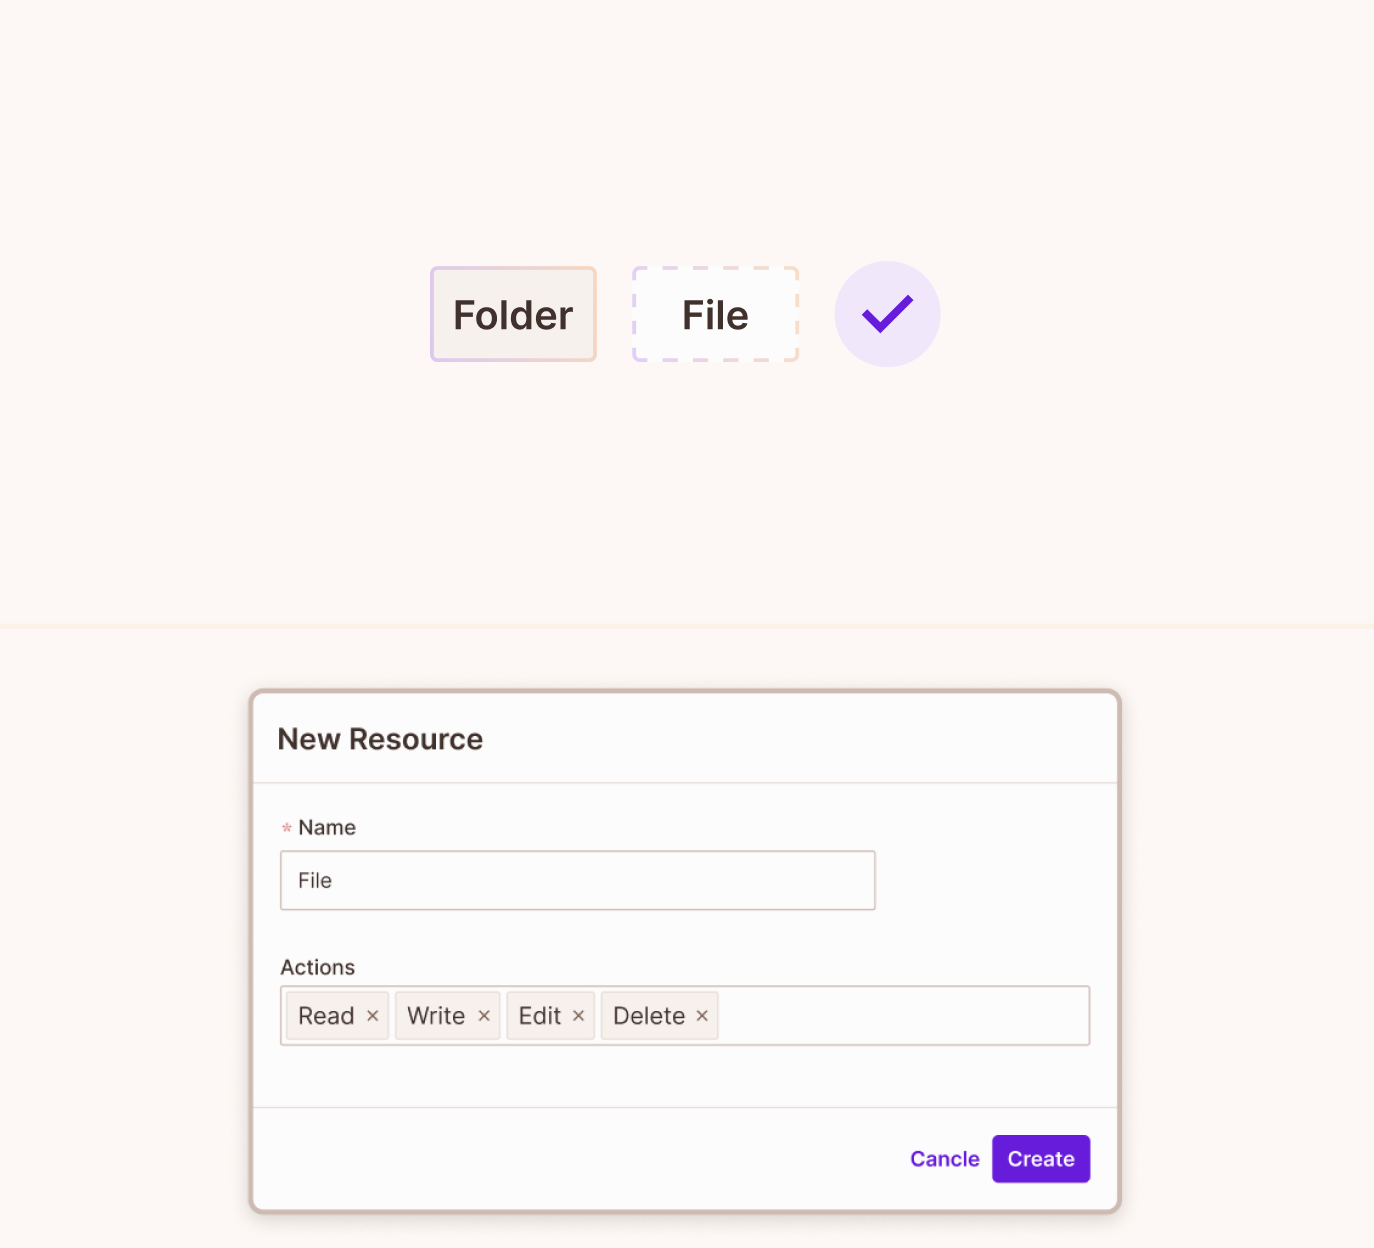
- Create a resource for each type in your map, with the actions users can perform on its instances, such as
Folderwithreadandedit, andFilewithreadandedit. For the fields of the New Resource panel, see Create a resource.
2. Create resource relations
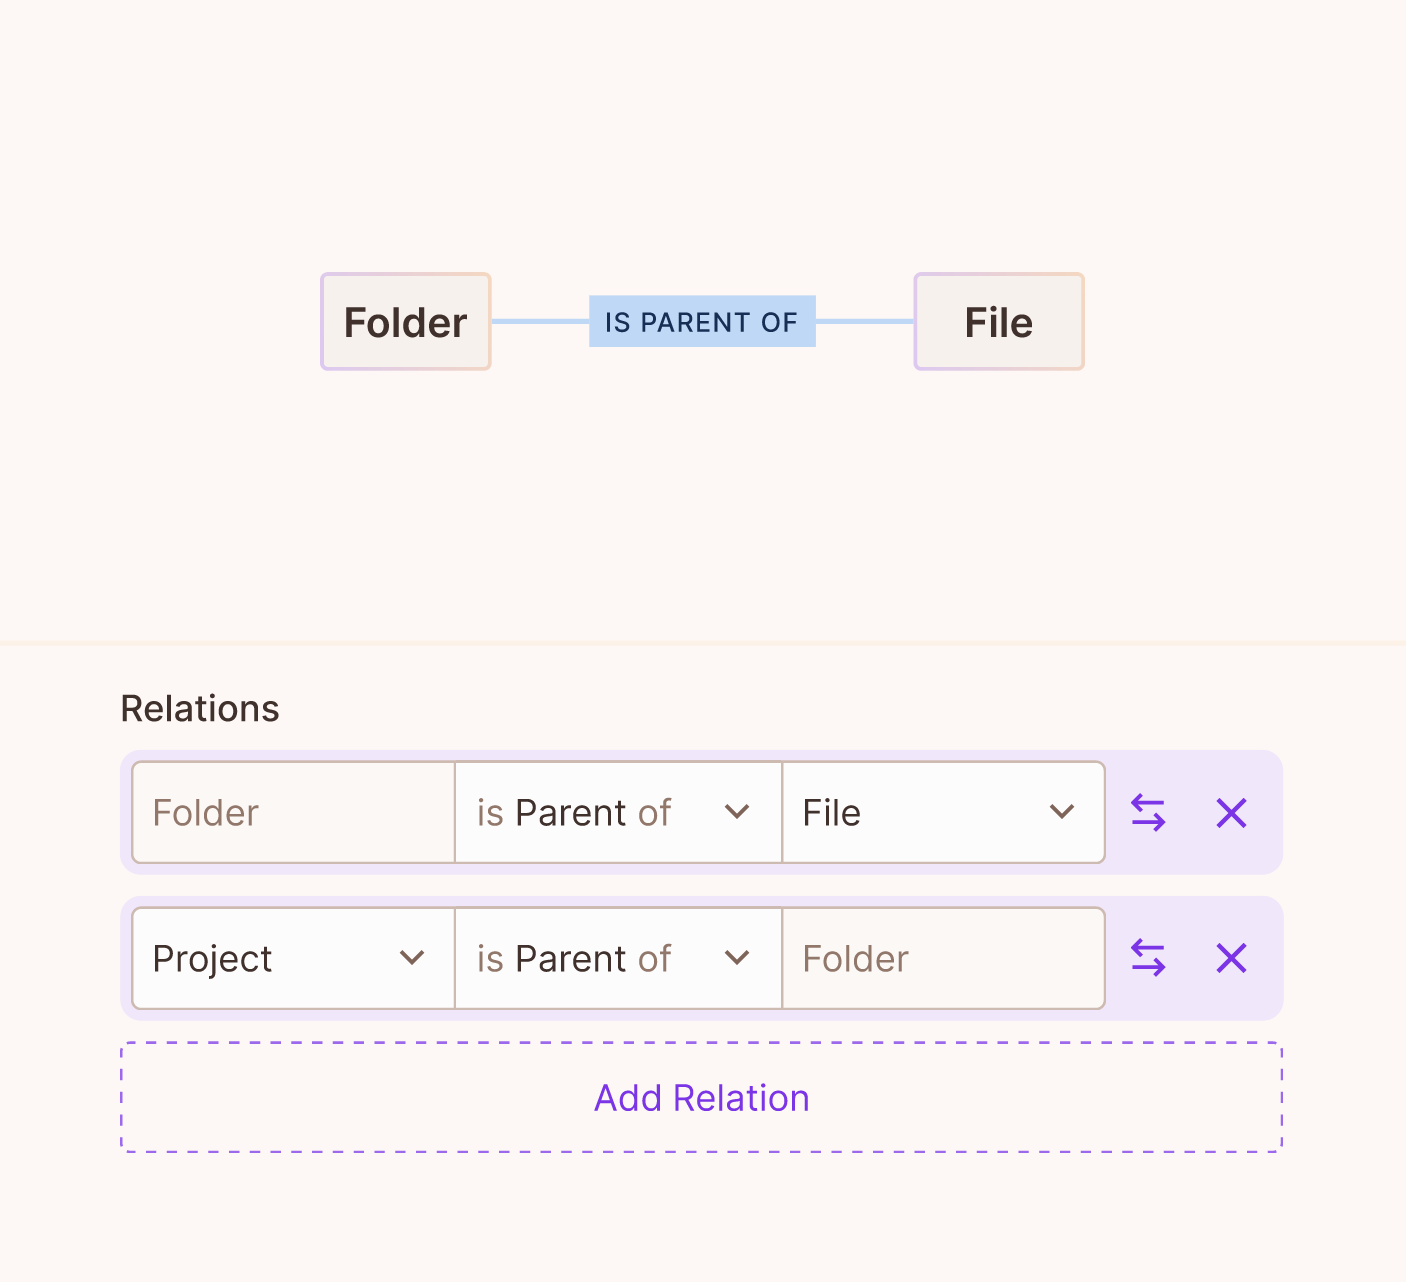
A relation defines how two resource types connect, such as Folder is parent of File. Later, you create relationships (also called relationship tuples) between specific instances based on these relations.
- On the Resources tab, open the three-dot menu of the parent resource, such as
Folder, and select Edit. - Under ReBAC Options, find Relations and click Add Relation.
- Set the row to
Folderis parent ofFile. - Click Save. Relations then lists the relation, and the diagram above it shows
FolderIS PARENT OFFile.
parent relationA resource can't be the parent of itself. To relate a resource to itself, use another relation type, such as owner or container.
3. Add roles to resources
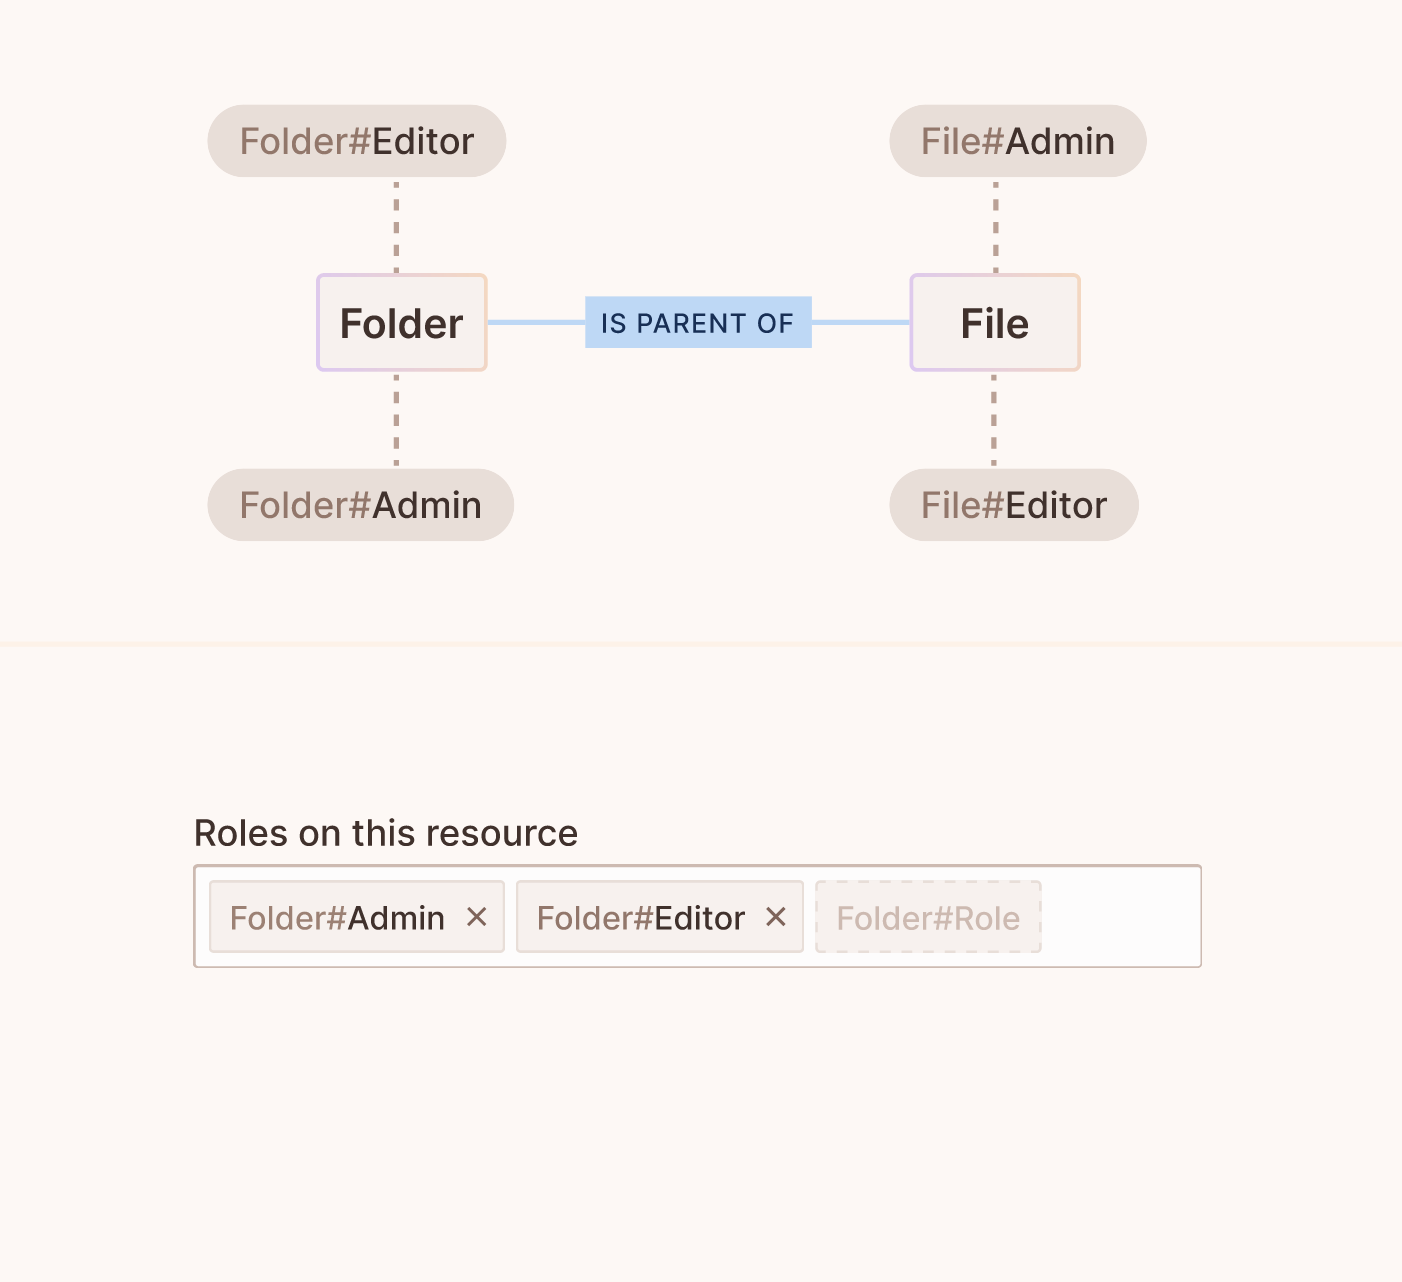
A resource role, such as Folder#Admin, grants permissions on the instances of one resource.
- On the Resources tab, open the three-dot menu of the resource and select Edit.
- Under ReBAC Options, find Roles on this resource.
- Type the name of each role users can hold on the resource's instances, such as
AdminandEditor, and press Enter after each name. A role that you type without pressing Enter is not added. - Click Save. The roles appear as
Folder#AdminandFolder#Editor. - Select the Policy Editor tab, select the actions each resource role can perform on its resource, and click Save Changes.
4. Define role derivations
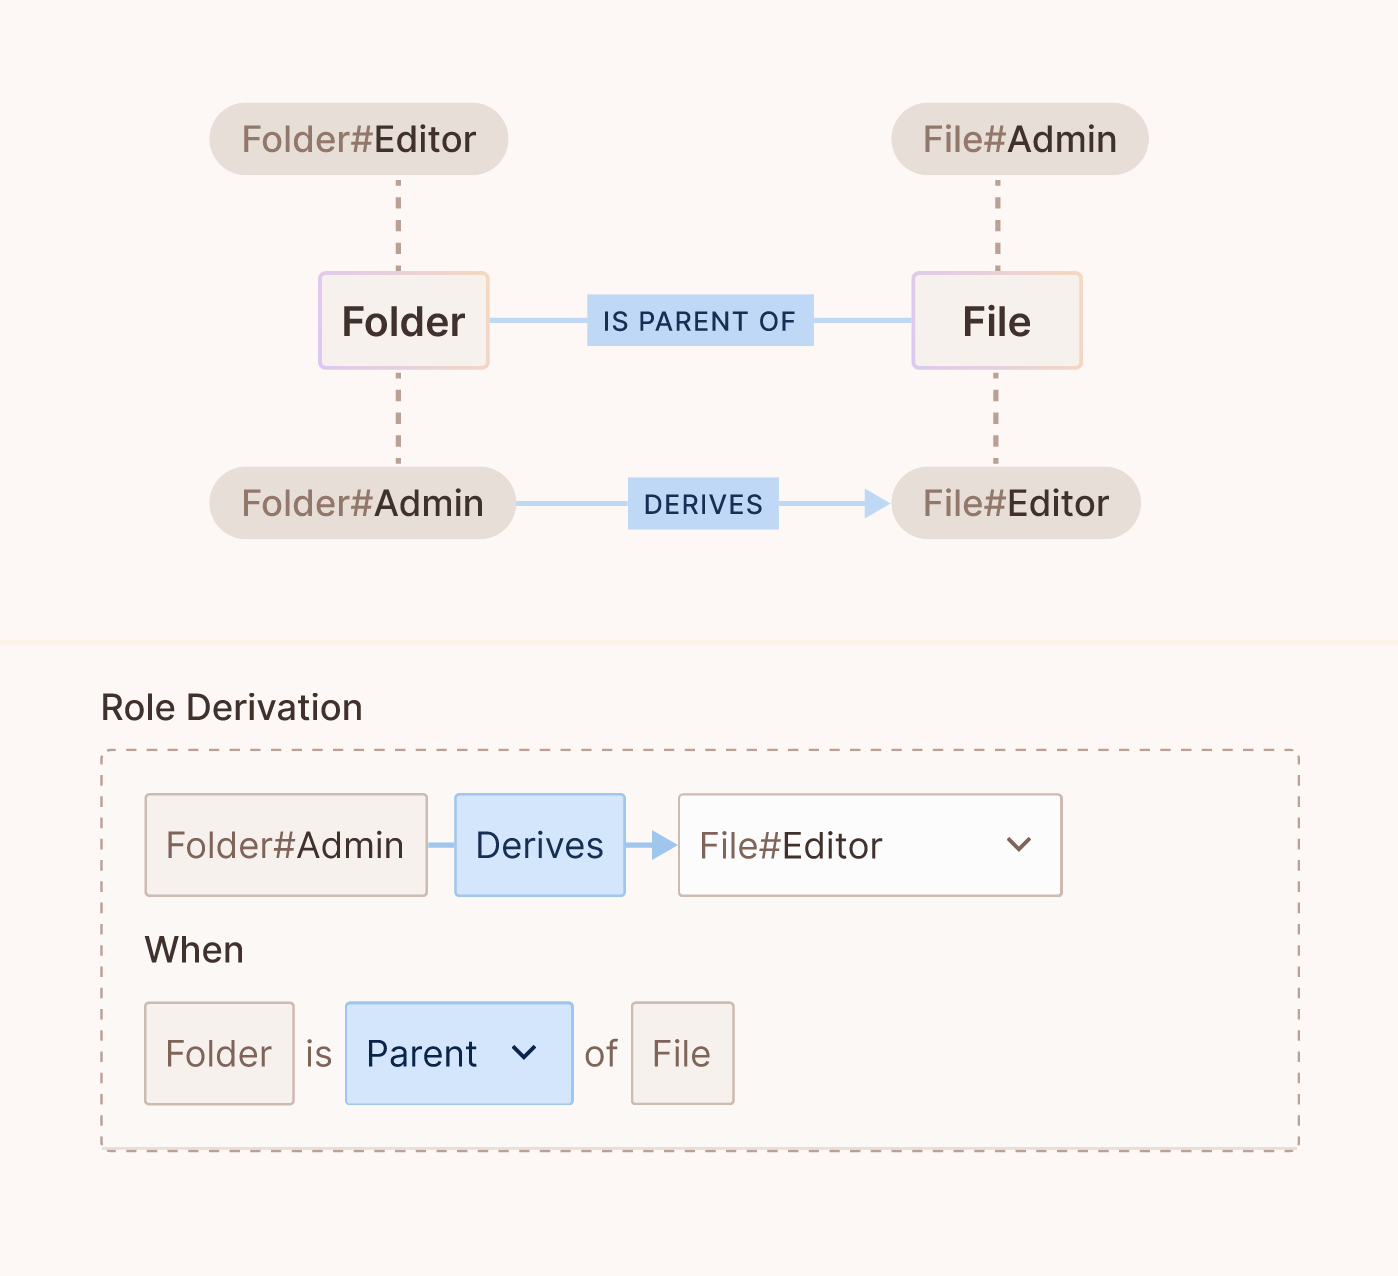
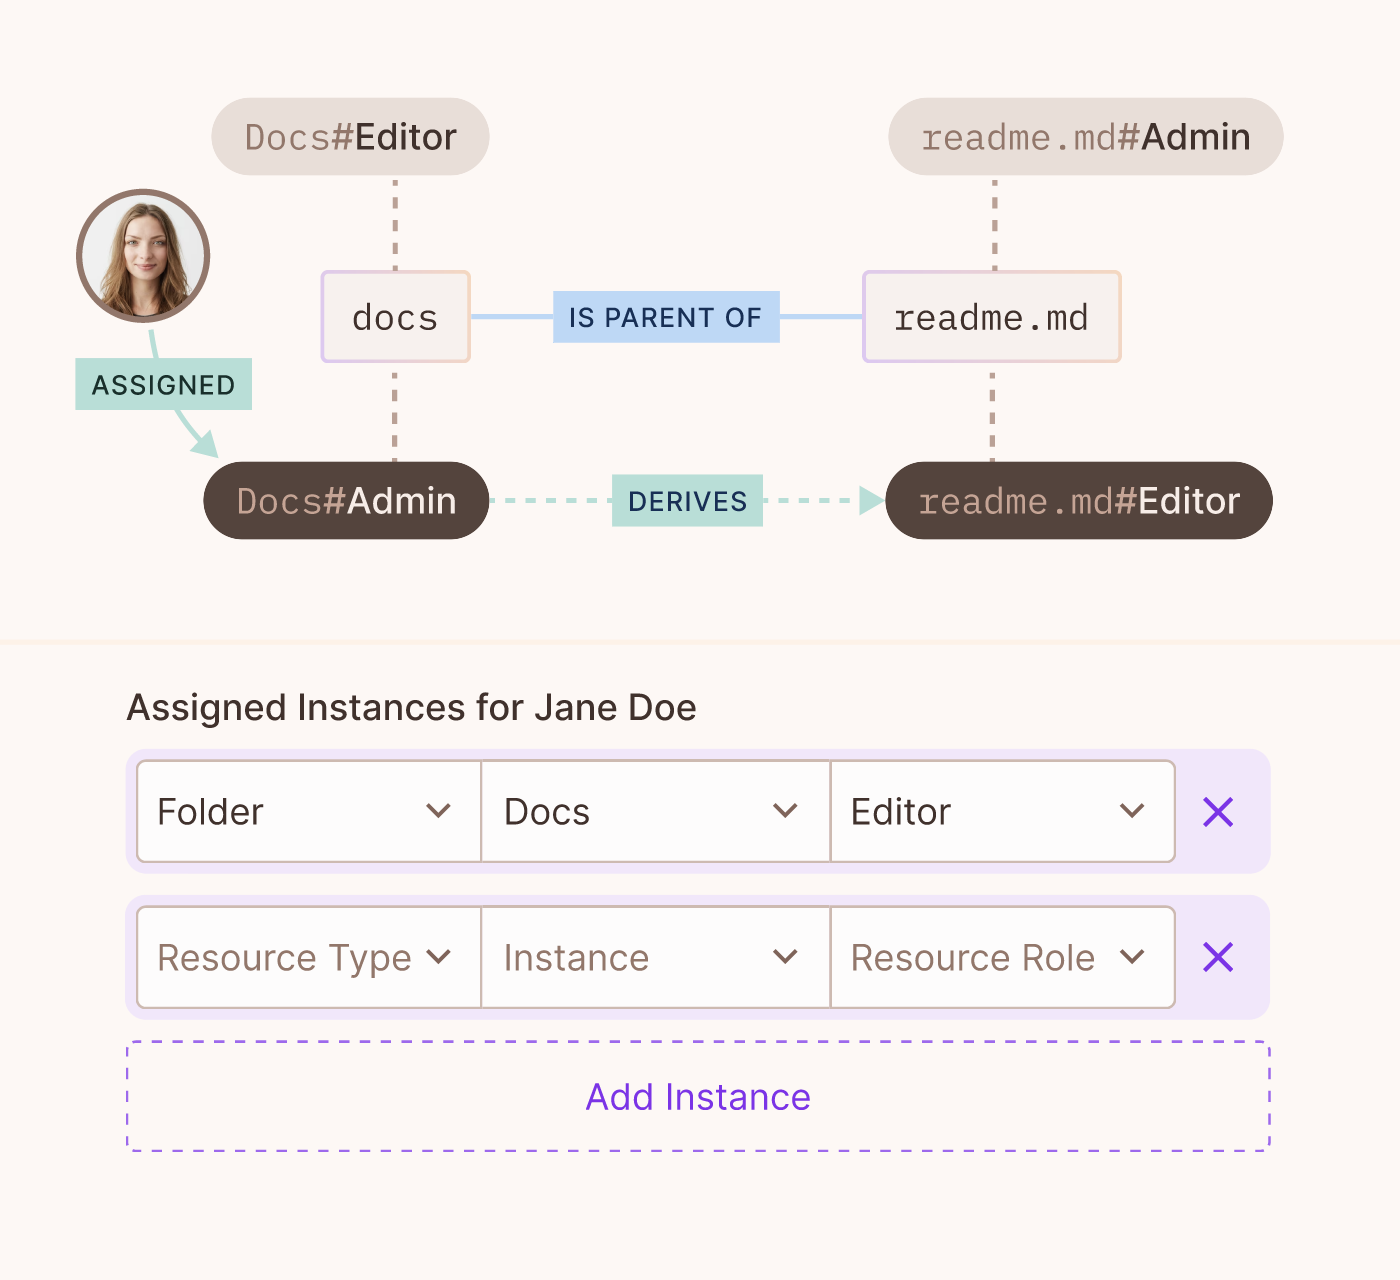
A role derivation grants a user a role on an instance because of a role they hold on a related instance. For example, a user with Folder#Admin gets File#Editor on every file whose parent is that folder.
- Open the Policy screen and select the Roles tab. The tab lists every resource role, such as
Folder#AdminandFile#Editor. - Open the resource role the user should receive, such as
File#Editor. - In Role Derivation, set
Folder#AdminDerivesFile#Editor. - Under When, select the relation that connects the two resources:
Folderis Parent ofFile. - Save the derivation. The rule then reads
Folder#AdminderivesFile#EditorifFolderis parent ofFile.
5. Create resource instances and relationships
A resource instance is a specific object of a resource type. For example, document is a resource, and Document A is one of its instances.
- Open the Directory screen and select the Instances tab.
- Create an instance for each object your application checks permissions on. Give each instance the resource type and the key your application uses for the object, such as the
docsinstance ofFolder.
Connect resource instances with a relationship
A relationship (relationship tuple) connects two specific instances, based on a relation in the policy schema. For example, you place a specific document in a specific folder, or a specific account under a specific company.
- Open the Directory screen and select the Instances tab.
- Create or edit a resource instance.
- Add a relationship between the instance and another instance. The other instance can be of a different resource type.
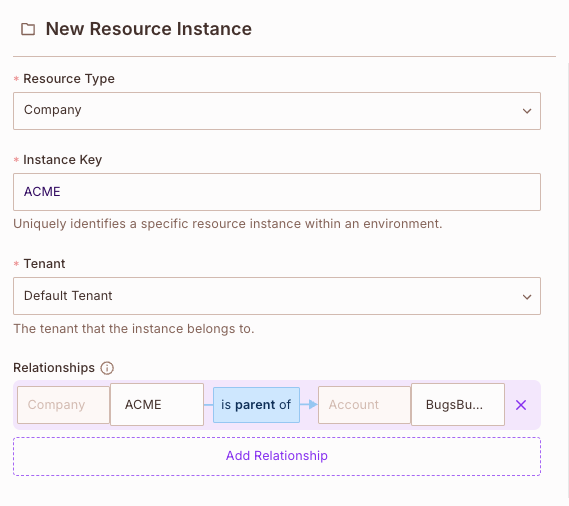
You can also create resource instances and relationship tuples with the Permit API and SDKs. See Sync application data into Permit.
6. Assign resource instance roles to a user
Assign a user a role on a specific resource instance. Role derivations then grant the user roles on related instances.
- Open the Directory screen and select the Users tab.
- In the row of the user, click Add Instance Roles in the INSTANCE ACCESS column. The Assigned Instances form opens.
- Click Add Instance, then select the Resource Type, the Instance, and the Resource Role.
- Save the assignment. The INSTANCE ACCESS column of the user lists the instance roles you assigned.
Enforce the policy in your code
In your application, call permit.check() with a resource instance. The policy decision point (PDP) evaluates the user's direct and derived roles on that instance.
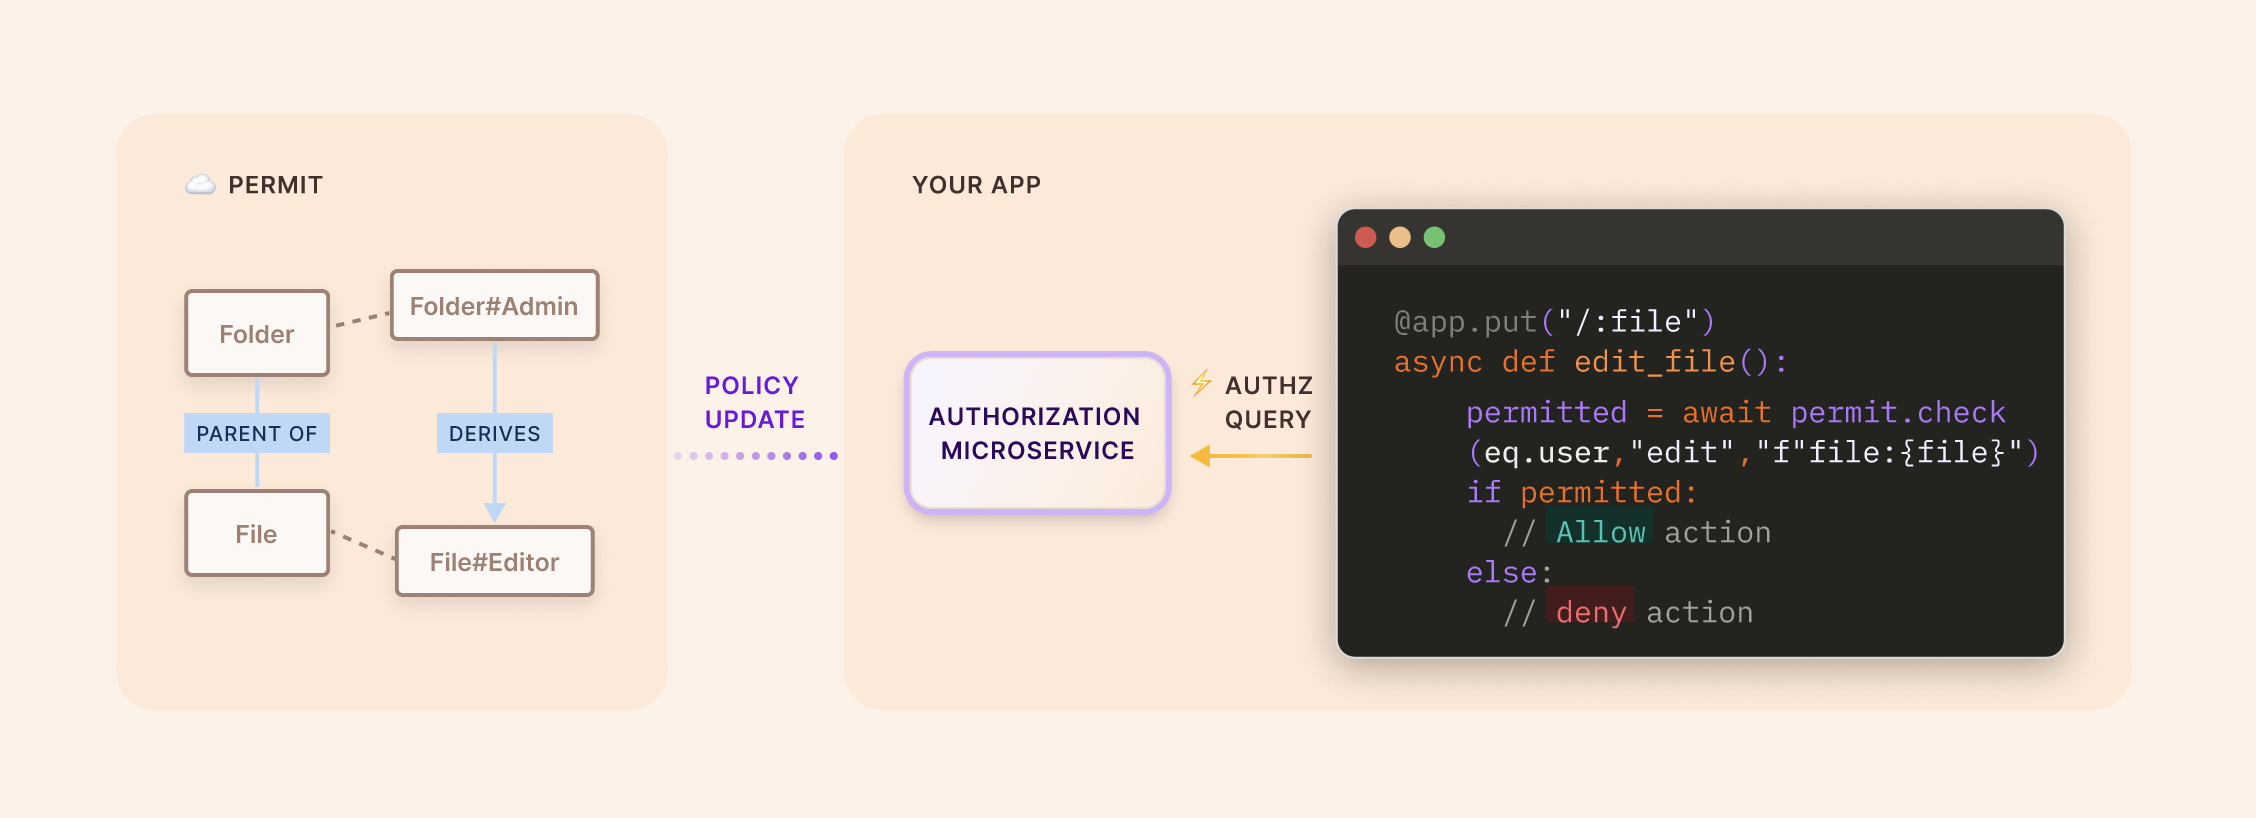
The following check asks whether a user can perform the edit action on one file. The code builds the instance key at runtime, and permit is the SDK client created in Verify the policy:
await permit.check(userId, "edit", `file:${fileKey}`);
permit.check() parameters
permit.check() returns true when the user can perform the action on the resource instance, and false otherwise.
| Parameter | Value in the example | Description |
|---|---|---|
| User | userId | The key of the user whose permissions you check. |
| Action | "edit" | The action the user wants to perform on the file. |
| Resource | `file:${fileKey}` | The resource instance, in resource_type:instance_key format. The template string inserts the key of the file instance. |
Other ways to pass the resource instance
Pass a fixed instance key:
await permit.check(userId, "edit", "file:readme");
Pass an object with the resource type, the instance key, and more data such as the tenant, as in role-based access control (RBAC) checks:
await permit.check(userId, "edit", { type: "file", key: "readme", tenant: "default" });
Verify the policy
Run a check for a user who holds the derived role, and one for a user who doesn't. The following example uses the Folder and File schema of this guide: the derivation from Folder#Admin to File#Editor, a folder instance with the key docs, a file instance with the key readme, a relationship that makes docs the parent of readme, and an assignment of the folder admin role on docs to jane@permit.io. A check takes the keys of the resource and the instance, not the display names. Replace <YOUR_API_KEY> with your environment API key:
import { Permit } from "permitio";

const permit = new Permit({
  token: "<YOUR_API_KEY>",
  pdp: "https://cloudpdp.api.permit.io",
});

// Jane holds folder:docs#admin, and docs is the parent of readme.
console.log(await permit.check("jane@permit.io", "edit", "file:readme"));

// Bob holds no role on either instance.
console.log(await permit.check("bob@permit.io", "edit", "file:readme"));
The script prints true and then false:
true
false
The example sends the checks to the Cloud PDP, which evaluates ReBAC policies. See Cloud PDP capabilities. These checks confirm the policy:
| Change you make | Result of the check for jane@permit.io |
|---|---|
| None | true |
Delete the relationship between folder:docs and file:readme | false |
Delete Jane's folder:docs#admin assignment | false |
Remove edit from file#editor in the Policy Editor | false |
To see why a check was allowed or denied, open the Audit Log in the Permit dashboard. For more check options, see Check permissions with permit.check().
Visualize your ReBAC policy with the resource relationship graph
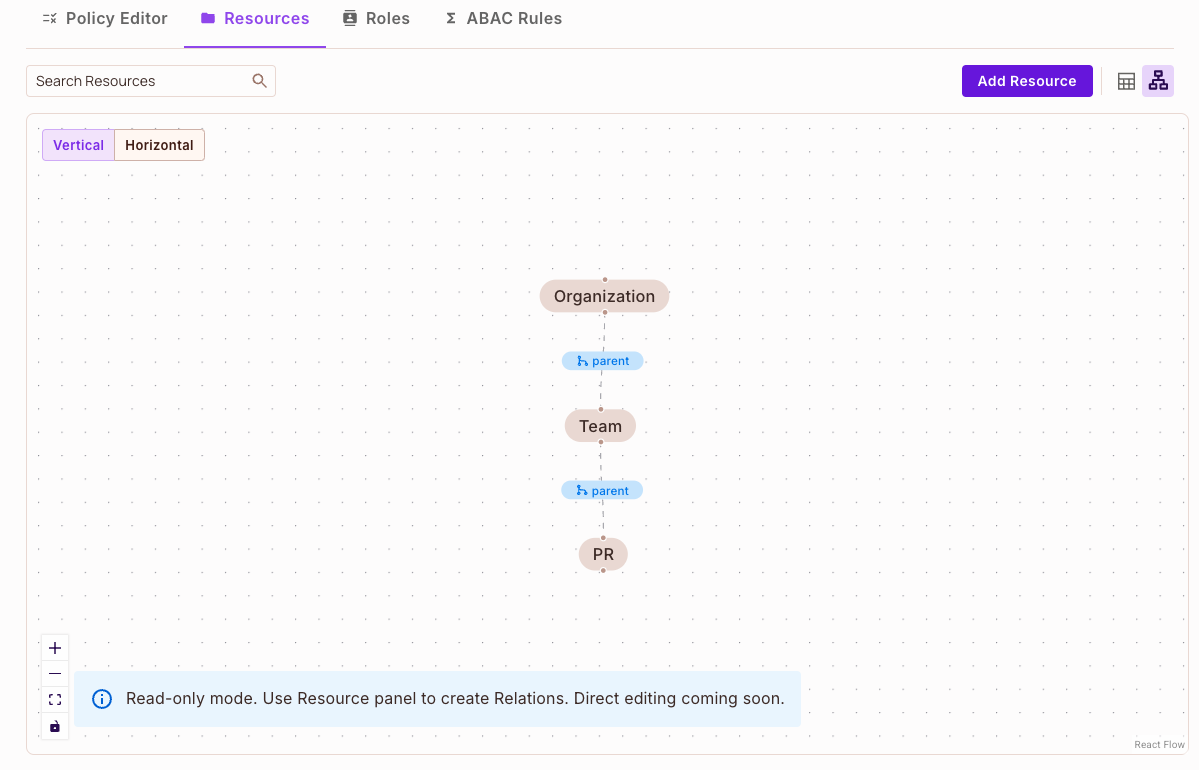
The resource relationship graph shows your resources as nodes and the relations between them as edges. The graph is read-only.
To open the graph, select the graph view button next to Add Resource on the Resources tab.

An example resource relationship graph:
Example ReBAC applications
- Google Drive: a file sharing application with a file and folder hierarchy.
- Galactic Health Corporation: a healthcare application with delegated access to user profiles.
- Pink Mobile: a telecom representative application with account-level access.
Next steps
- Sync application data into Permit: create resource instances and relationship tuples from your code.
- Assign roles to groups with the Groups API: derive permissions from group membership.
- Model ownership: compare ABAC and ReBAC approaches to resource ownership.
- Check permissions with permit.check(): every check option, including resource instances.