Show or hide UI components by permission
Model each UI tile in a Next.js dashboard as a Permit.io resource, then render a tile only when the policy allows the signed-in user to view it. This worked example is for frontend developers who toggle features per user without shipping a second build.
Use this pattern to limit a feature to a group of test users, or to change the dashboard for paying users based on their plan or location.
What you build
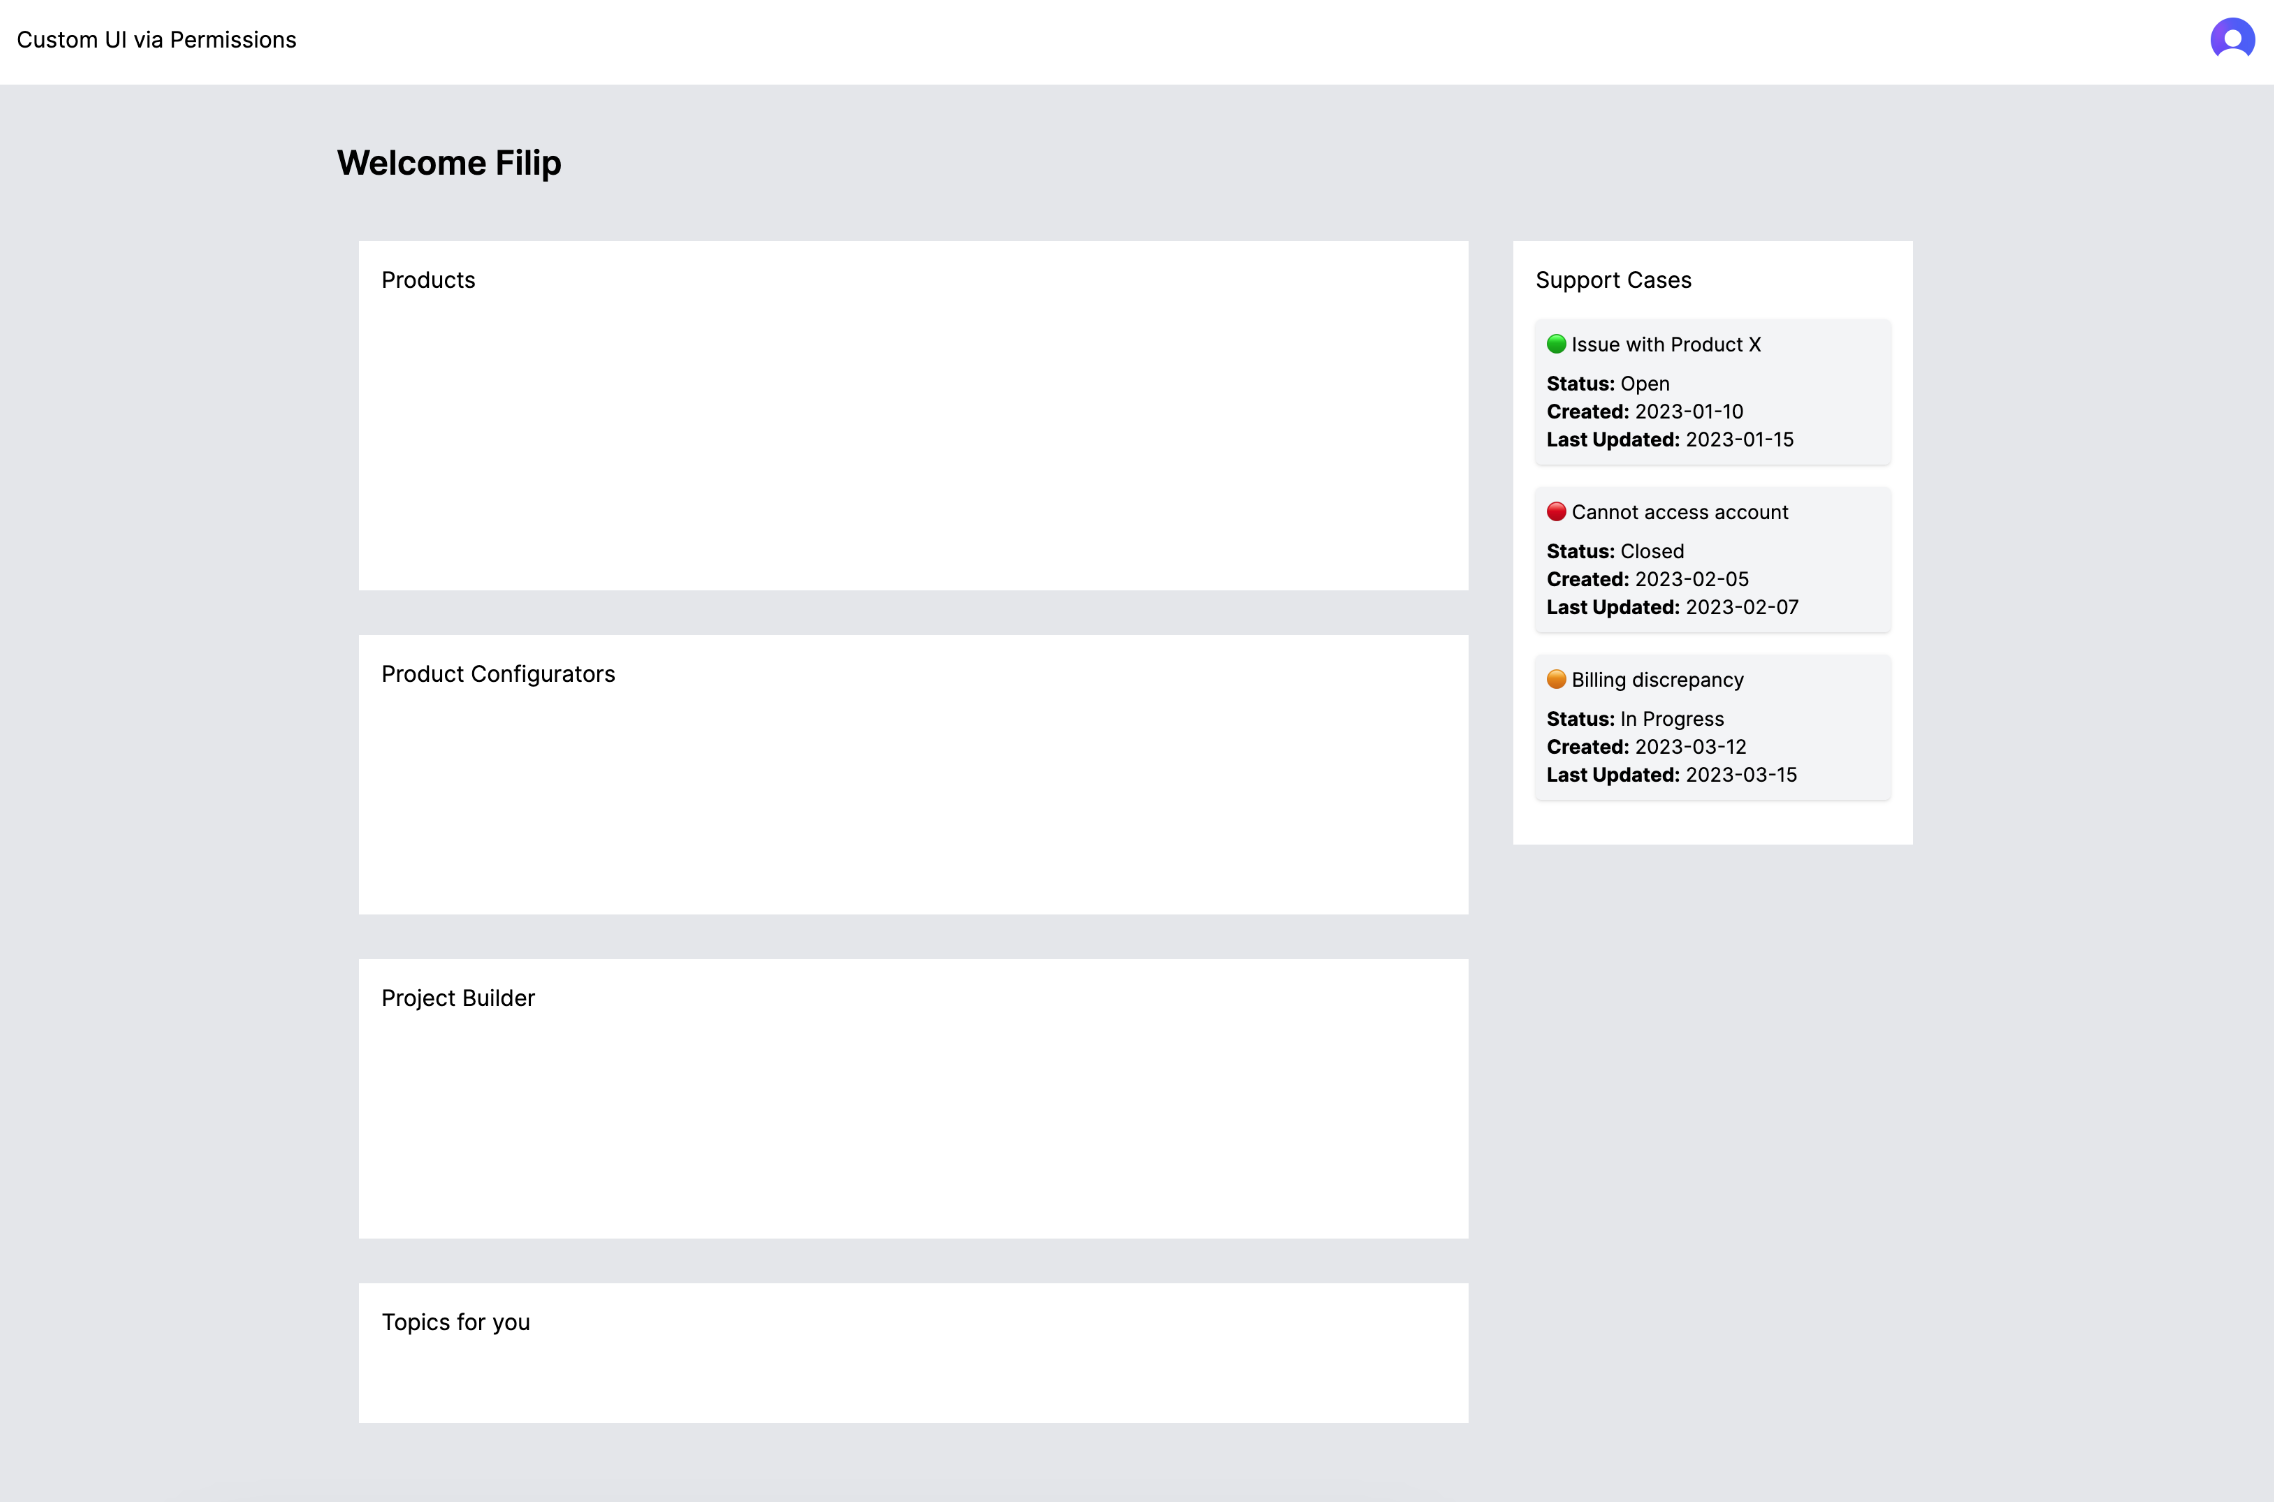
The dashboard loads four tiles: Products, Product Configurators, Project Builder, and Topics for you. Each tile is a resource in Permit with one view action. On sign-in, the app asks Permit once whether the user can view each of the four resources, stores the four answers, and renders the tiles whose answer is true.
The policy that decides this is role-based access control (RBAC): a Viewer role with view checked on some of the four resources. Change which resources the role may view, and the dashboard changes for every viewer. To make one tile depend on the user instead of the role, add an attribute condition as described in Make a tile depend on a user attribute.
The flow has three parts:
| Part | Where it runs | What it does |
|---|---|---|
| Permission check route | Your backend (Next.js API route) | Receives a list of actions and resources, calls permit.check() for each one against the policy decision point (PDP), and returns one boolean per item. |
AbilityLoader | Your frontend (React) | Uses permit-fe-sdk to call the permission check route once for all four tiles, and stores the results. |
| Conditional rendering | Your frontend (React) | Calls permitState.check() for each tile and renders the tile when the stored result is true. |
Prerequisites
- A Permit.io account and an environment API key. See Get your API key.
- A running PDP that your backend can reach at
http://localhost:7766. See Run the PDP. - A Next.js (React) app to render the dashboard in.
- The
permitiopackage installed in your backend, and thepermit-fe-sdkand@casl/abilitypackages installed in your frontend. - An authentication provider that gives your app the signed-in user's ID. This example uses Clerk.
- The signed-in users synced to Permit with the
Viewerrole assigned. See Sync users.
1. Create a resource for each UI component
Each tile the dashboard toggles needs its own resource with a view action. The resource key is the string the frontend passes to permitState.check(), so keep the keys and the component names in step.
-
On the Policy screen, open the Resources tab and create the first resource. Give it the name Product Configurators, the key
Product_Configurators, and aviewaction.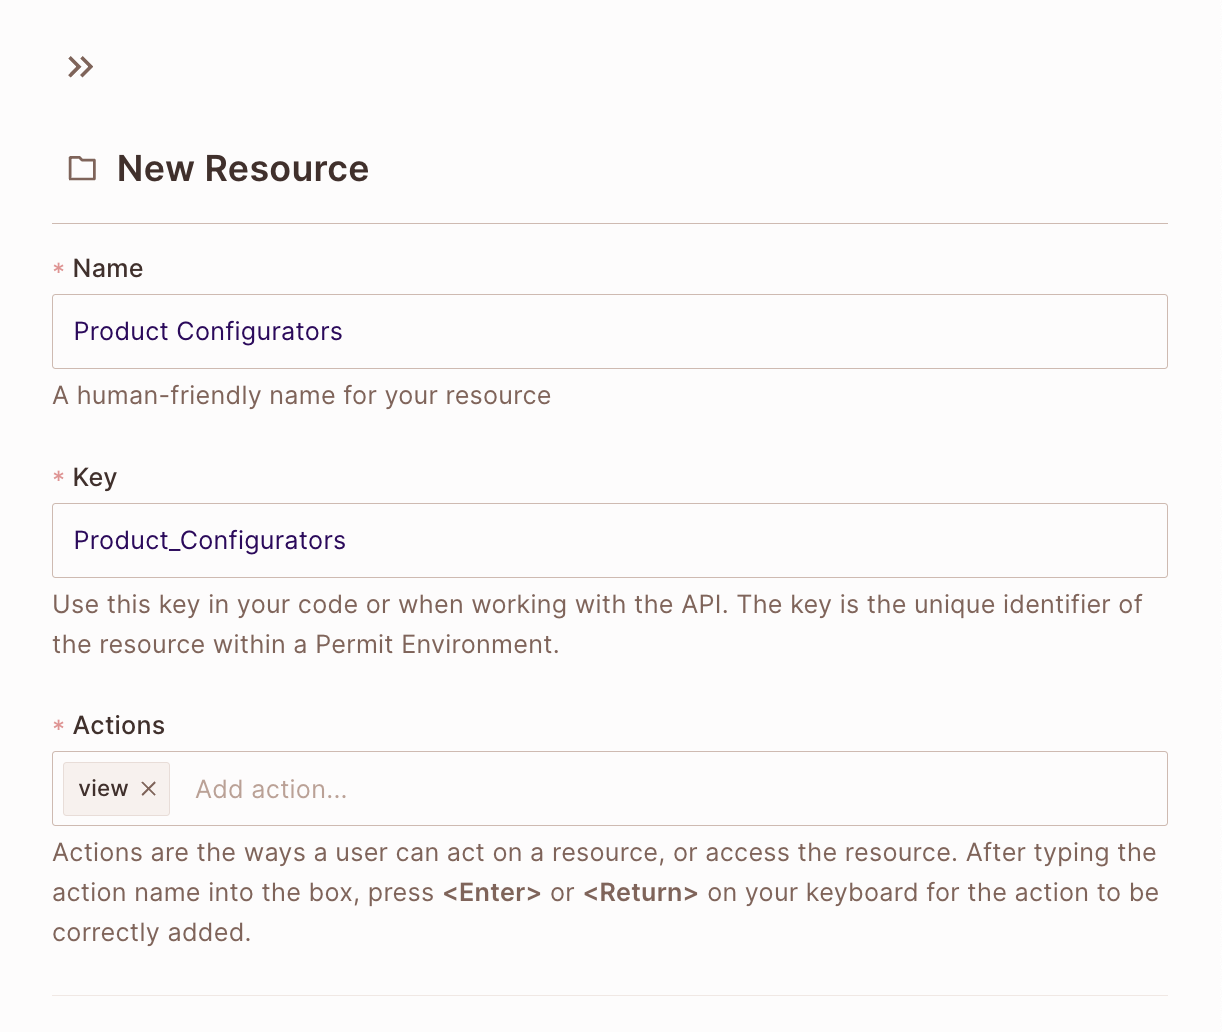
-
Create the other three resources the same way, so the environment has four:
Products,Product_Configurators,Project_Builder, andTopics_for_you. Each one has aviewaction.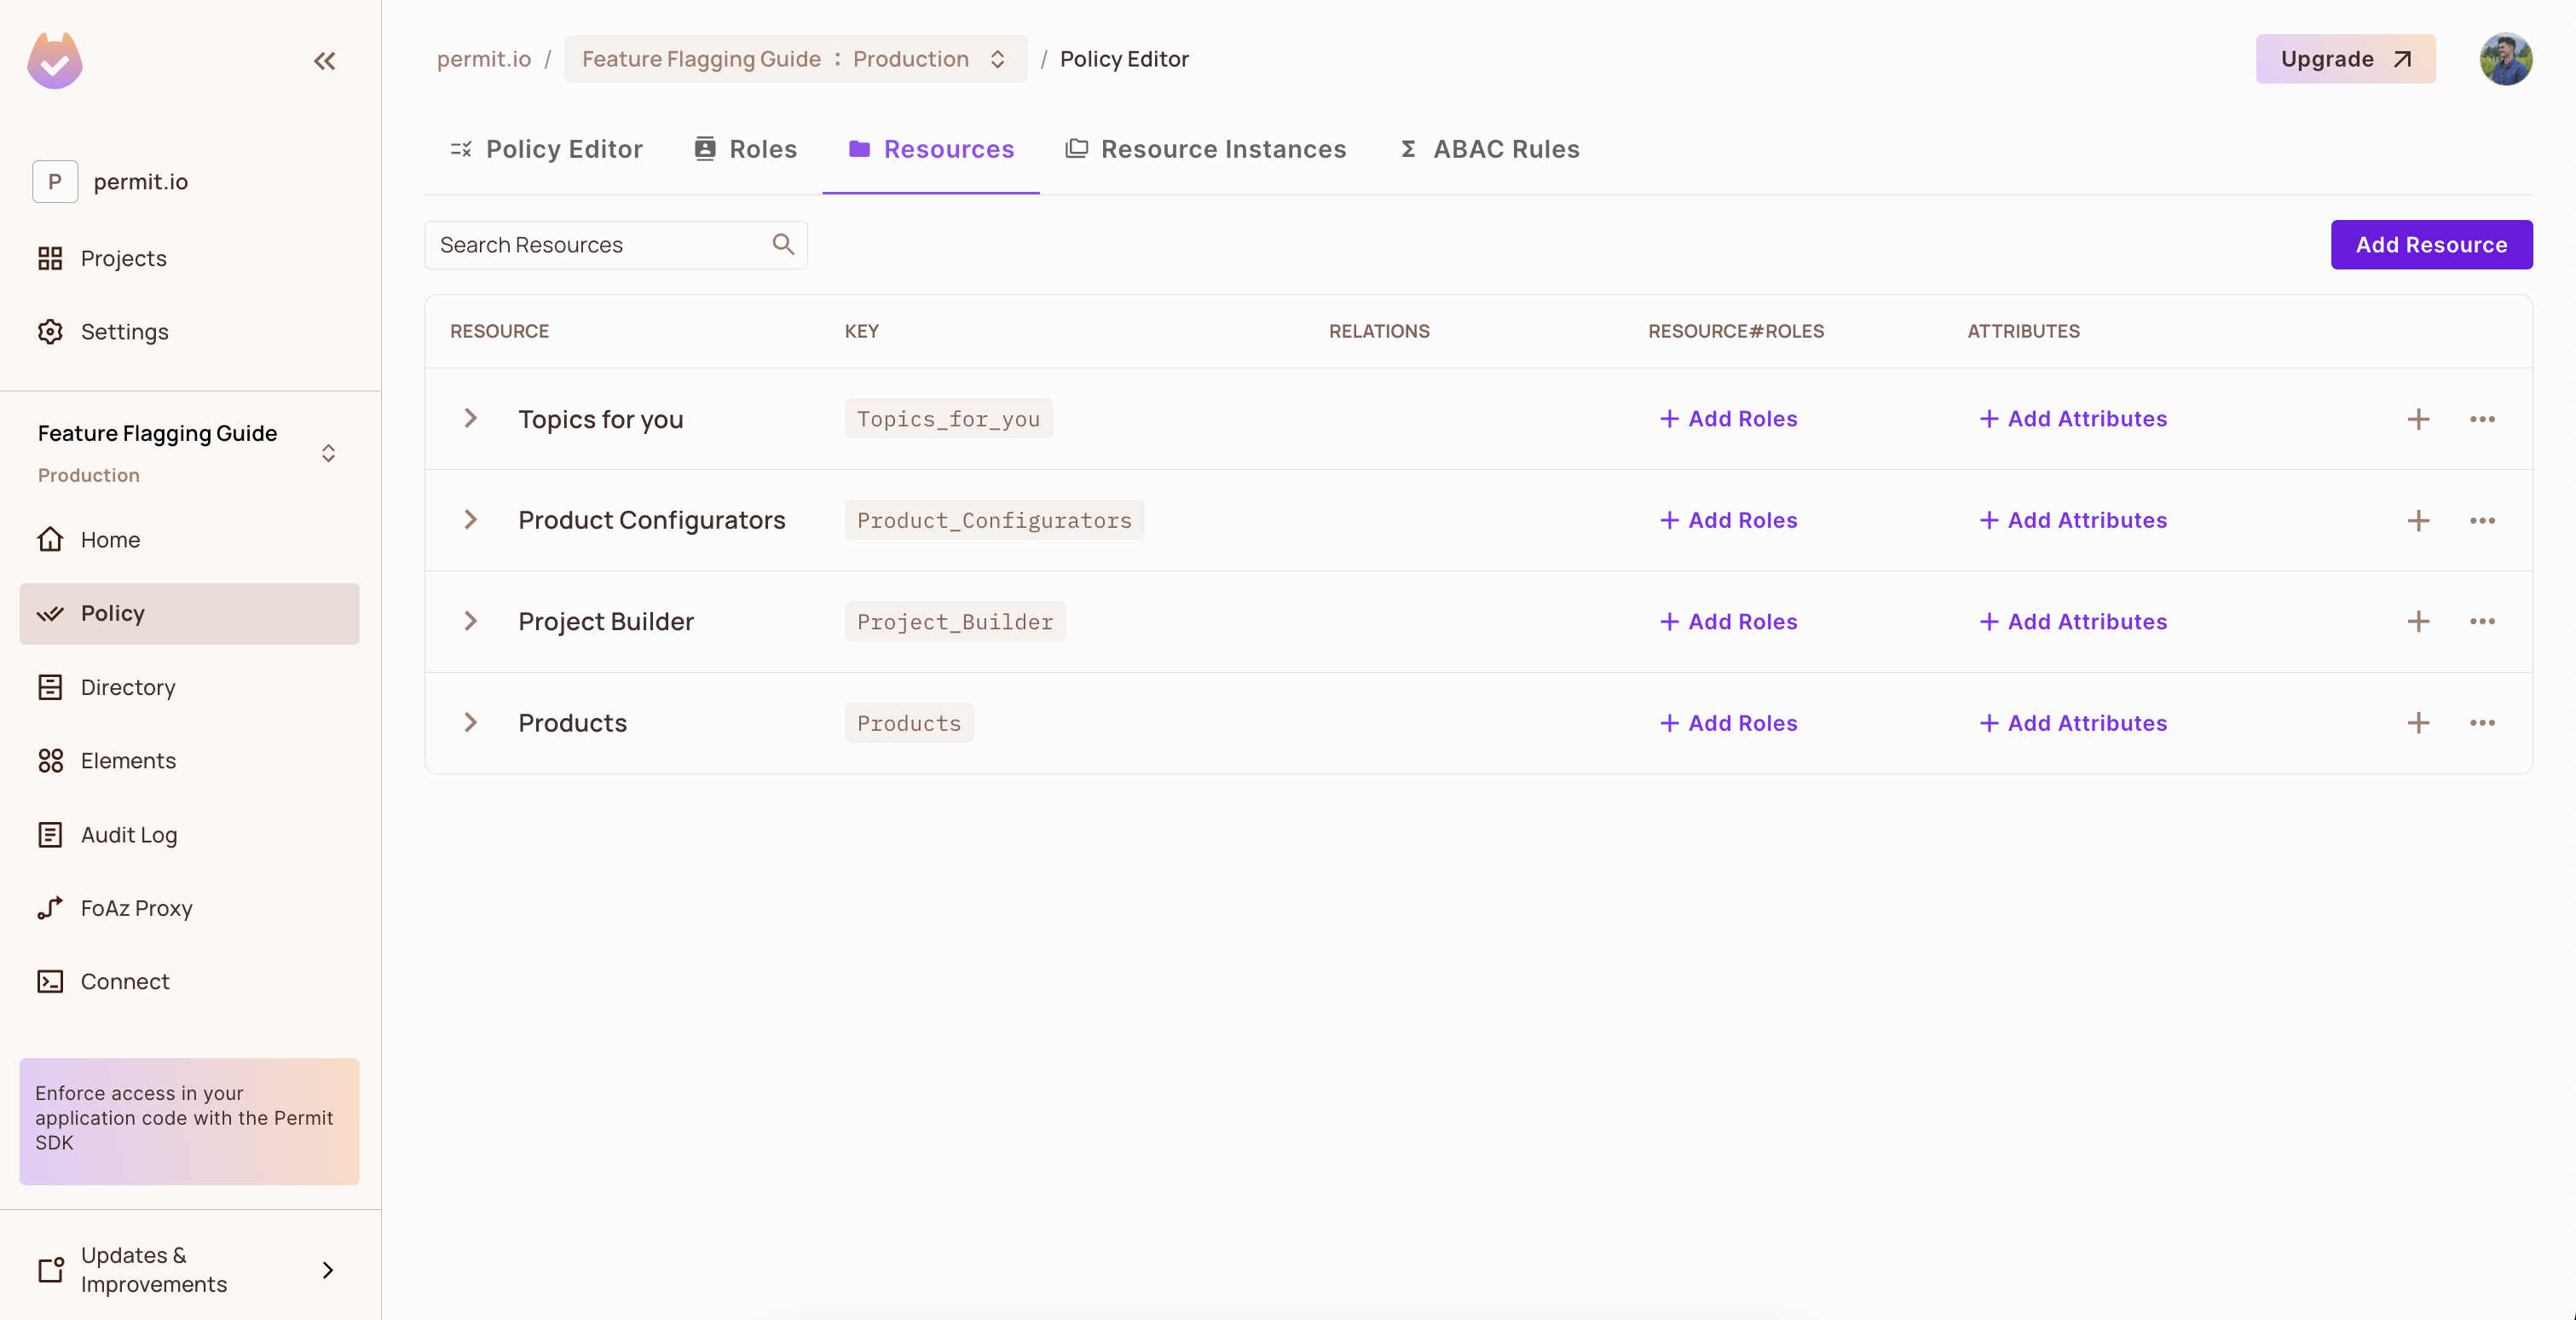
Verify: the Resources tab lists the four resources, and each row shows a view action.
2. Create the Viewer role and its policy
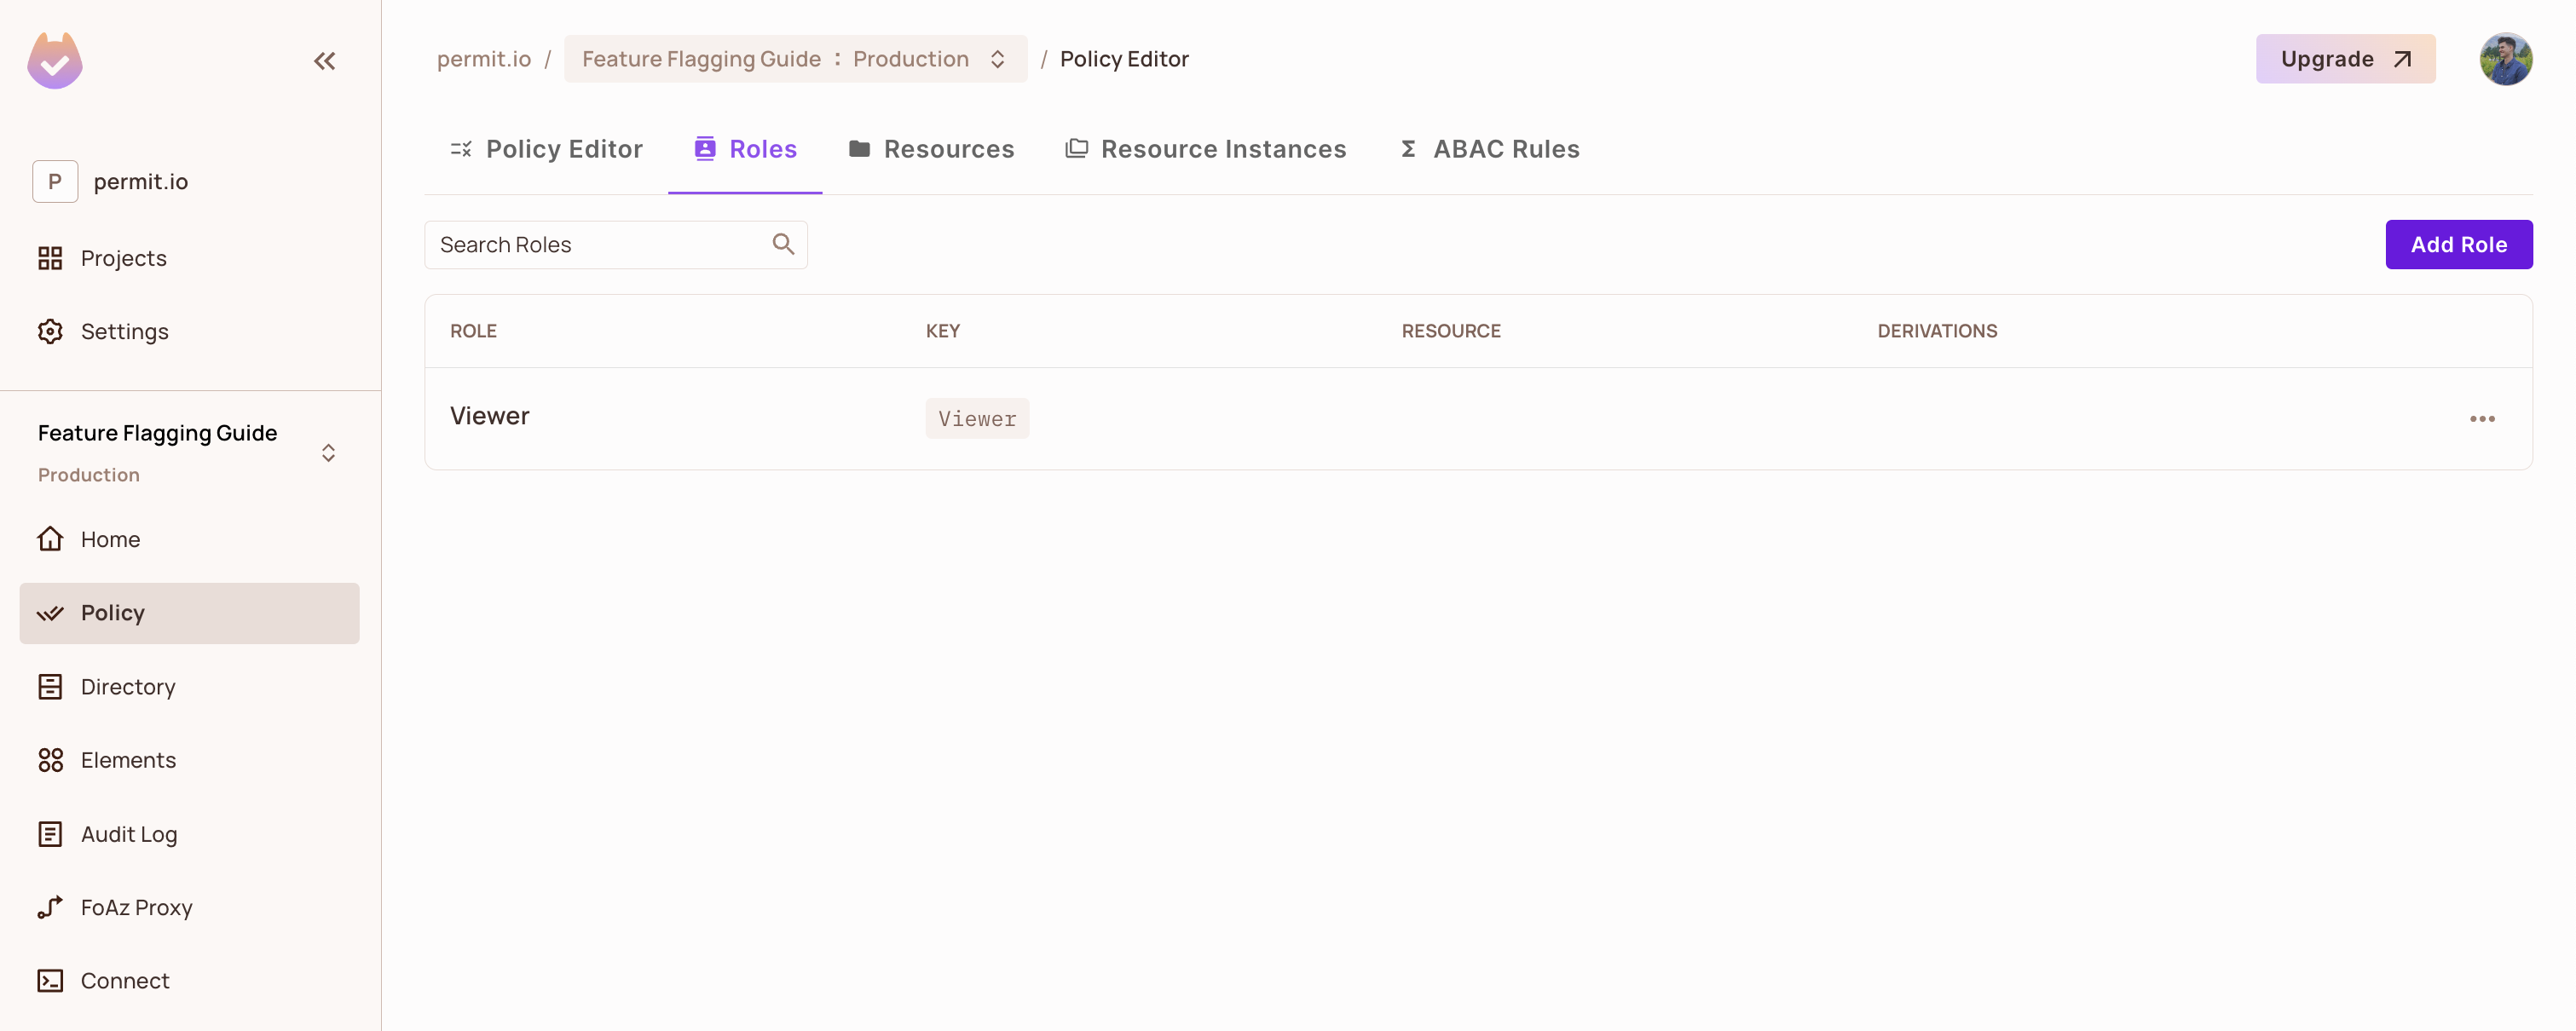
Create a Viewer role on the Roles tab. The policy for the Viewer role decides which tiles a viewer sees.
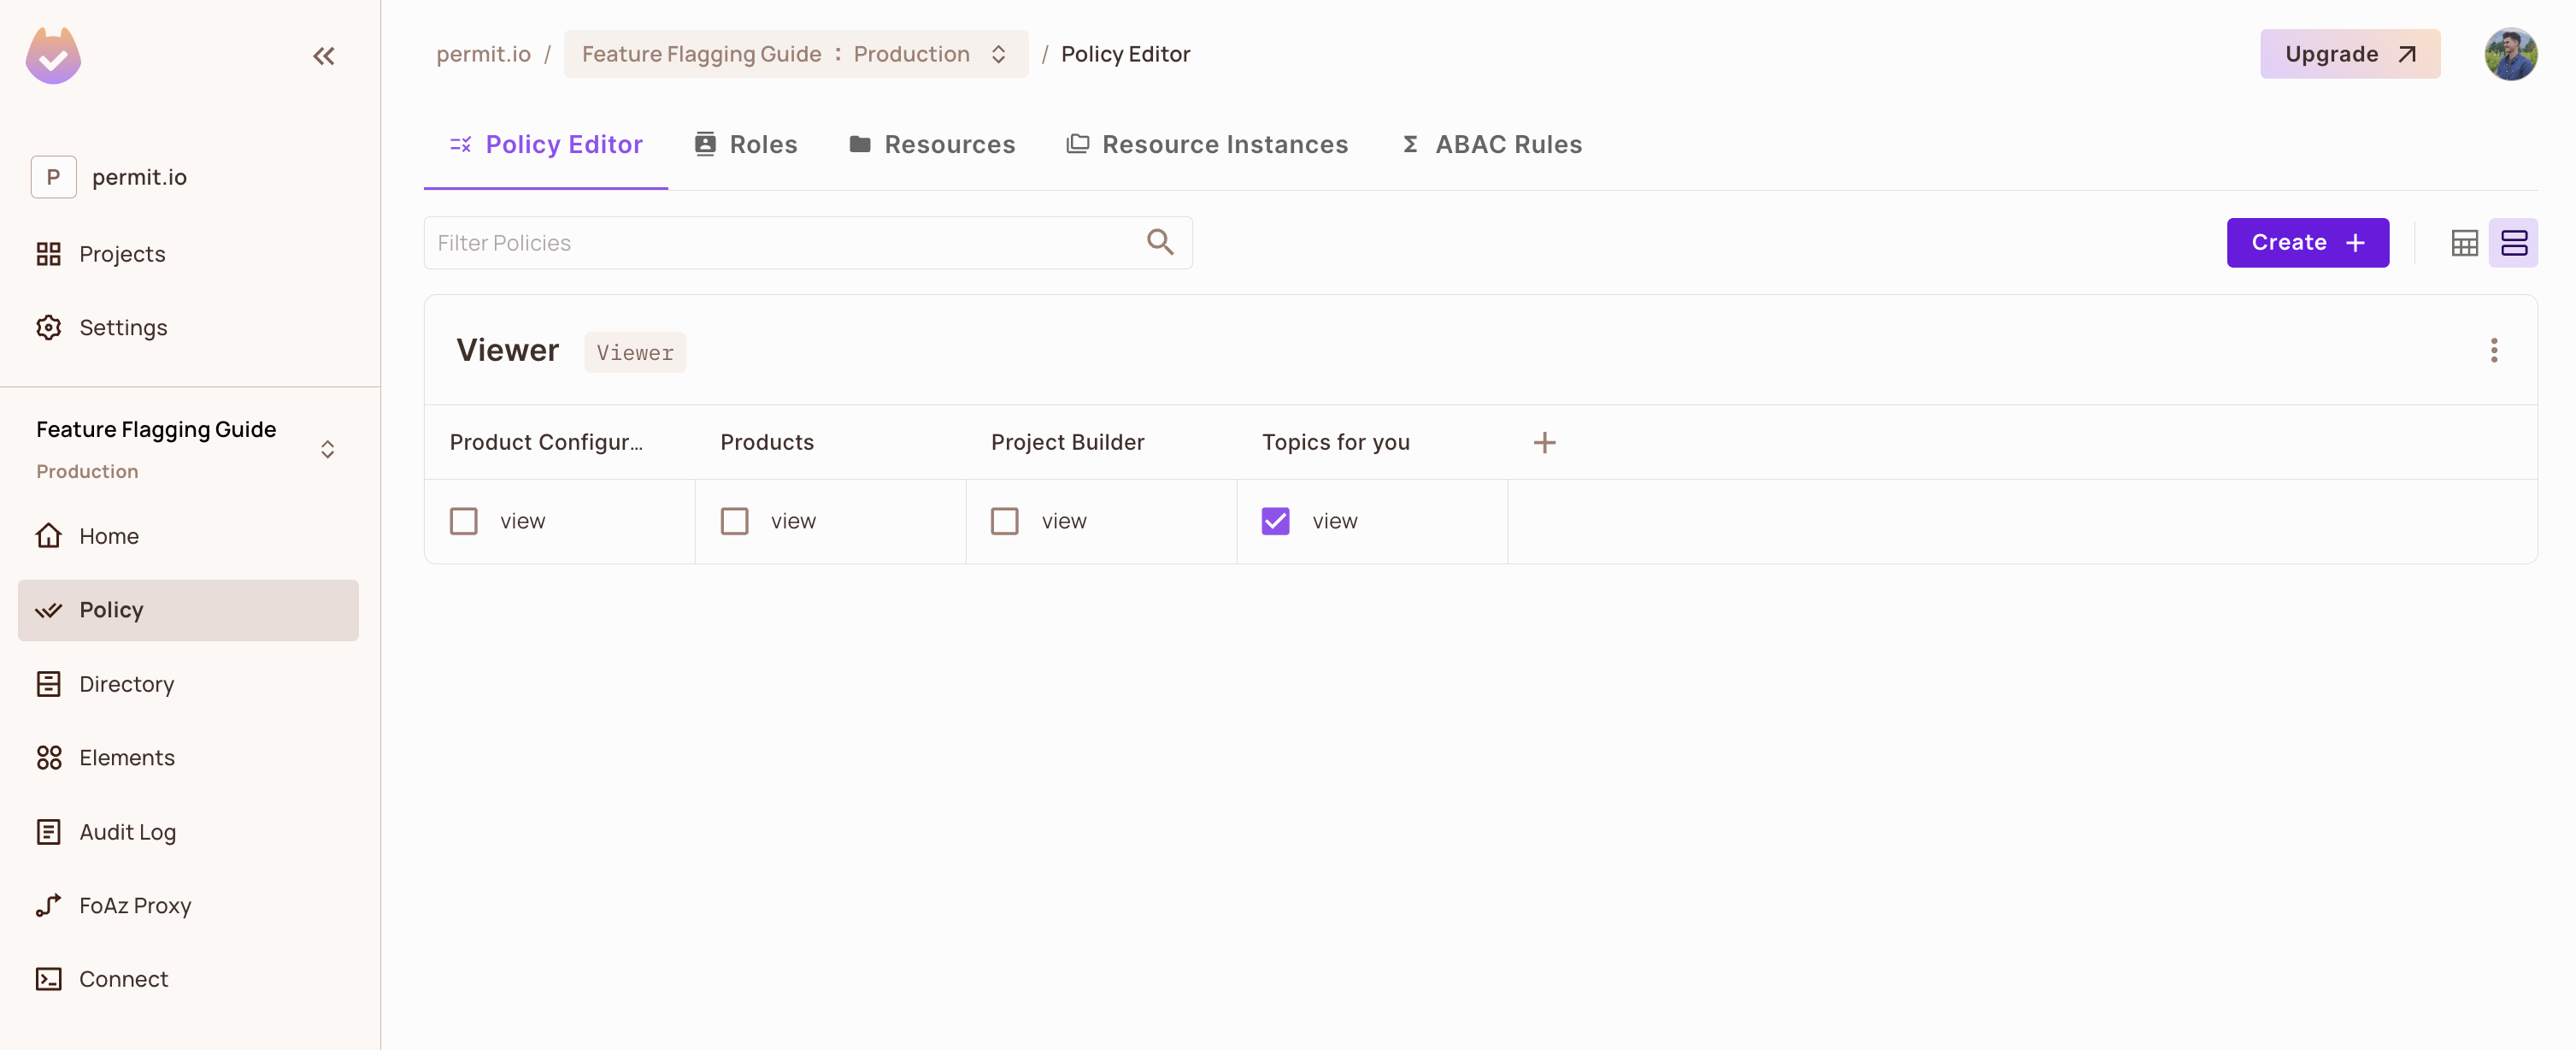
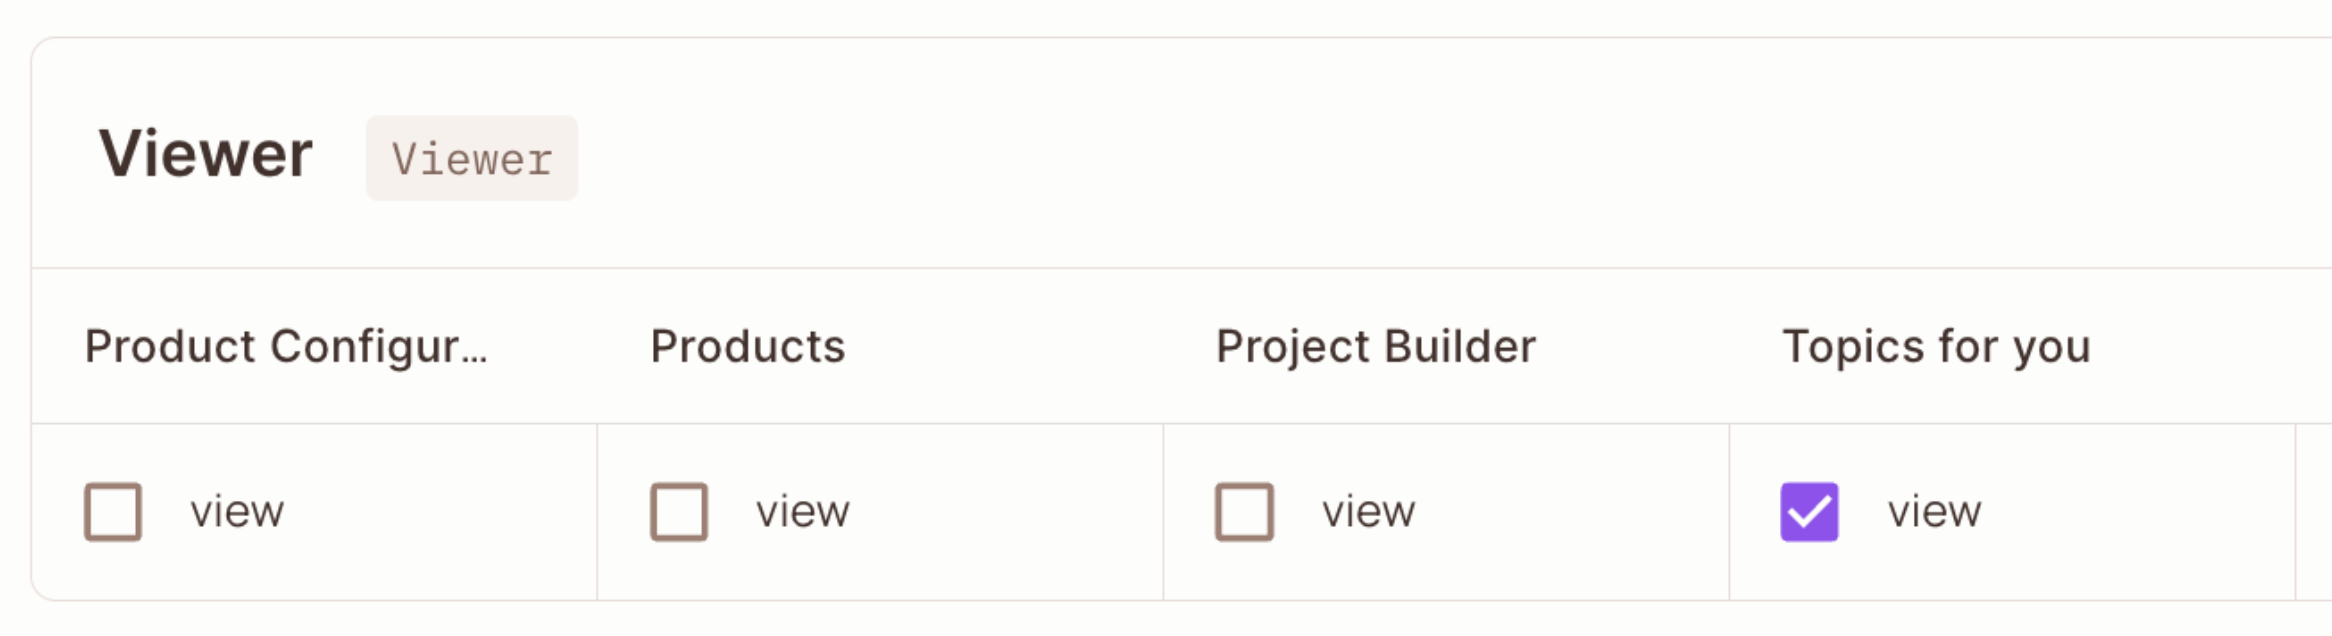
In the Policy Editor, check view for each resource the Viewer role may see. A user with the view permission on a resource sees the matching tile. In the following policy, viewers see only the Topics for you tile:
Check view on all four resources to show every tile:
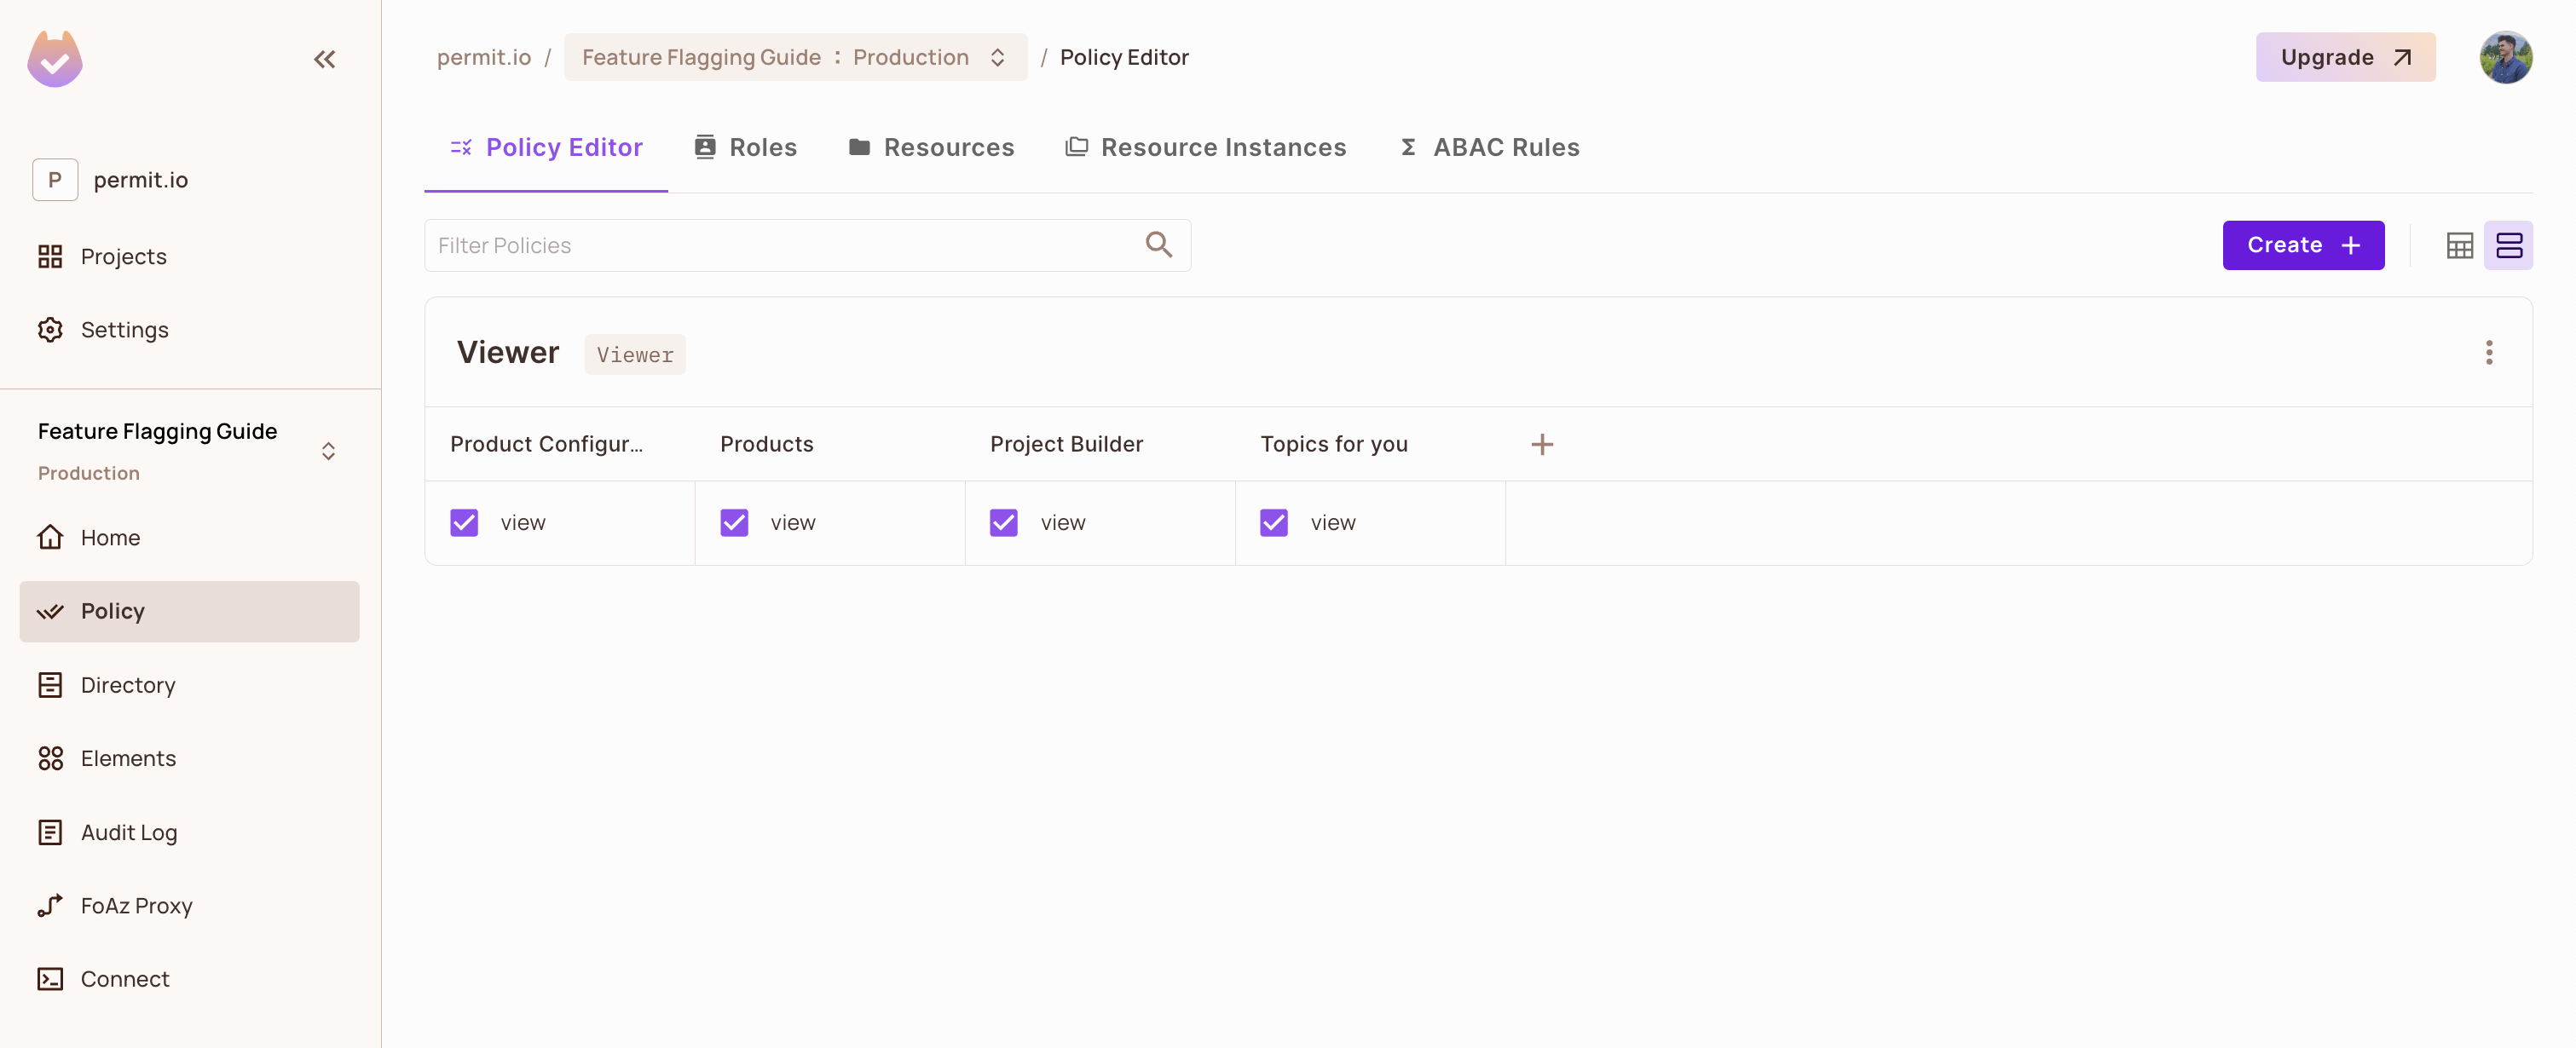
Verify: on the Policy Editor tab, the Viewer row shows a checked view box for each resource you granted, and an empty box for the rest.
3. Create the permission check route
permit-fe-sdk doesn't call Permit directly, because that would put your environment API key in the browser. The frontend sends its checks to a route in your backend, and the route calls the PDP. When the frontend loads permissions in bulk, permit-fe-sdk sends a POST request to the route with the user ID in the user query parameter and a resourcesAndActions array in the body. The route must respond with a permittedList array holding one boolean per item, in the same order as the request.
The following route handles that request. Save it at pages/api/permit-check.js, which Next.js serves at /api/permit-check. Any path works as long as you pass the same path as backendUrl in the AbilityLoader in step 4.
import { Permit } from "permitio";

const permit = new Permit({
  token: process.env.PERMIT_API_KEY,
  pdp: process.env.PERMIT_PDP_URL,
});

export default async function handler(req, res) {
  try {
    const { resourcesAndActions } = req.body;
    const { user: userId } = req.query;

    if (!userId) {
      return res.status(400).json({ error: "No userId provided." });
    }

    const checkPermissions = async ({ resource, action, userAttributes, resourceAttributes }) =>
      permit.check(
        { key: userId, attributes: userAttributes },
        action,
        { type: resource, attributes: resourceAttributes, tenant: "default" }
      );

    const permittedList = await Promise.all(resourcesAndActions.map(checkPermissions));

    console.log("permittedList:", permittedList);

    return res.status(200).json({ permittedList });
  } catch (error) {
    console.error(error);
    return res.status(500).json({ error: "Internal Server Error" });
  }
}
Set the two environment variables the route reads:
| Variable | Value |
|---|---|
PERMIT_API_KEY | Your environment API key. See Get your API key. |
PERMIT_PDP_URL | The address of your PDP, for example http://localhost:7766. See Run the PDP. |
Anyone with your environment API key can change that environment's policy through the Permit API. Load the key from an environment variable that your frontend bundle never reads, and don't commit it. A key in a NEXT_PUBLIC_ variable ships to every browser that loads the dashboard.
Verify: with the PDP running, send a request to the route for a user who has the Viewer role. permittedList holds one boolean per item, in the request order.
curl -s -X POST "http://localhost:3000/api/permit-check?user=john@permit.io" \
  -H "Content-Type: application/json" \
  -d '{"resourcesAndActions":[{"action":"view","resource":"Products"},{"action":"view","resource":"Topics_for_you"}]}'
With view granted on Topics_for_you and not on Products, the route responds:
{ "permittedList": [false, true] }
4. Load the user's permissions with the AbilityLoader
The AbilityLoader component runs after the user signs in. It reads the user ID from Clerk, initializes permit-fe-sdk with the route from step 3 as backendUrl, and calls loadLocalStateBulk() once with every action and resource the dashboard checks. permit-fe-sdk stores the results, so later checks don't call the backend. The component also converts the results into CASL rules and shares them through a React context. For the full CASL setup, see Integrate CASL with Permit.
The loggedInUser value must match the user key synced to Permit, or every check returns false. Any authentication provider works if it gives your app that key.
import React, { createContext, useEffect, useState } from "react";
import { useUser } from "@clerk/nextjs";
import { Ability } from "@casl/ability";
import { Permit, permitState } from "permit-fe-sdk";

const TILE_RESOURCES = ["Products", "Product_Configurators", "Project_Builder", "Topics_for_you"];

export const AbilityContext = createContext();

export const AbilityLoader = ({ children }) => {
  const { isSignedIn, user } = useUser();
  const [ability, setAbility] = useState(undefined);

  useEffect(() => {
    const getAbility = async (loggedInUser) => {
      const permit = Permit({
        loggedInUser: loggedInUser,
        backendUrl: "/api/permit-check",
      });

      const userAttributes = {
        country: user.publicMetadata.country,
        channel: user.publicMetadata.channel,
      };

      await permit.loadLocalStateBulk(
        TILE_RESOURCES.map((resource) => ({ action: "view", resource, userAttributes }))
      );

      const caslConfig = permitState.getCaslJson();

      return caslConfig && caslConfig.length ? new Ability(caslConfig) : undefined;
    };

    if (isSignedIn) {
      getAbility(user.id).then((caslAbility) => {
        setAbility(caslAbility);
      });
    }
  }, [isSignedIn, user]);

  return <AbilityContext.Provider value={ability}>{children}</AbilityContext.Provider>;
};
TILE_RESOURCES holds the four resource keys from step 1, so one loadLocalStateBulk() call covers every tile. The userAttributes on each item are the signed-in user's country and channel from Clerk. permit-fe-sdk sends them to the permission check route, which passes them to permit.check() as the user's attributes. An RBAC policy ignores them. An attribute condition uses them, as described in Make a tile depend on a user attribute.
Wrap the dashboard in AbilityLoader so the permissions load before the tiles render.
Verify: sign in and open the browser devtools network tab. One POST request to /api/permit-check?user=<user key> appears, with four items in resourcesAndActions and a permittedList of four booleans in the response.
5. Render tiles based on the stored permissions
In the file that renders the dashboard, import permitState:
import { permitState } from "permit-fe-sdk";
Call permitState.check() for each tile. permitState.check() reads the result stored by loadLocalStateBulk() and doesn't call the backend. When no stored result matches, permitState.check() returns false by default, and the tile stays hidden.
<div className="flex h-full">
  <div className="flex flex-col flex-grow">
    {permitState?.check("view", "Products") && <div className="bg-white m-4 p-4 h-[250px]">Products</div>}

    {permitState?.check("view", "Product_Configurators") && <div className="bg-white m-4 p-4 h-[200px]">Product Configurators</div>}

    {permitState?.check("view", "Project_Builder") && <div className="bg-white m-4 p-4 h-[200px]">Project Builder</div>}

    {permitState?.check("view", "Topics_for_you") && <div className="bg-white m-4 p-4 h-[100px]">Topics for you</div>}
  </div>
</div>
permitState.check() finds a stored result only when the action, the resource, and the resource attributes match an item that loadLocalStateBulk() loaded. The third argument of permitState.check() is resource attributes, not user attributes, so don't pass user attributes there.
6. Verify the dashboard
Sign in as a user with the Viewer role and reload the dashboard twice, once per policy.
-
In the Policy Editor, check
viewfor theViewerrole on all four resources. Reload the dashboard.The route logs
permittedList: [ true, true, true, true ], and all four tiles render. -
Clear
viewonProducts,Product_Configurators, andProject_Builder, leaving it checked onTopics_for_you. Reload the dashboard.The route logs
permittedList: [ false, false, false, true ], and only the Topics for you tile renders.
The booleans follow the order of TILE_RESOURCES in the AbilityLoader, so index 0 is Products and index 3 is Topics_for_you. A tile that stays hidden while its boolean is true means the render check and the loaded item don't match. See Render tiles based on the stored permissions.
UI example with all permissions enabled
The Permit policy for all tiles
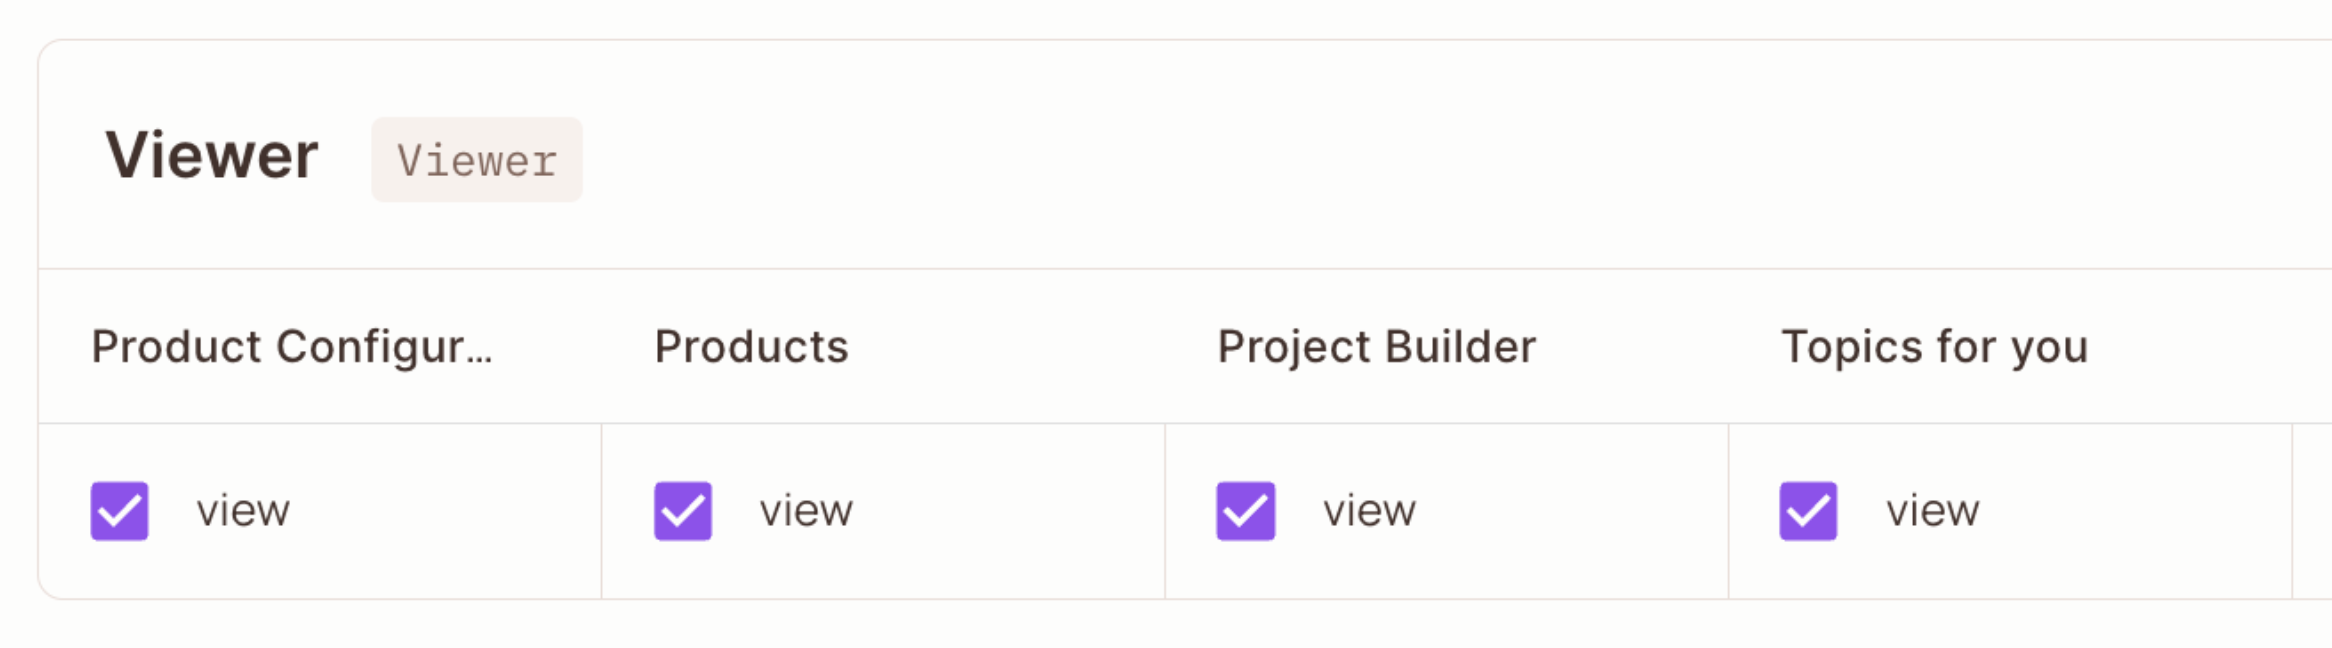
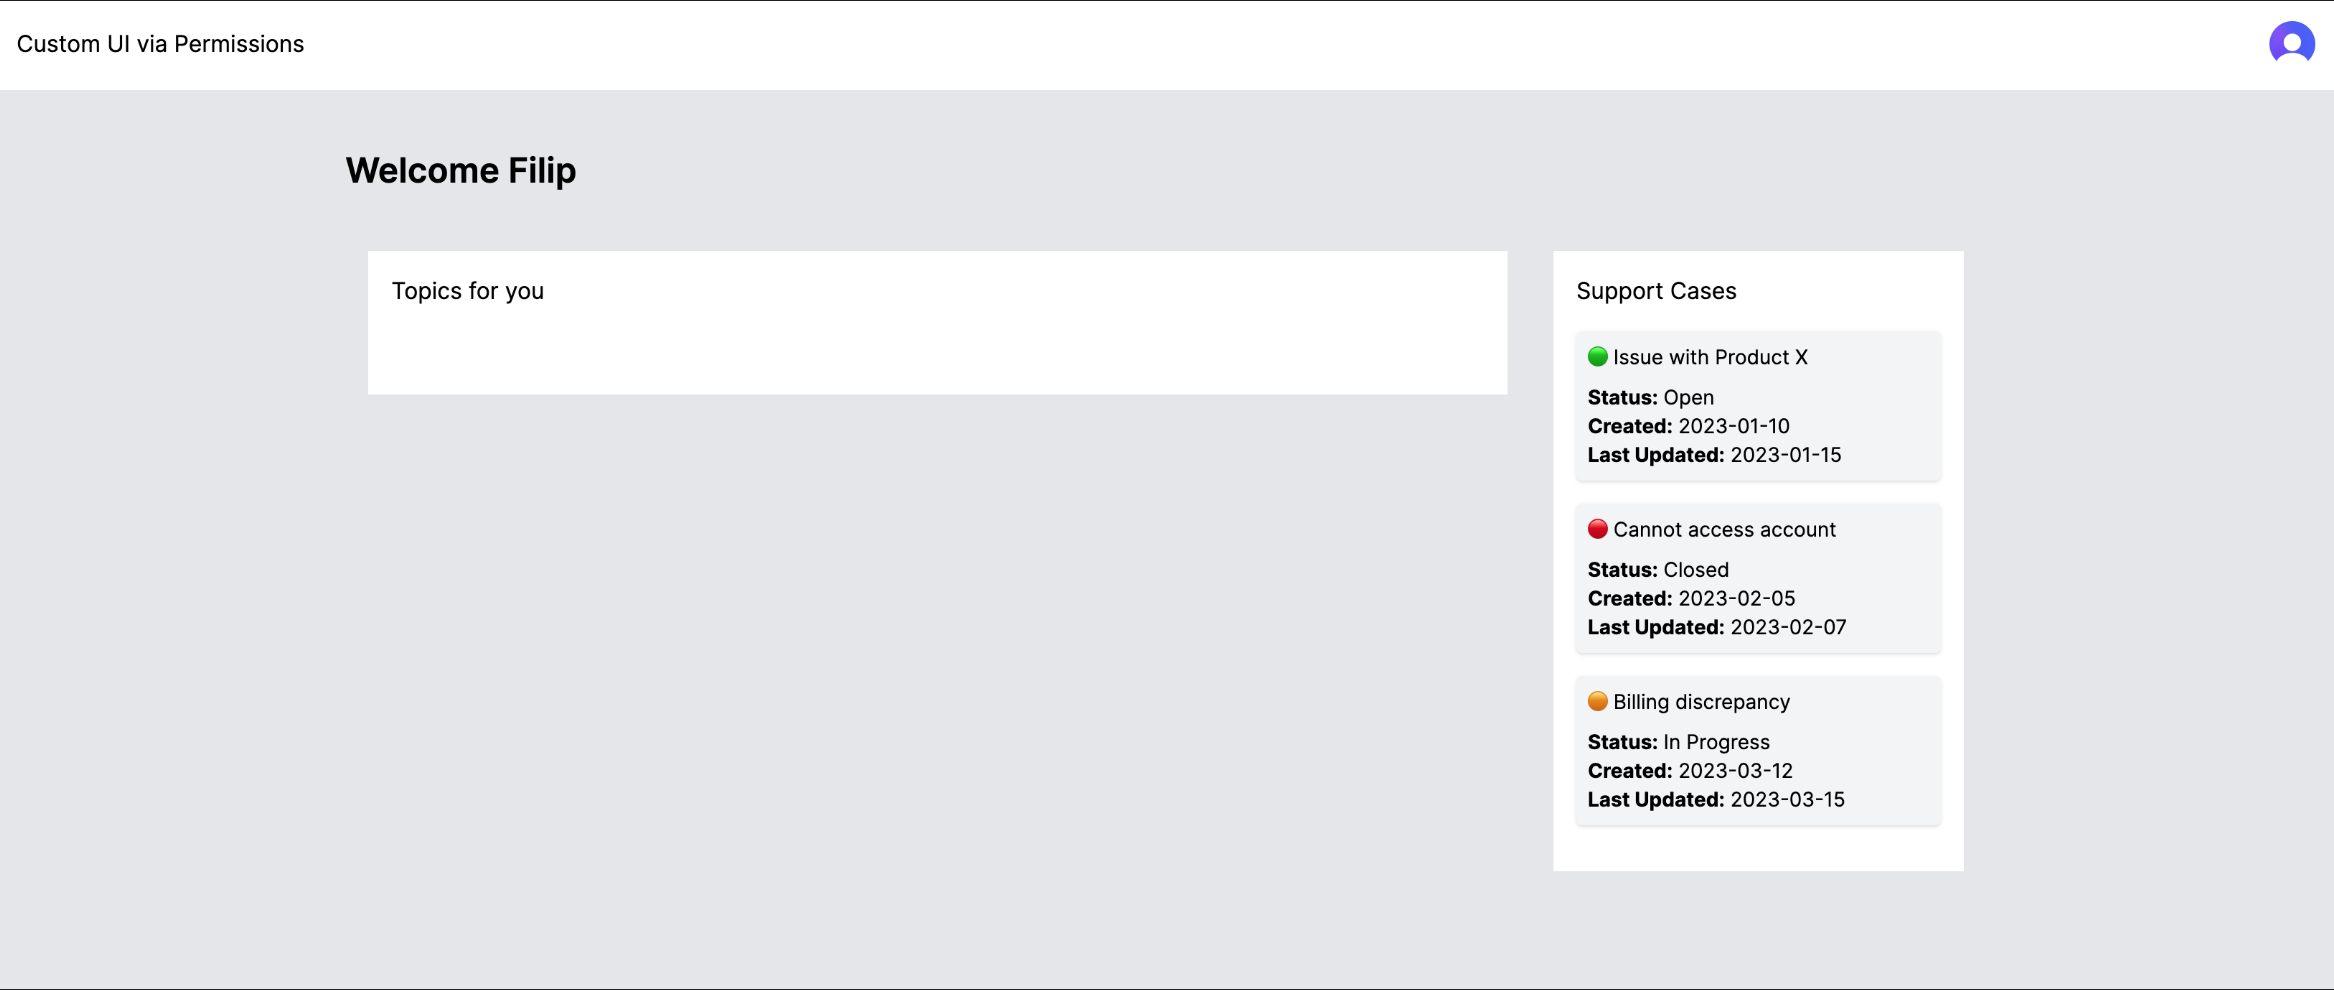
The dashboard with all tiles
UI example with some permissions enabled
The Permit policy for one tile
The dashboard with one tile
Make a tile depend on a user attribute
The Viewer role shows the same tiles to every viewer. To show a tile to some viewers only, move the rule to attribute-based access control (ABAC), which decides from the user's attributes instead of the role alone. The country and channel values that the AbilityLoader already sends are the attributes to condition on.
-
Store the attributes on each user in your authentication provider. In Clerk, the example keeps
countryandchannelin the user's public metadata.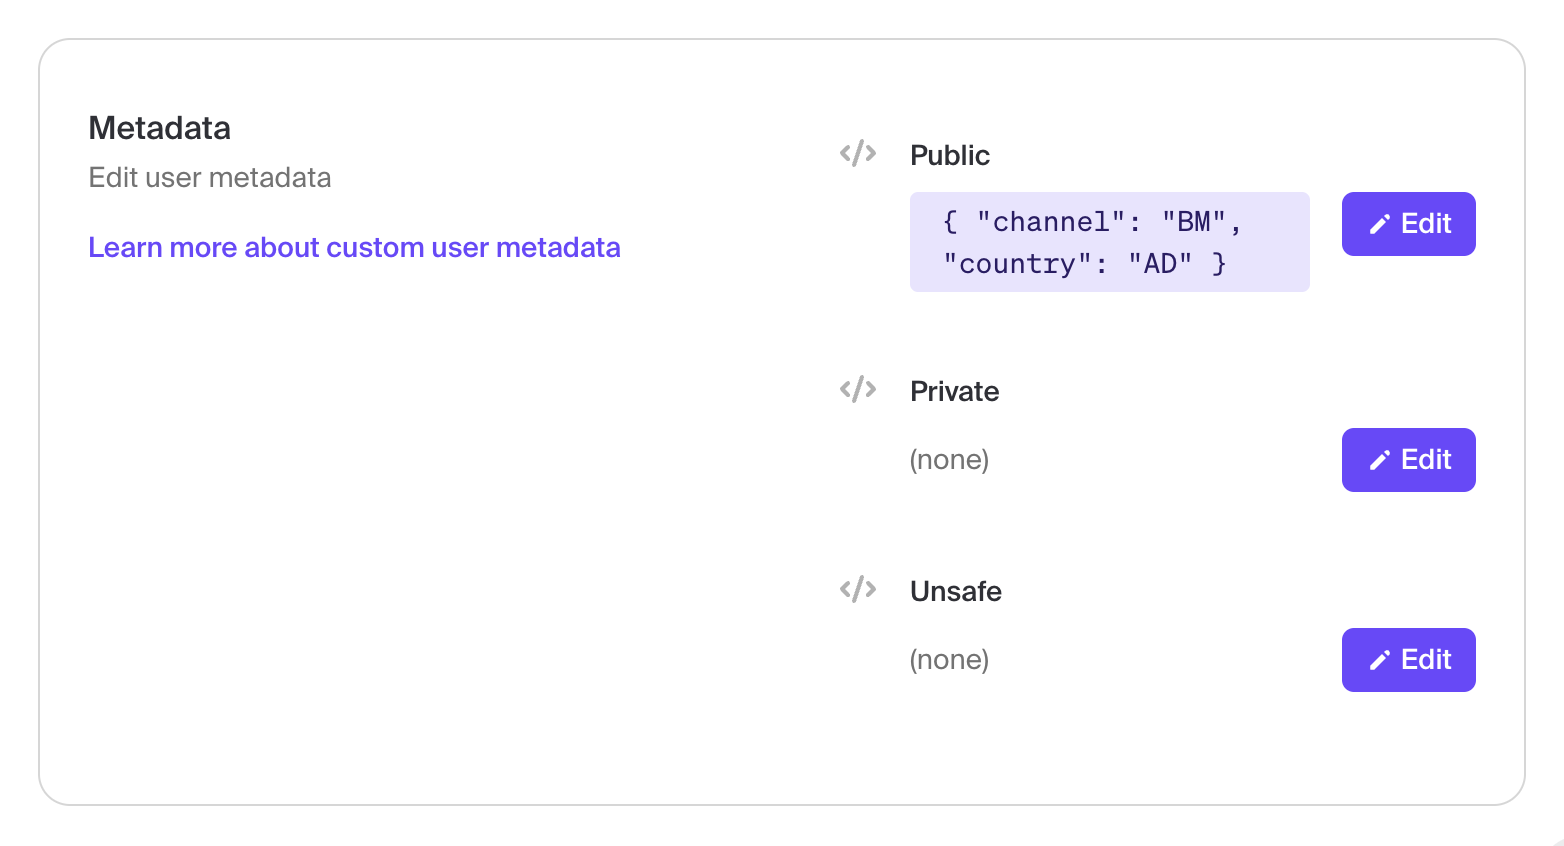
-
In Permit, declare
countryandchannelas user attributes of type String on the User Attributes screen. Permit needs the declaration to offer the attributes as conditions. -
On the ABAC Rules tab, create a user set with the condition you want, for example
countryequalsGermany. -
In the Policy Editor, check
viewfor that user set on the tile resource, and clearviewfor theViewerrole on the same resource.
The steps for creating a user set and granting permissions to it are in Building Your First ABAC Policy.
Declaring country and channel as user attributes does not require you to store their values in Permit. The AbilityLoader reads them from Clerk and sends them with each check, and the permission check route passes them to permit.check() as the user's attributes. The PDP evaluates the policy with the values from the request. See Pass just-in-time (JIT) attributes.
An attribute condition returns false on the Cloud PDP. Point PERMIT_PDP_URL at a container PDP before you add a user set. See Cloud PDP capabilities.
Next steps
- Integrate CASL with Permit for the full
permit-fe-sdkand CASL setup. - Building Your First ABAC Policy to create the user sets and resource sets that attribute conditions need.
- Check permissions with permit.check() for the backend check options, including just-in-time (JIT) attributes.
- Sync users to create the users and role assignments the checks rely on.