Food Delivery System Example
Run a Nuxt.js food delivery app and configure its authorization in Permit.io, one policy model at a time. This worked example is for developers who build with Nuxt or Vue and want to see role-based access control (RBAC), attribute-based access control (ABAC), and relationship-based access control (ReBAC) enforced together on the same action.
By the end, customers, vendors, riders, and admins in the app can each perform only the order and meal actions that the policy allows them.
Prerequisites
- A Permit.io project and its environment API key. Use an existing project or create one at app.permit.io. See Get your API key.
- Docker, to run the policy decision point (PDP) container that answers permission checks. See Install Docker.
- Node.js, to run the Nuxt app. See Node.js downloads.
What you build
The app code is in the permit-nuxt-example repository, on the all-features branch. The app has four pages, one per role:
- A customer page for browsing meals and placing orders
- A vendor page for managing meals and fulfilling orders
- A rider page for delivering orders
- An admin page for assigning riders and managing the system
Tech stack
| Layer | What the app uses |
|---|---|
| Frontend | Nuxt.js with Vue, one page per role (customer, rider, vendor, admin) |
| Backend | Nuxt server routes with authorization middleware that calls permit.check() |
| Authorization | RBAC for role permissions, ABAC for the free delivery offer, ReBAC for order assignments, and cities as tenants |
| Data sync | Server routes that sync users, orders, and role assignments to Permit when they change |
How the app uses each policy model
| Model | What it controls in the app |
|---|---|
| RBAC | Which roles can create, delete, and act on meals and orders |
| ABAC | Free delivery: orders that cost 500 or more, and riders with 500 or more rides |
| ReBAC | Order assignments: the vendor who owns the order and the rider assigned to it |
Order management
Each role acts on orders at a different stage:
- Customers create orders.
- Vendors fulfill orders (mark them ready for delivery).
- Admins assign riders to orders.
- Riders deliver orders.
Composite permissions
Policies from all three models apply to the same action. For the deliver action:
- The
riderrole grantsdeliveron theOrderresource type (RBAC). - The
Order#Riderresource role links a rider to one order (ReBAC). - A user set of riders with 500 or more rides grants
deliveron the resource set of free delivery orders (ABAC).
The deliver endpoint runs two checks: server/middleware/permissions/check-role.ts checks deliver on the Order resource type, and server/middleware/permissions/check-rider-eligibility.ts checks deliver on the specific order instance. Permit evaluates each check against every rule that applies to the action.
Multi-tenant authorization
The app uses cities (california and washington) as tenants. A role assignment in one city doesn't grant the same permission in the other city.
Continuous data syncing
The server routes sync these changes to Permit when they happen:
- A customer creates an order.
- An admin assigns a rider.
- An order's status changes.
Server endpoints
The Nuxt server exposes these endpoints. The Authorization column lists the policy models that each endpoint's check depends on, and the Action column lists the action key the middleware derives from the method and path.
| Method | Endpoint | Action | Authorization |
|---|---|---|---|
| GET | /meals | read (not checked) | None |
| POST | /meals | create | RBAC |
| DELETE | /meal/:id | delete | RBAC |
| GET | /orders | read (not checked) | None |
| POST | /orders | create, create-with-free-delivery | RBAC & ABAC |
| POST | /order/:id/fulfill | fulfill | RBAC & ReBAC |
| POST | /order/:id/assign-rider | assign-rider | RBAC |
| POST | /order/:id/deliver | deliver | RBAC, ABAC, & ReBAC |
| POST | /users | None | None |
| DELETE | /users | None | None |
check-role.ts derives read for every GET request and then returns before calling permit.check(), with the comment "Allow the user to read meals and others even if they are not logged in". Reading meals and orders therefore succeeds for any caller, signed in or not. The read permission you grant in the Policy Editor documents the intent, and it feeds the frontend checks in permit-vue-example, but it changes nothing in this app.
/meals and /orders return every meal and every order in the tenant without a permission check. The example does this to keep the demo browsable before you build the policy. Remove the early return for read in check-role.ts before you reuse this middleware in an application with real data.
Set up and run the app
Clone the app, connect it to your Permit environment, start a local PDP, and open the app in your browser.
Clone the repository and install dependencies
git clone https://github.com/permitio/permit-nuxt-example.git
cd permit-nuxt-example
git checkout all-features
npm install
Set the environment variables
- Copy your environment API key from the API keys settings in Permit.
- Create a
.envfile at the root of the project with the following content. Replace thePERMIT_TOKENplaceholder with your API key.
PERMIT_TOKEN=permit_key_XXXXXXXXXXXXXXXXXXXXXXXXX
PERMIT_PDP=http://localhost:7766
nuxt.config.ts maps PERMIT_TOKEN to runtimeConfig.permitToken and PERMIT_PDP to runtimeConfig.permitPdp, and server/utils/permit.ts builds the Permit client from both.
The sample.env file in the repository points PERMIT_PDP at https://cloudpdp.api.permit.io. The Cloud PDP does not evaluate ABAC, so the free delivery checks in Configure ABAC for free delivery return false against it. Set PERMIT_PDP=http://localhost:7766 and run the container PDP in the next step. See Cloud PDP capabilities.
Start a local PDP
Run the PDP container. Replace your-permit-api-key with your environment API key. The command maps the container's port 7000 to port 7766 on your machine, which matches PERMIT_PDP.
docker run -it \
  -p 7766:7000 \
  --env PDP_API_KEY=your-permit-api-key \
  --env PDP_DEBUG=True \
  permitio/pdp-v2:latest
For more PDP options, see Run the PDP.
Open the app
Open http://localhost:3000 in your browser. The app shows a page for each role's actions. Use the sidebar to set the current user ID, set roles, choose the current city, and delete users.
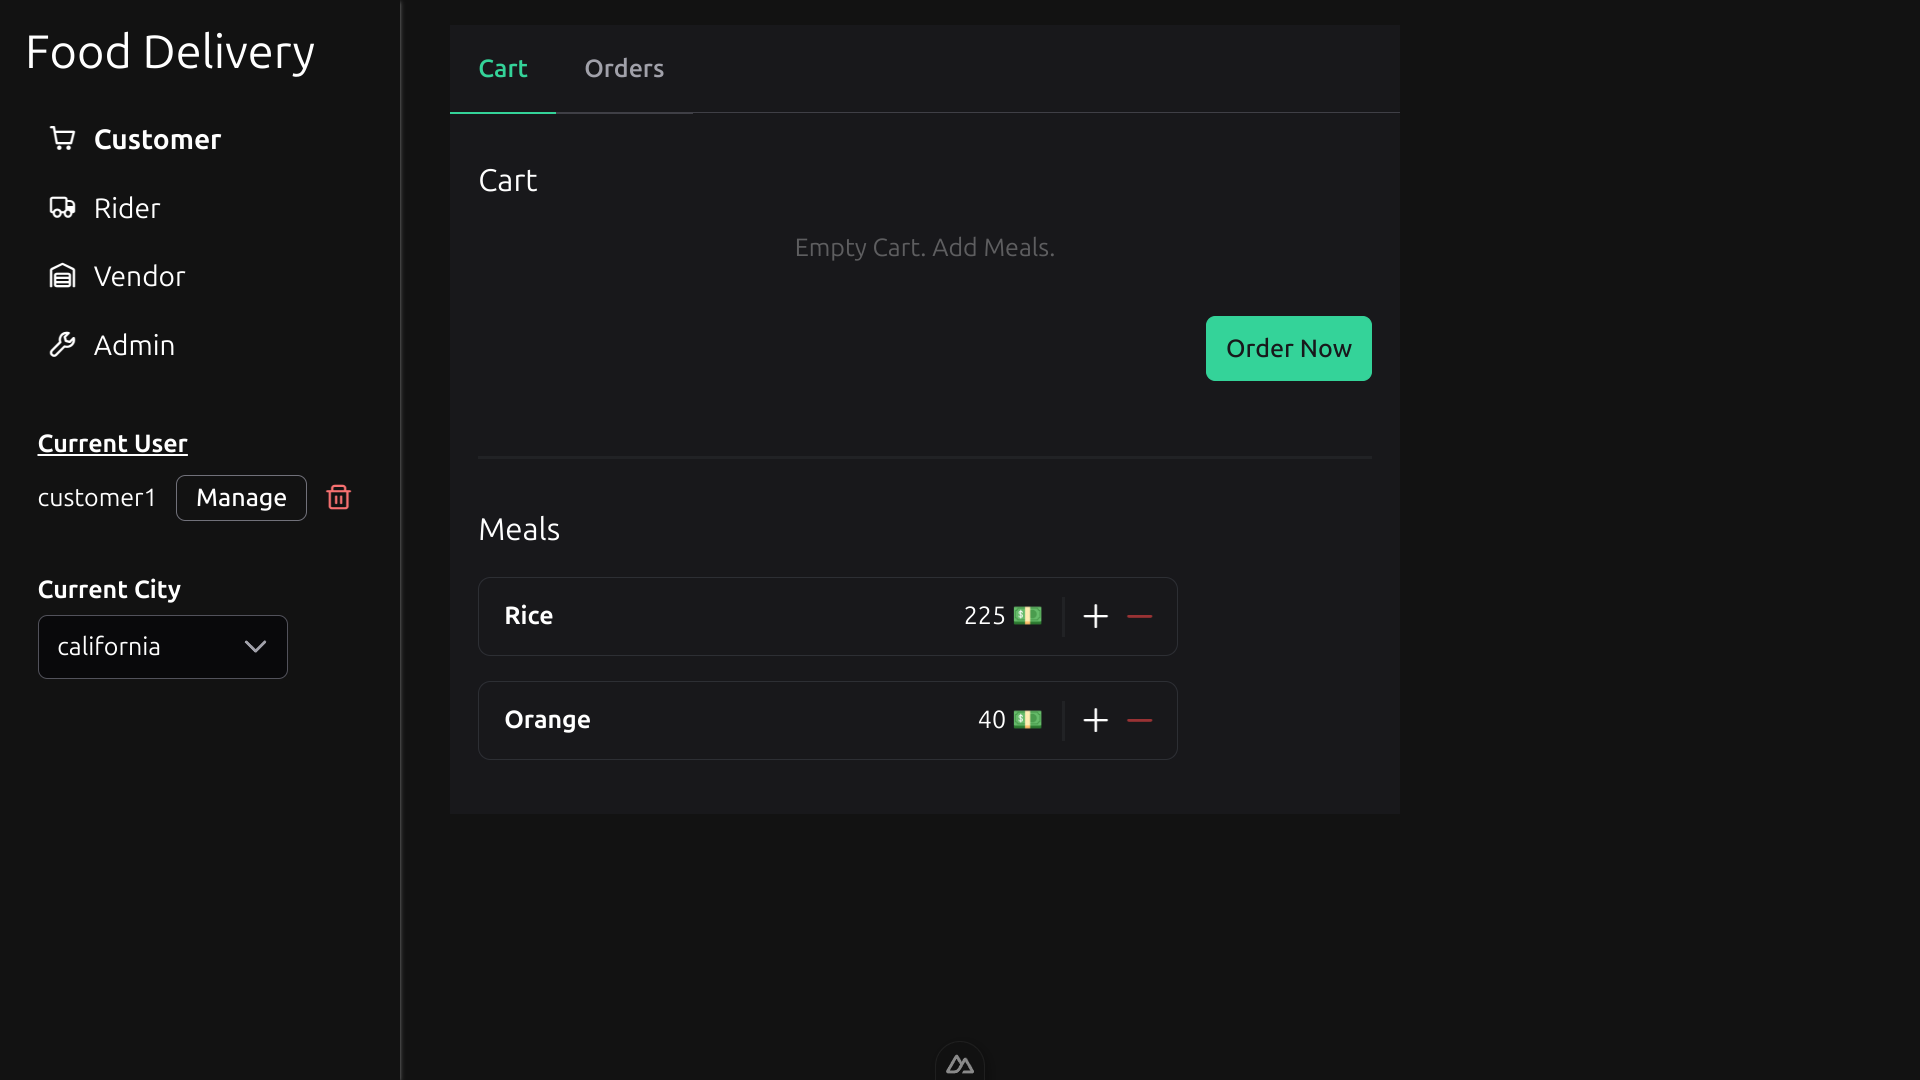
Verify: the meal and order lists render, and placing an order answers "You are not permitted to perform this action". The empty Permit environment has no Order resource yet, so permit.check() returns false.
The meal and order lists load because GET /meals and GET /orders return before the middleware calls permit.check(). Every other action stays denied until you build the policies in the next three sections.
Configure RBAC for meals and orders
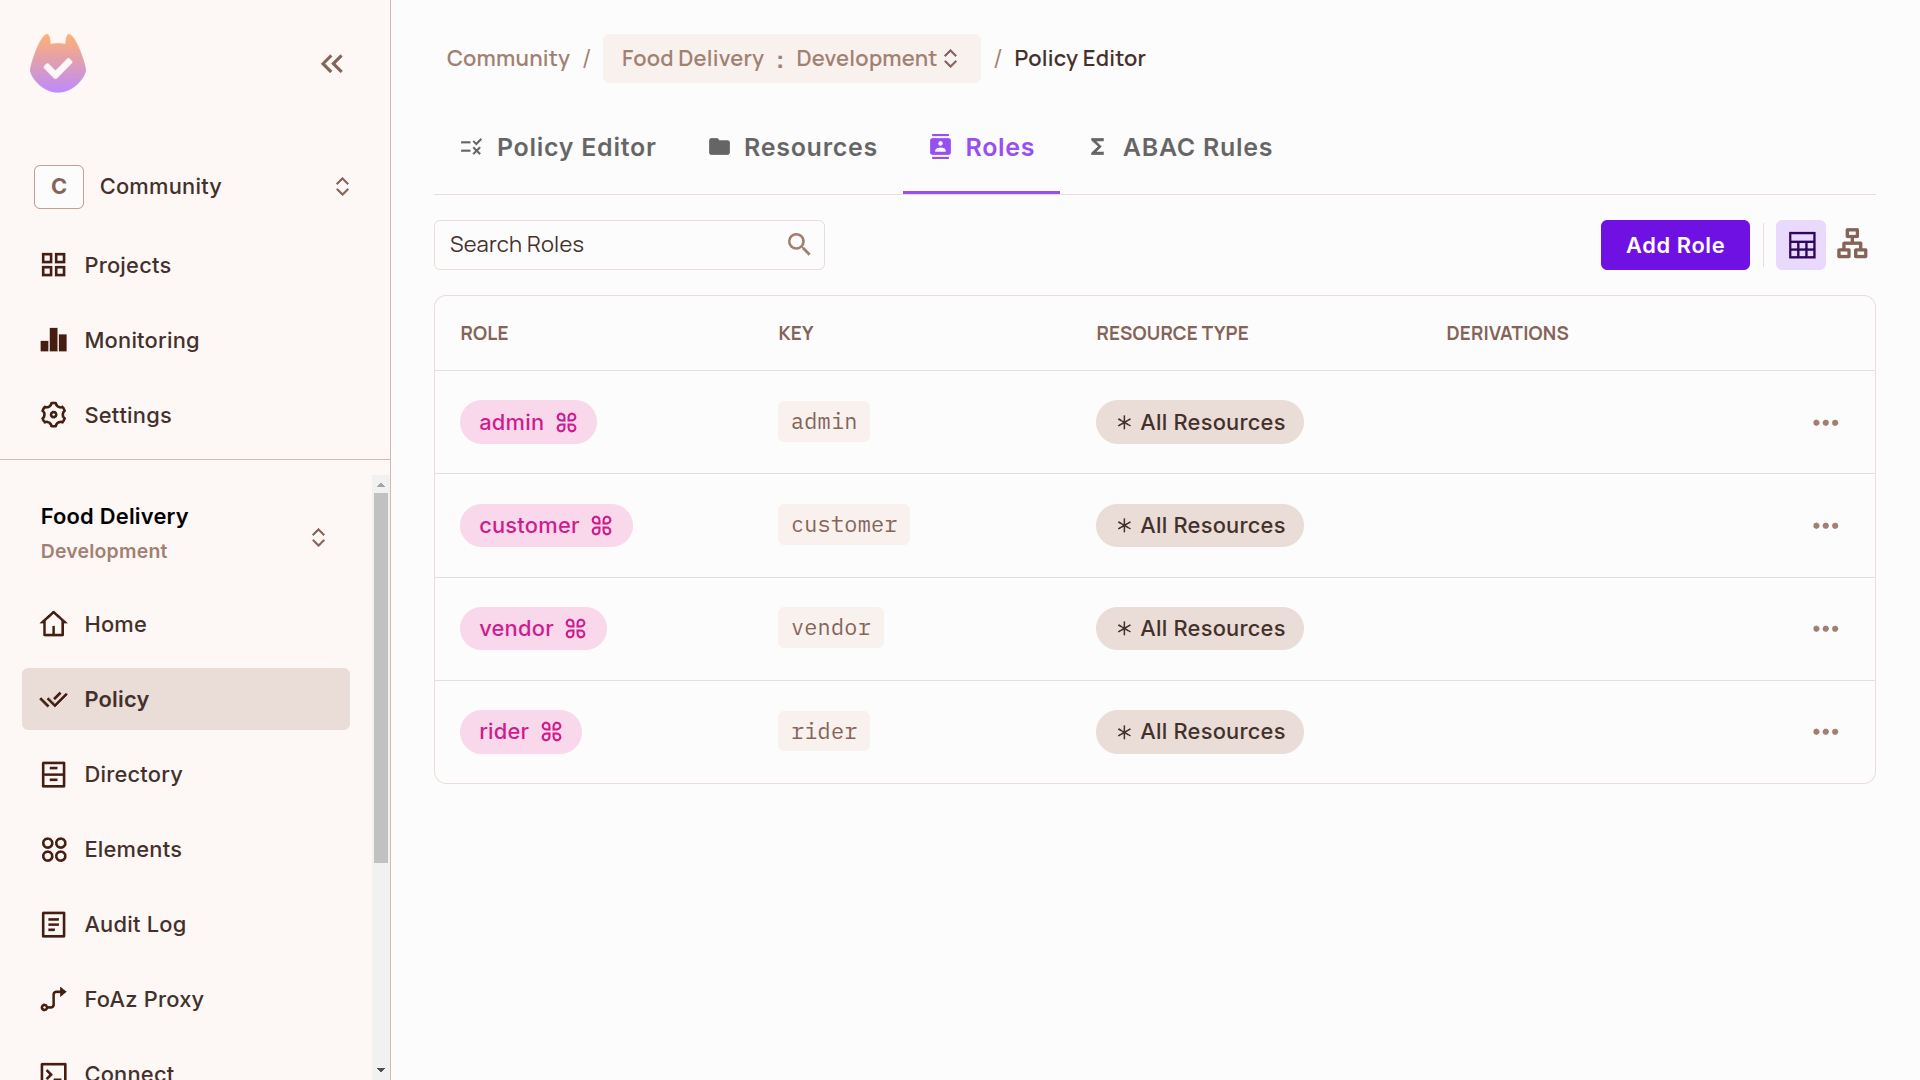
Role-based access control (RBAC) grants permissions by role. RBAC is the base layer of the app's policy:
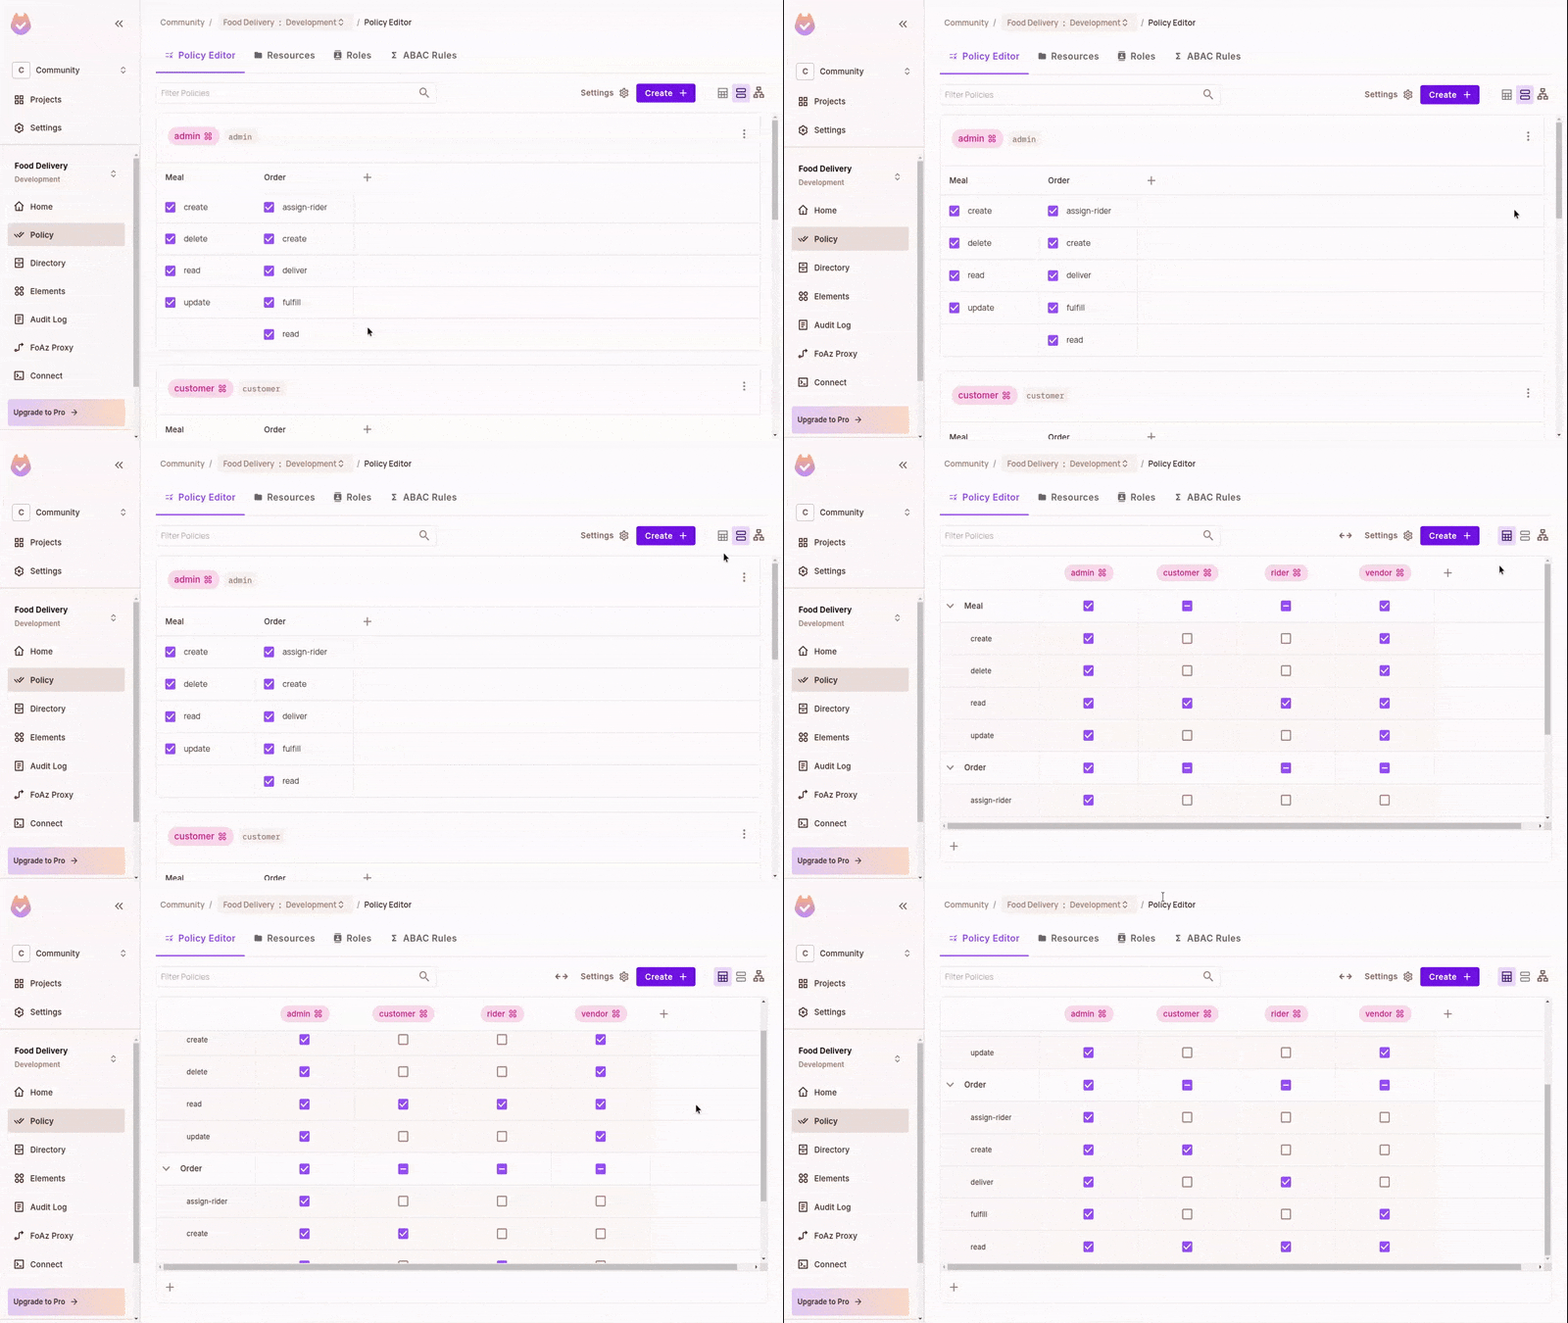
Meals:
- Only
vendorandadmincan create and delete meals. - All roles (
customer,rider,vendor, andadmin) getread, which the middleware does not check.
Orders:
- Only
customercan create orders. - Only
vendorcan fulfill orders (mark them ready for delivery). - Only
admincan assign riders to orders. - Only
ridercan deliver orders. admincan also create, fulfill, and deliver orders.- All roles get
read, which the middleware does not check.
To configure these RBAC policies:
Create the Meal and Order resources
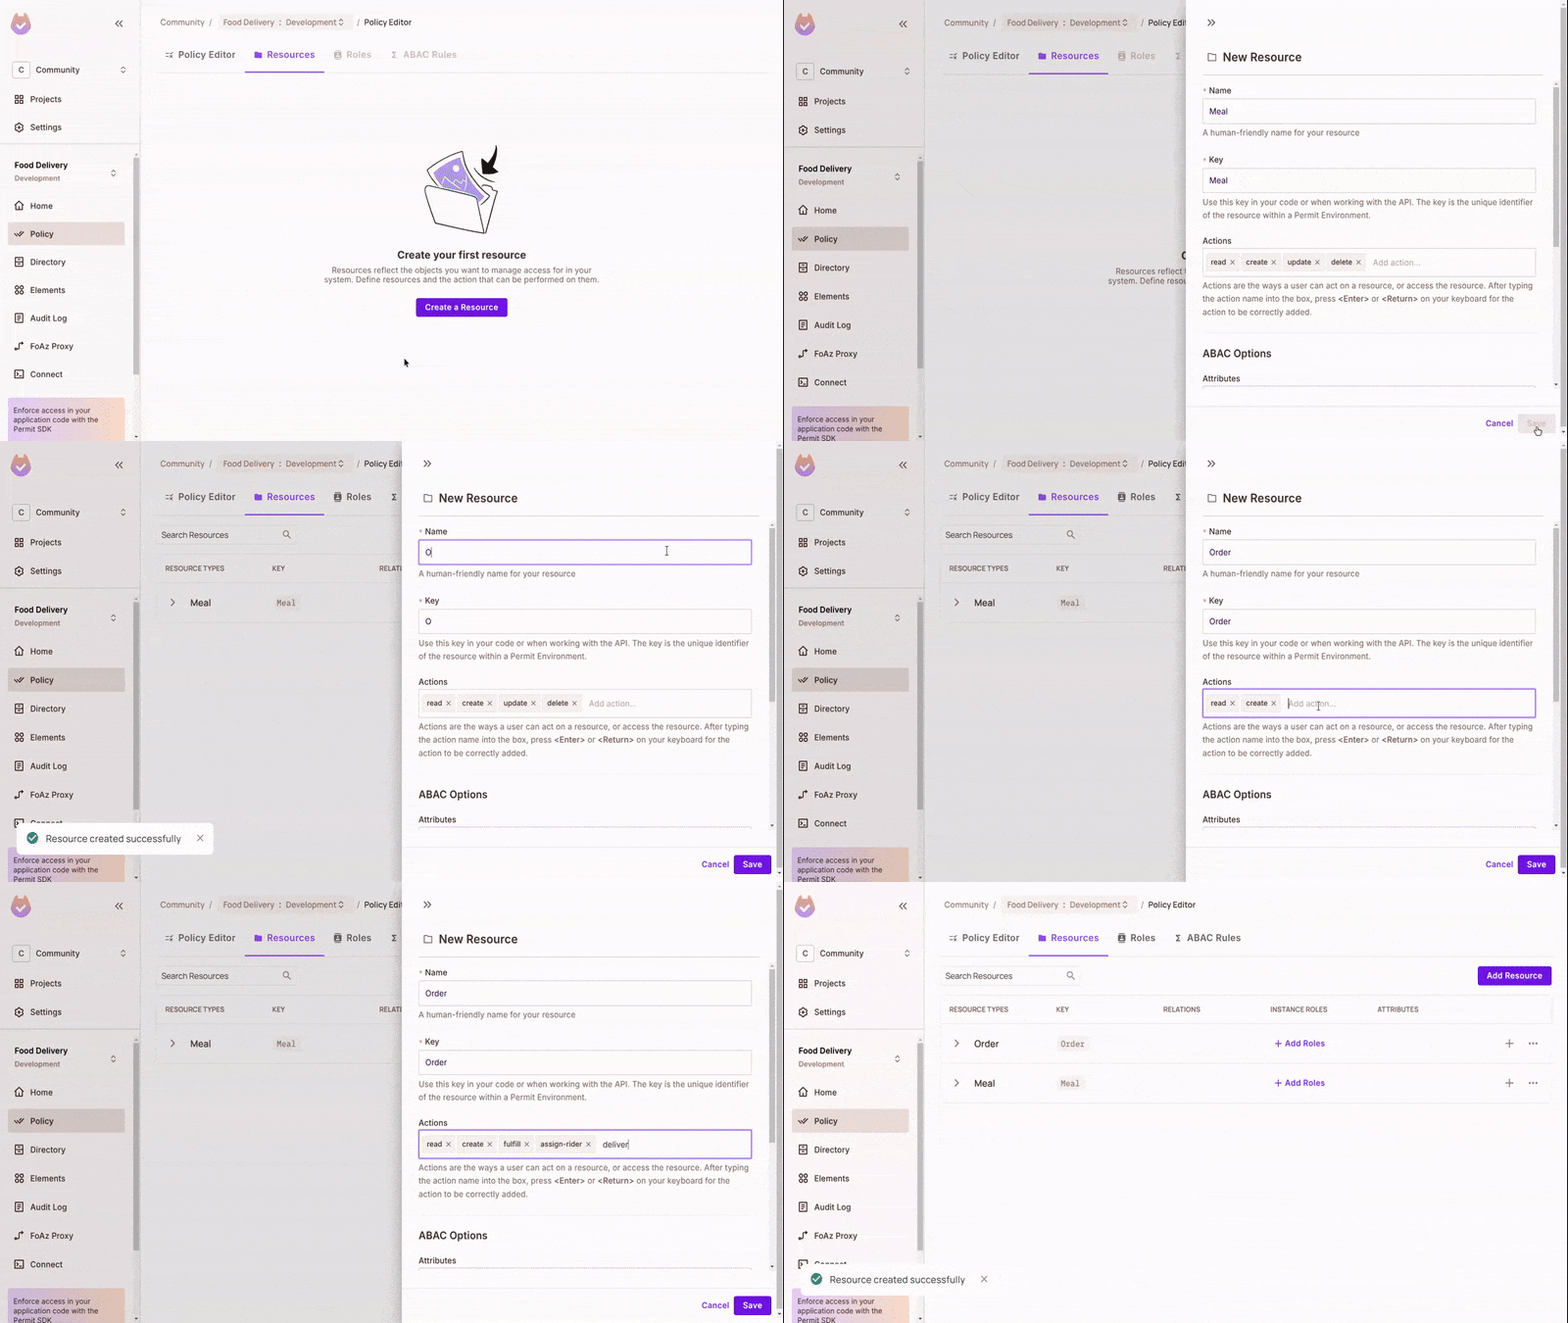
On the Policy screen, open the Resources tab. Create two resources, Meal and Order, with the action keys the app derives in its middleware and sends from its frontend. Type the keys exactly as listed, including the hyphens: permit.check() matches on the key, and a mismatch returns false.
| Resource | Action keys | Where the key comes from |
|---|---|---|
Meal | create, read, delete | server/middleware/permissions/check-role.ts maps POST to create, DELETE to delete, and everything else to read. |
Order | create, read, fulfill, assign-rider, deliver | check-role.ts maps POST /orders to create and takes any other POST /order/:id/<action> path segment as the action key. |
Add the create-with-free-delivery action on Order in Configure ABAC for free delivery.
Grant RBAC permissions in the Policy Editor
In the Policy Editor, check the actions each role may perform on Meal and Order, following the RBAC rules in this section.
Verify: refresh the app, then in the sidebar set the current user and assign that user the customer role in the current city. Place an order on the customer page. The order appears in the order list. Switch the current user to one with the rider role only and place another order: the app answers "You are not permitted to perform this action".
Configure ABAC for free delivery
Attribute-based access control (ABAC) grants permissions based on attributes of the user and the resource. You group attribute conditions into user sets and resource sets, and grant permissions to those sets in the Policy Editor.
The app uses ABAC for a free delivery offer:
- A
customercan create an order with free delivery if the order'scostis 500 or more. - A
ridercan deliver a free delivery order if the rider'snumber_of_ridesis 500 or more.
These ABAC rules extend the RBAC roles and actions with conditions.
Add the cost attribute and the free delivery action
- Open the
Orderresource for editing. - Add a
create-with-free-deliveryaction. The app checks this action when it decides whether to issue free delivery. - In the ABAC section, add a
costattribute of type Number. - Save the changes.
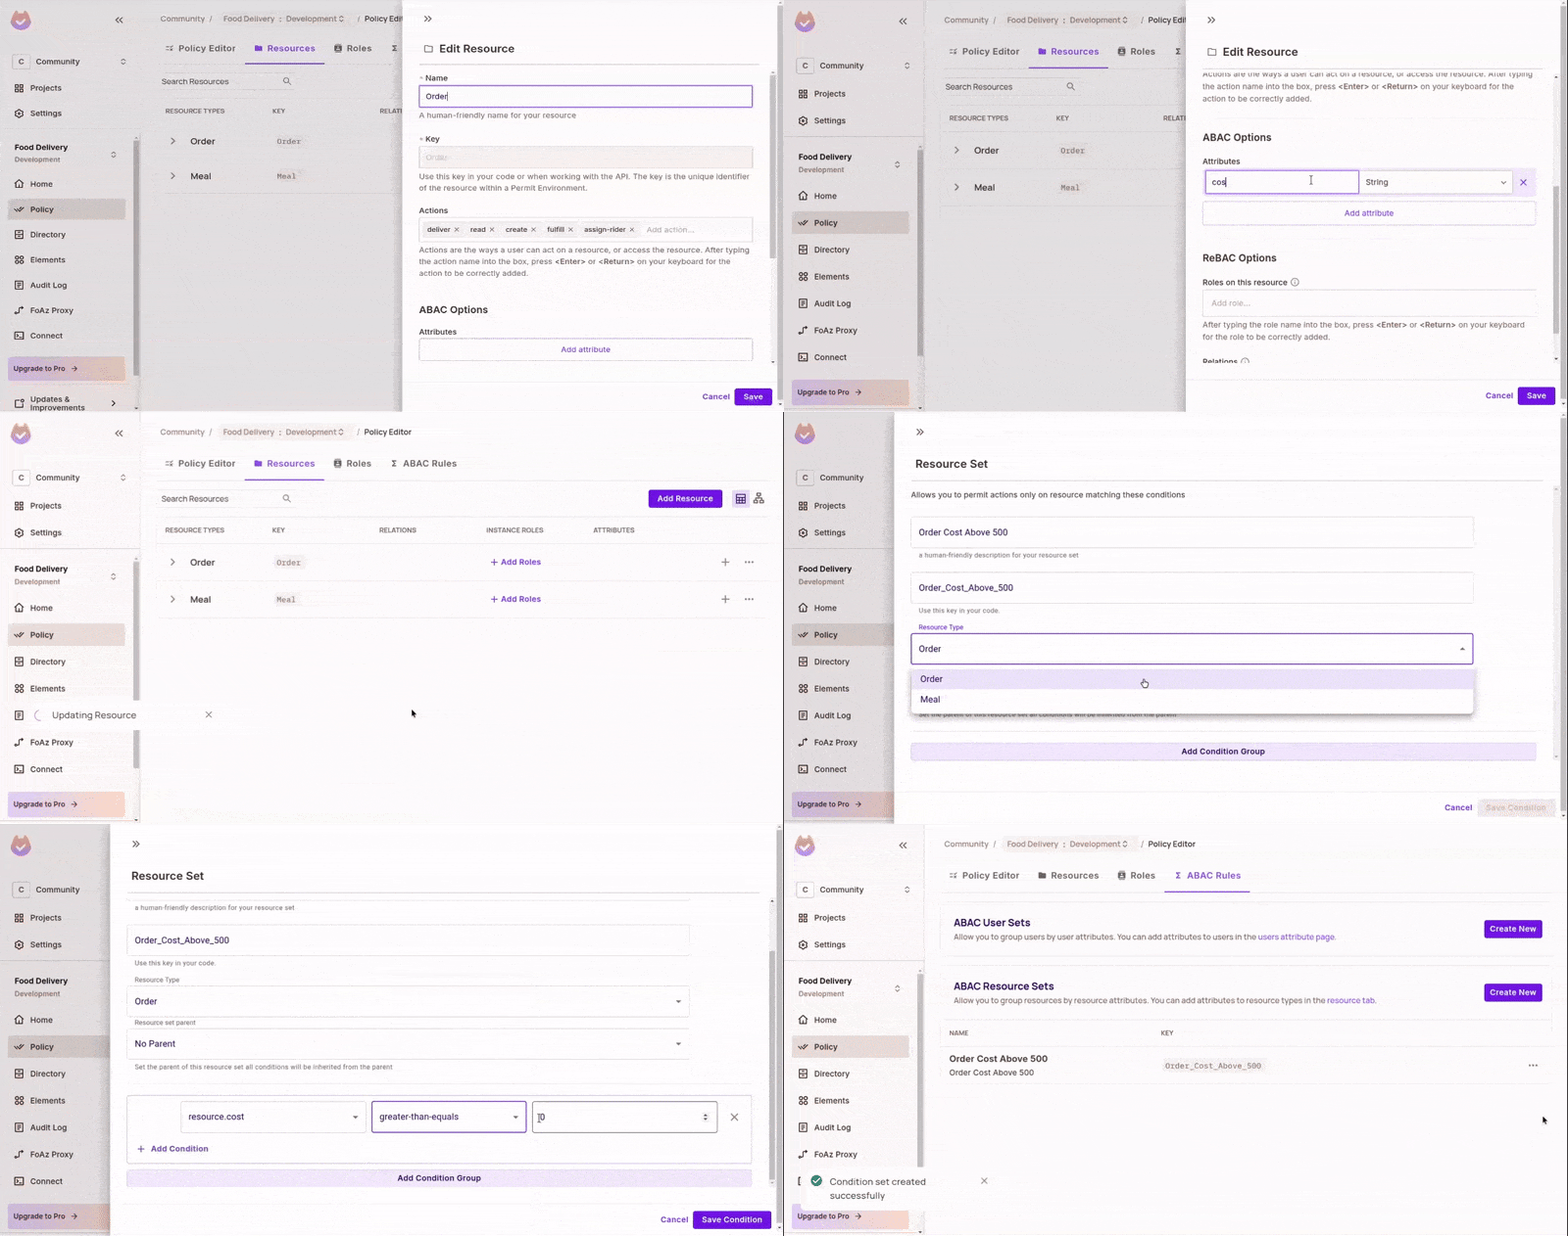
Create a resource set for orders that cost 500 or more
- On the ABAC Rules tab, create a resource set for
Order. - Add the condition
costgreater than or equal to 500.
Every order whose cost matches the condition belongs to the resource set.
Add the number_of_rides user attribute
In the user attributes settings, add a number_of_rides attribute of type Number.
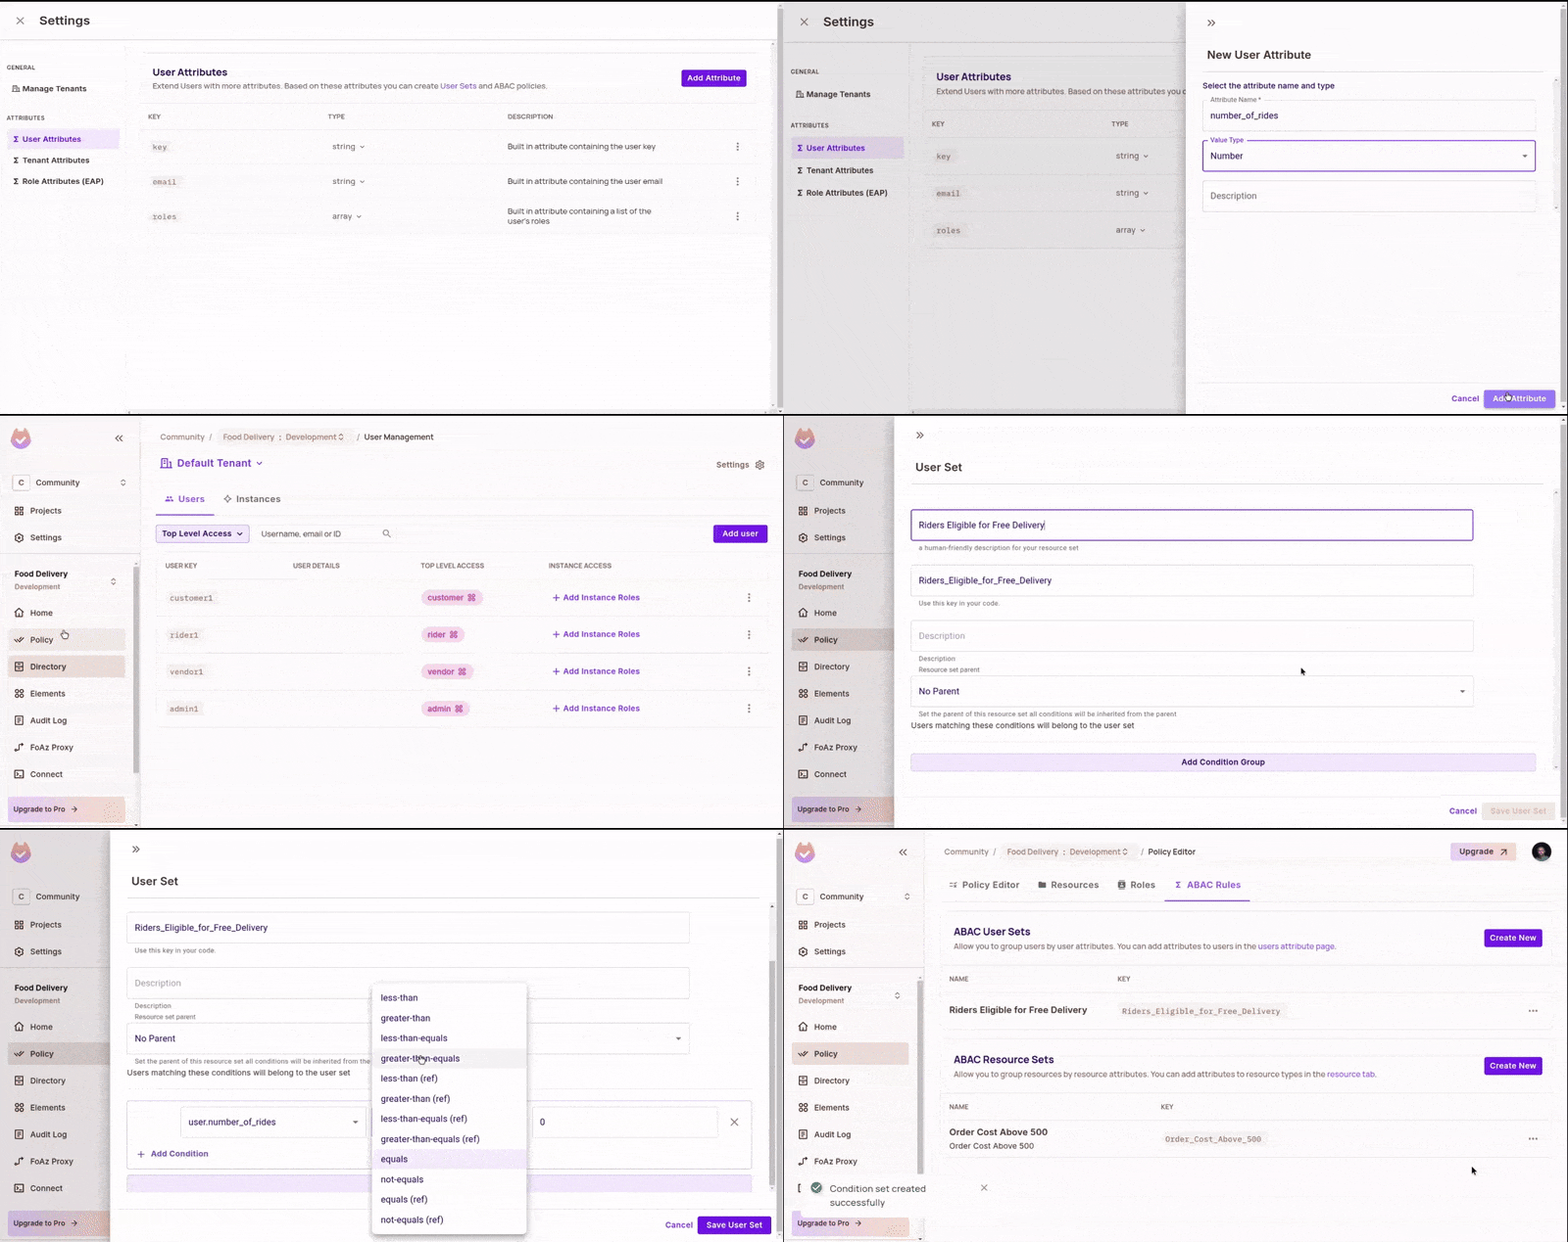
Create a user set for riders with 500 or more rides
- On the ABAC Rules tab, create a user set.
- Add the condition
number_of_ridesgreater than or equal to 500.
Every user whose number_of_rides matches the condition belongs to the user set.
Grant ABAC permissions in the Policy Editor
The user set and the resource set appear in the Policy Editor.
- For the
customerrole, checkcreate-with-free-deliveryon the order resource set. - For the rider user set, check
deliveron the order resource set.
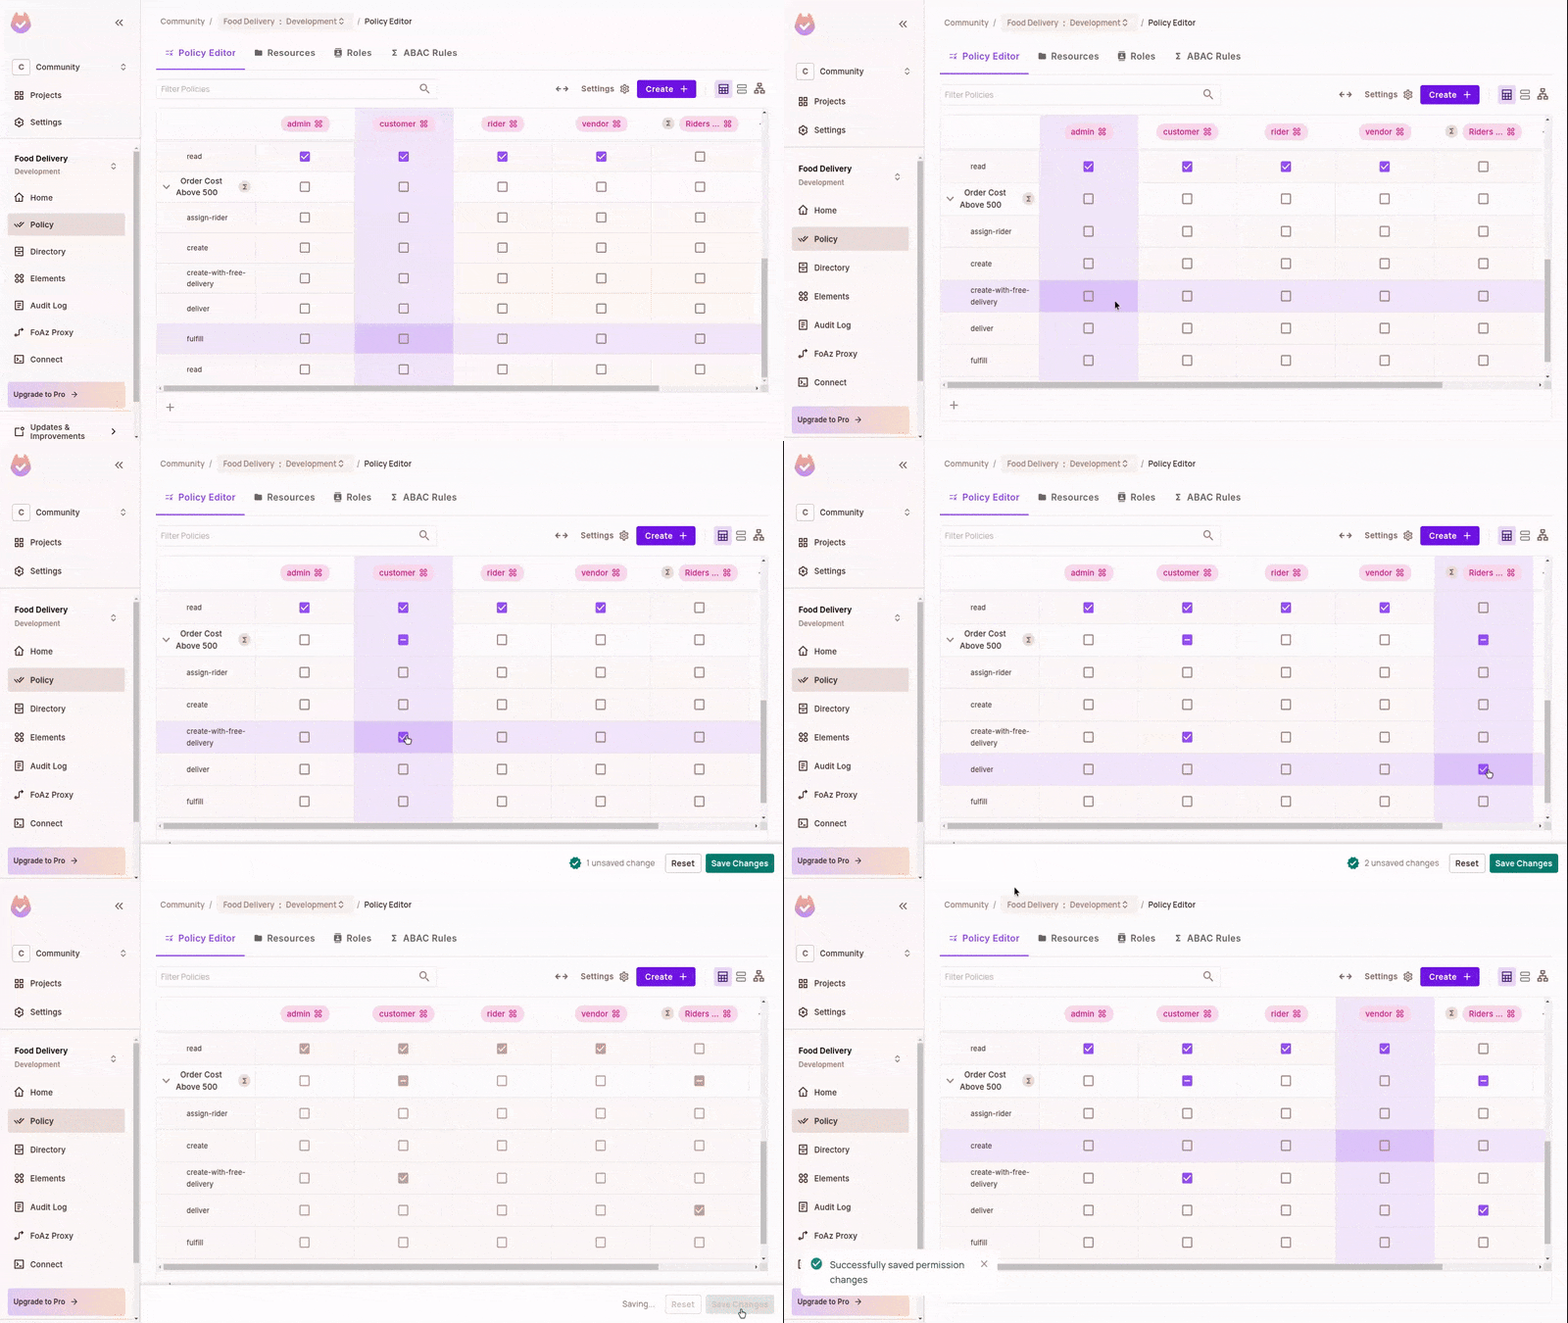
Verify: refresh the app and, as a customer, create an order whose meals total 500 or more. The order's Delivery Fee row reads FREE. Create an order under 500 and the row shows the fee, because create-with-free-delivery returns false and issue-free-delivery.ts leaves deliveryFee in place.
Configure ReBAC for order assignments
Relationship-based access control (ReBAC) grants permissions based on relationships between users and resource instances. The app uses ReBAC for two rules:
- A
vendorcan fulfill an order only if the vendor created the meals in that order. - A
ridercan deliver an order only if an admin assigned the order to that rider.
The fulfill and deliver endpoints check the specific order instance, { type: 'Order', key: orderId, tenant }, so the PDP can evaluate the user's resource roles on that order. A resource role is a role that applies to instances of one resource type, written Resource#Role. See ReBAC overview.
Create the Vendor and Rider resource roles
- Open the
Orderresource for editing. - In the ReBAC section, create two resource roles with the keys
VendorandRider. The Policy Editor shows them asOrder#VendorandOrder#Rider. The app assignsVendorinserver/routes/orders/index.post.tsandRiderinserver/routes/order/[id]/assign-rider.post.ts, both by that exact key.
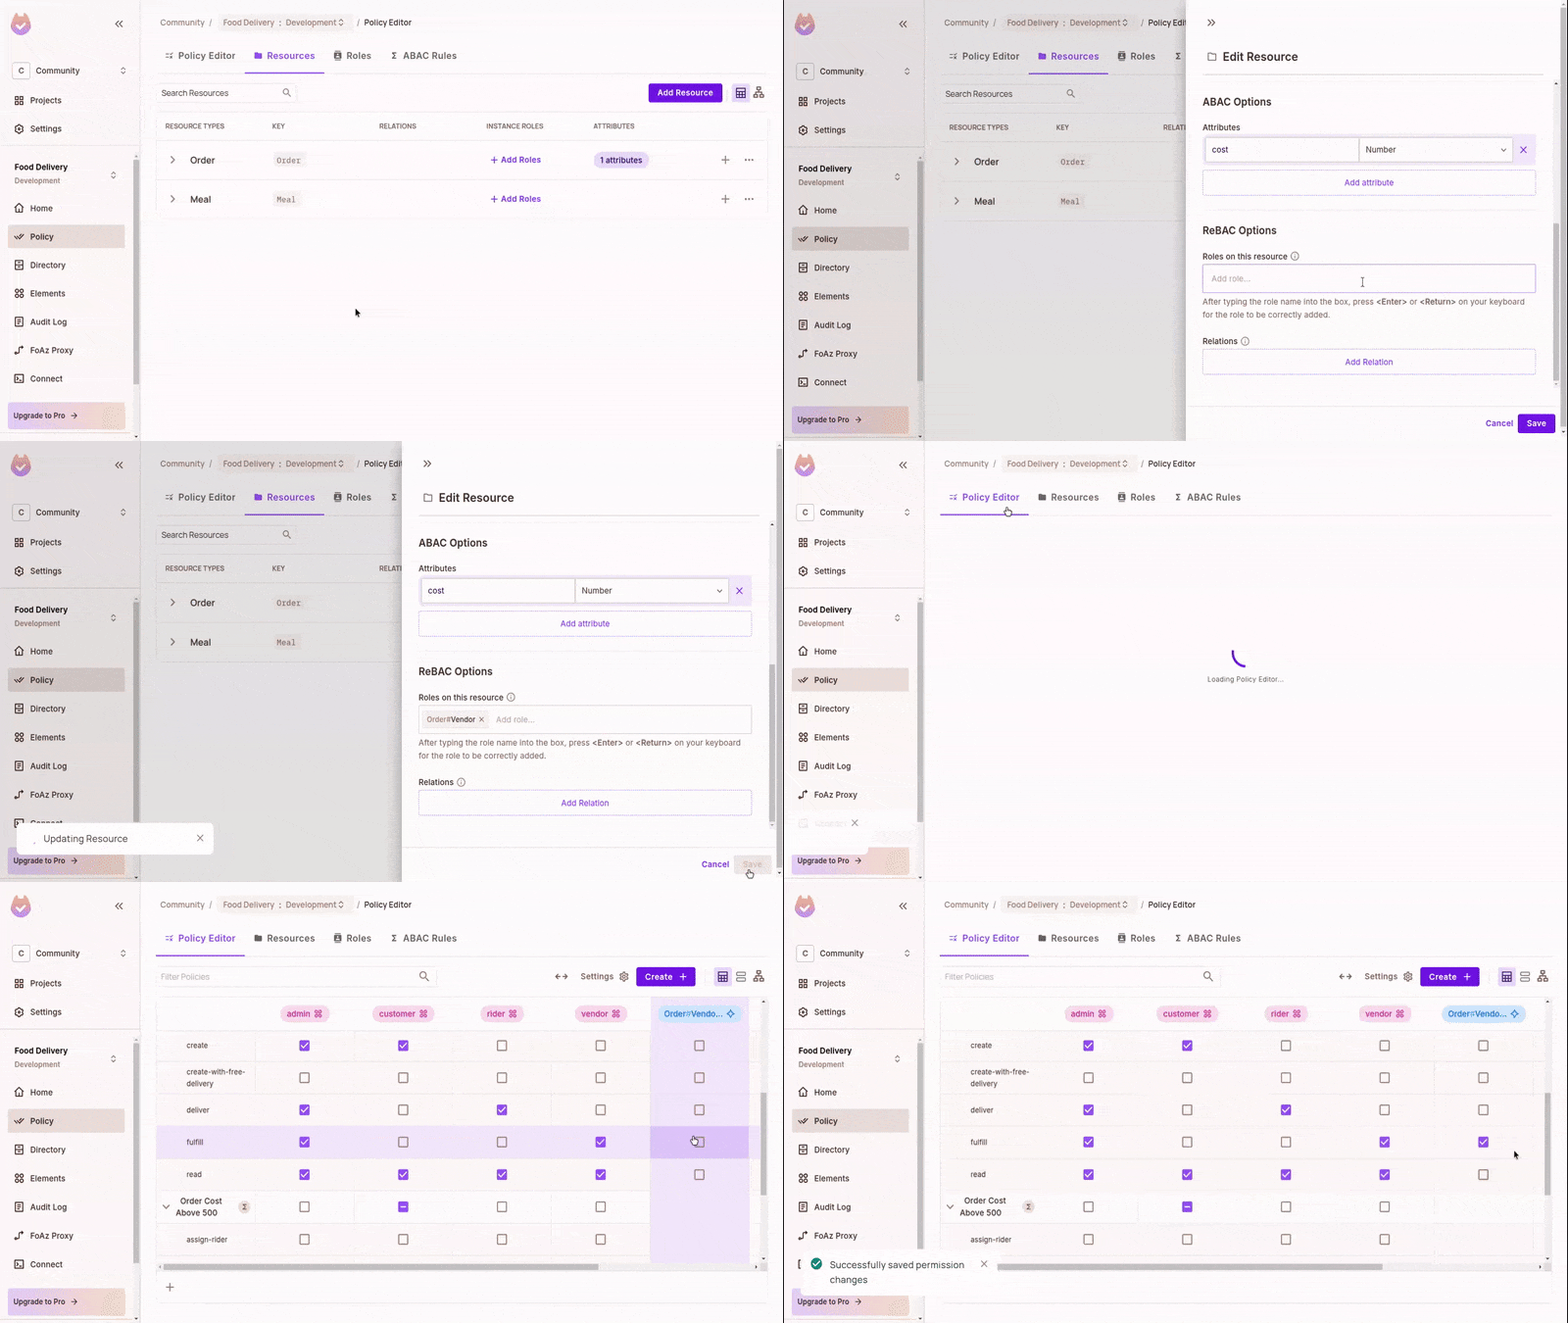
Grant ReBAC permissions in the Policy Editor
In the Policy Editor, check fulfill for Order#Vendor and deliver for Order#Rider.
Verify: refresh the app. Sign in as the vendor who created the meals in an order and fulfill it: the order's Fulfilled Time fills in. Switch to a vendor who created no meals in that order and fulfill it again: the app answers "You are not permitted to perform this action", because that vendor holds no Order#Vendor role on the instance.
Sync app data to Permit
The policies depend on users, orders, and role assignments that exist in Permit. The app syncs them with methods on permit.api from the Permit Node.js SDK.
The handlers of the /users endpoints create or update users with permit.api.users.sync(), which creates the user if the user doesn't exist and updates the user if the user exists. The number_of_rides attribute is sent with the user. The handlers delete users with permit.api.users.delete().
// Create the user if it does not exist, and update it if it does
await permit.api.users.sync({
  key: user,
  ...(noOfRides ? { attributes: { number_of_rides: noOfRides } } : {}),
});

// Delete the user
await permit.api.users.delete(user);
The app also syncs resources and role assignments:
| SDK namespace | What it manages |
|---|---|
permit.api.resources | Resource types |
permit.api.resourceInstances | Individual resource instances, such as one order |
permit.api.roleAssignments | Role assignments, both tenant-level (RBAC) and resource instance-level (ReBAC) |
Resource instances and role assignments belong to a tenant. Pass the tenant key, or "default" if your application is not multi-tenant. Permit also exposes condition sets through the Condition Sets API.
When a customer creates an order, the app creates the order as a resource instance carrying its cost, and assigns the Order#Vendor resource role on that order to the vendor. The cost attribute is what the ABAC resource set from Configure ABAC for free delivery reads. When an order is deleted, the app deletes the resource instance.
// tenant is the city header on the request, for example "california"
const { city: tenant, id, totalPrice, vendor } = newOrder;

// Sync the new order with Permit
await permit.api.resourceInstances.create({
  key: id,
  resource: 'Order',
  attributes: { cost: totalPrice },
  tenant,
});

// Assign the Order#Vendor resource role on this order to its vendor
await permit.api.roleAssignments.assign({
  user: vendor,
  role: 'Vendor',
  resource_instance: `Order:${id}`,
  tenant,
});

// Sync a deleted order with Permit
await permit.api.resourceInstances.delete(`Order:${id}`);
For more sync options, see Sync users.
Enforce permissions in the server and the UI
The app enforces permissions in two places:
- Server middleware calls
permit.check(). Onepermit.check()call evaluates every RBAC, ABAC, and ReBAC rule that applies to the action. - The Vue frontend loads the user's permissions in bulk and shows or hides UI elements. See Integrate CASL with Permit for that setup.
The middleware that protects the deliver endpoint checks whether the rider can deliver the order:
// user and tenant (city) come from the request headers, orderId from the path
// One check evaluates every RBAC, ABAC, and ReBAC rule on the "deliver" action
const canRiderDeliver = await permit.check({ key: user }, 'deliver', {
  type: 'Order',
  key: orderId,
  tenant
});

// Prevent the rider from doing the delivery if not authorised
if (!canRiderDeliver) {
  return {
    success: false,
    message: 'You are not permitted to perform this action'
  };
}
The permit-nuxt-example app enforces permissions only on the server. For the frontend half, the permit-vue-example repository on the casl branch builds the same food delivery UI with permit-fe-sdk and CASL.
In that app, src/stores/abilities.ts creates the permit-fe-sdk client with a backendUrl and calls loadLocalStateBulk() once with every action and resource the UI checks: create, read, and delete on Meal, and create, read, fulfill, assign-rider, and deliver on Order. Components then read the stored results with permit.value.check(action, resource, resourceAttributes), which returns a boolean without calling the backend again.
The deliver handler in src/components/OrdersDisplay.vue checks before it sends the request:
const deliver = async (orderId: number) => {
  if (permit.value.check('deliver', 'Order', {})) {
    isDelivering.value = true;
    const success = await orders.deliver(orderId);
    isDelivering.value = false;
    if (success) {
      toast.add({
        severity: 'success',
        summary: 'Order Delivered',
        life: 3000
      });
    }
  }
};
The same check hides the button, so a rider who cannot deliver the order never sees it:
<Button
  type="submit"
  label="Deliver"
  v-if="!order.deliveredTime && permit.check('deliver', 'Order', {})"
  @click="deliver(order.id)"
  :loading="isDelivering"
/>
The Fulfill button and the assign rider form in the same component follow this pattern with the fulfill and assign-rider actions. Read src/components/OrdersDisplay.vue for the complete component.
permit.check() in the browser reads a result the backend already returned, and anyone can call your API directly. Keep the server middleware check on every endpoint. A UI-only check leaves the endpoint open.
Test the full policy
Run the PDP and the app, then test each rule.
-
Start the PDP in one terminal:
docker run -it -p 7766:7000 --env PDP_API_KEY=your-permit-api-key --env PDP_DEBUG=True permitio/pdp-v2:latest -
Start the app in a second terminal, from the project root:
npm run dev -
Test the authorization rules. Use the sidebar to switch the current user, the current user's roles, and the current city. Each row lists the expected result:
Test Expected result Model that decides As a customer, create an order The order appears in the order list. RBAC As a customer, create an order whose meals total 500 or more The order's Delivery Fee row reads FREE. ABAC As a customer, create an order under 500 The Delivery Fee row shows a fee. ABAC As the vendor who created the meals, fulfill the order The order's Fulfilled Time fills in. RBAC and ReBAC As a vendor who created none of the meals, fulfill the order "You are not permitted to perform this action". ReBAC As an admin, assign a rider to the order The order's Rider and Rider Assigned Time fill in. RBAC As the assigned rider, deliver the order The order's Delivered Time fills in. RBAC, ABAC, and ReBAC As a rider who was not assigned the order, deliver it "You are not permitted to perform this action". ReBAC As a user with no role in the current city, create an order "You are not permitted to perform this action". RBAC -
Test tenant isolation. Assign a user the
customerrole incaliforniaonly, create an order there, then switch the city towashingtonand create another order. The second attempt answers "You are not permitted to perform this action", because the role assignment belongs to thecaliforniatenant.
Verify: every row above matches. When a row does not, open the Audit Log screen in Permit and select the entry for that check. The entry shows the user, action, resource, and tenant, and its decision log carries a human-readable reason for the result.
Next steps
- Read the permit-nuxt-example source to see the middleware for each endpoint.
- Build ReBAC policies for other relationship patterns.
- Check permissions with permit.check() for all check options.
- Ask questions and share what you build in the Permit Slack community.