Banking app example: Mesa Verde
Learn how Mesa Verde Bank, an open source Next.js banking demo, models its authorization with Permit.io: tenant roles, attribute-based wire transfer limits, per-transaction relationships, and approval flows. This page is for developers who implement authorization in a fintech or banking application and want a worked example to copy from.
What you build
The Mesa Verde model answers these authorization questions for a bank account:
- Who can use an account. Each new user gets their own tenant and the
AccountOwnerrole in it. Owners invite beneficiaries and members. - Who can send a wire transfer, and how much. Rules combine the user's role, the transfer amount, where the user signs in from, and whether the user entered a one-time password (OTP).
- Who can see a transaction. The sender and the receiver of each transaction get a role on that transaction instance.
- Who can approve a blocked transfer. When a transfer is denied, the account owner reviews it in an embedded approval UI.
Model overview
The schema is defined in Terraform in main.tf. The tables below summarize it.
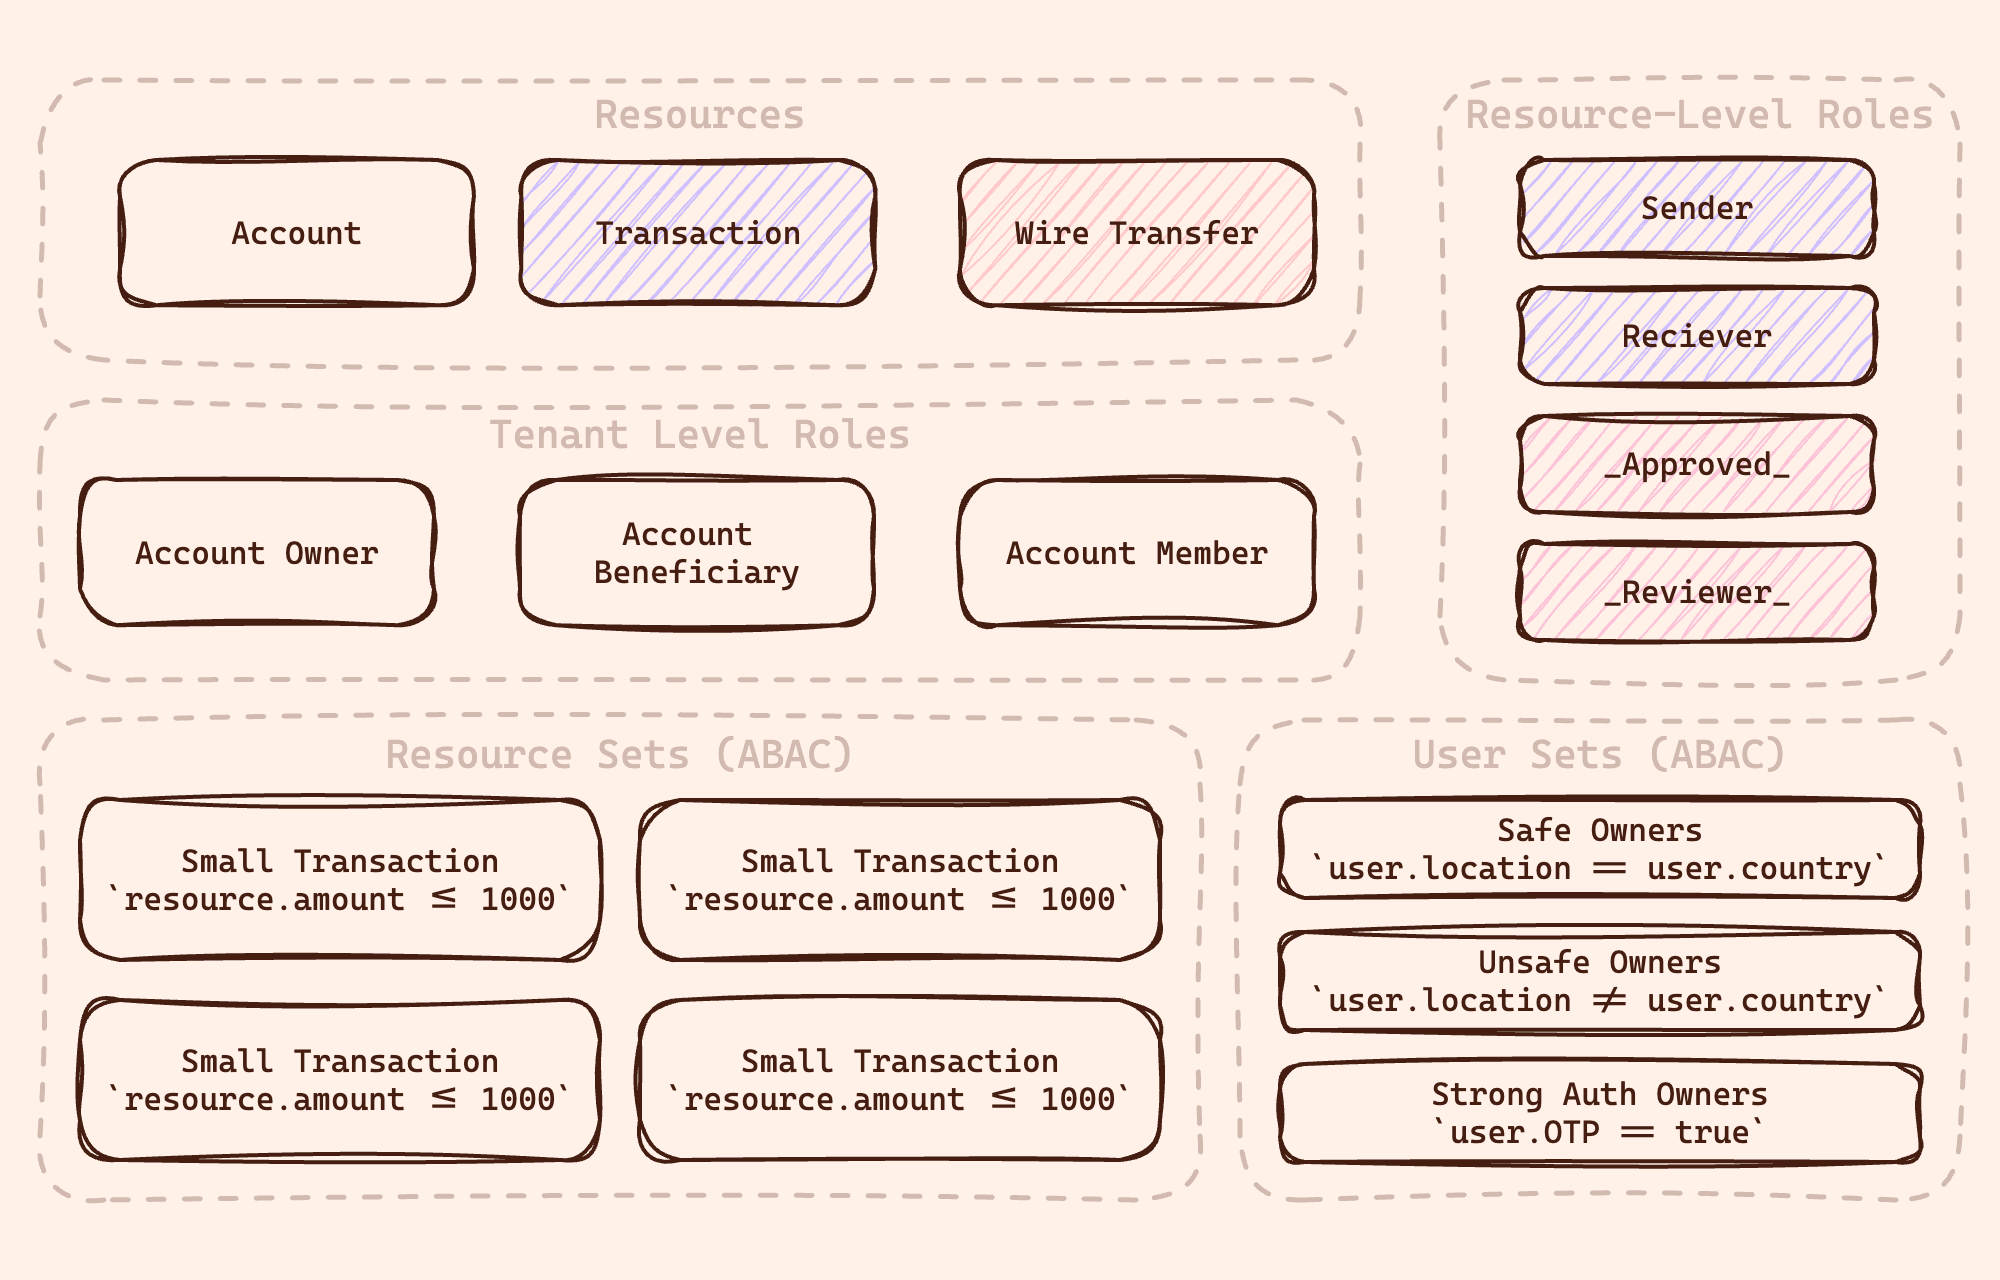
Resources
| Resource key | Actions | Attributes |
|---|---|---|
Account | read, add-beneficiaries, add-members | None |
Wire_Transfer | approve, review, deny, operate, create | id, description, date, currency (string), amount (number) |
Transaction | create, list | id, description, date, currency (string), amount (number) |
Tenant roles (role-based access control, RBAC)
| Role key | Permissions |
|---|---|
AccountOwner | Account:add-members, Account:add-beneficiaries, Account:read, Transaction:list, Wire_Transfer:create, Wire_Transfer:approve |
AccountBeneficiary | Account:add-members, Account:read, Transaction:list |
AccountMember | Account:read |
Resource roles (relationship-based access control, ReBAC)
| Resource role | Permissions | Assigned to |
|---|---|---|
Transaction#Sender | list | The sender of a transaction |
Transaction#Receiver | list | The owner of the receiving account |
Wire_Transfer#_Reviewer_ | approve, deny, review | The account owner who reviews a blocked transfer |
Wire_Transfer#_Approved_ | operate | The requesting user, after a reviewer approves the request |
Attribute-based sets (attribute-based access control, ABAC)
| Set | Type | Condition |
|---|---|---|
Small_Transaction, Small_Wire | Resource set | resource.amount less than or equal to 1000 |
Large_Transaction, Large_Wire | Resource set | resource.amount greater than or equal to 1000 |
Safe_Owners | User set | user.location equals user.country, and the user has the AccountOwner role |
Unsafe_Owners | User set | user.location doesn't equal user.country, and the user has the AccountOwner role |
Strong_Auth_Owners | User set | user.strongAuth is true, and the user has the AccountOwner role |
User attributes, created by the demo's setup.js script: location (country of the request IP address), country (country the user is from), and strongAuth (the user entered an OTP).
The model has no relations between resource types. For a model built on relations and role derivations, see Google Drive permissions with ReBAC.
Prerequisites
To run the demo locally, you need:
- Node.js, Docker, Terraform, and ngrok. ngrok exposes your local app so Permit can call the approval webhook.
- A Permit.io account and an environment with no existing policy. Create an environment as described in Projects and environments, then copy its environment API key (Get your API key).
- Accounts on Stytch (authentication and OTP) and JSONBin.io (stores each user's home country).
Run the demo locally
The repository README owns the full setup. The short version:
- Clone
permitio/mesa-verde-banking-demoand runnpm install. - Copy
.env.templateto.envand fill in the Stytch, Permit, JSONBin, webhook secret, and ngrok values. - Run
npm run setup. The script creates the user attributes, appliesmain.tfwith Terraform, and creates the Permit Elements configurations. - Run
docker-compose up --build. Docker Compose starts the Next.js app, a policy decision point (PDP) container on port 7766, and ngrok.
To verify the setup, open the Policy Editor in your environment. It shows the Account, Wire_Transfer, and Transaction resources with the roles from the model overview. Then open your ngrok URL and sign up. The app shows your account with the Send Wire Transfer and Manage Account Users buttons.
Authorization flows in the demo
Each flow below maps to part of the model and to code in the repository.
Multi-tenant RBAC for new accounts
When a user signs up, the app creates a tenant for that user, syncs the user to Permit, and assigns the AccountOwner role in the new tenant. The sign-up event comes from Stytch, the authentication provider. The code is in Sync users, tenants, and roles.
Secure collaboration with Permit Elements
Account owners and beneficiaries manage the people on an account with Permit Elements, embeddable UI components for permission management. The User Management element lets a user invite members and assign them roles.

Feature toggling in the UI
The frontend shows or hides buttons based on the same policy the backend enforces. The app uses CASL with permit-fe-sdk: the browser sends the list of actions to the app's /account/api/frontend-permissions route, which runs permit.bulkCheck() and returns one decision per action. The React components read the results through @casl/react:
{
  abilities?.CREATE_WIRE_TRANSFER && (
    <Button type="primary" onClick={() => setActiveModal(ModalType.WIRE_TRANSFER)}>
      Send Wire Transfer
    </Button>
  );
}
{
  abilities?.ADD_MEMBERS && (
    <Button
      type="default"
      onClick={() => setActiveModal(ModalType.USER_MANAGEMENT)}
      disabled={!userJwt}
    >
      Manage Account Users
    </Button>
  );
}
Multi-step wire transfer authorization
A wire transfer passes more than one permission check before the app records it. The POST handler in src/app/account/api/transactions/route.ts runs these steps:
- Check the transfer.
permit.check(user, "create", Wire_Transfer)with the transfer attributes. Owners pass through theAccountOwnerrole. Beneficiaries pass only for transfers inSmall_Wire. - Start an approval if the transfer check fails. The app creates a
Wire_Transferresource instance, assigns the account owner the_Reviewer_role on it, and returns HTTP 403 withWire transfer needs approval. - Check the transaction.
permit.check()onTransaction:createwith the user attributeslocationandstrongAuth. The condition set rules decide the result (see Condition set rules). - Ask for an OTP if the transaction check fails. The app sends an OTP email through Stytch and returns HTTP 403 with
Wire transfer needs strong authentication. When the user resubmits the transfer with the OTP, the app verifies the code with Stytch and runs the checks again withstrongAuth: true. - Record the transaction. The app creates a
Transactionresource instance and assigns theSenderandReceiverresource roles.
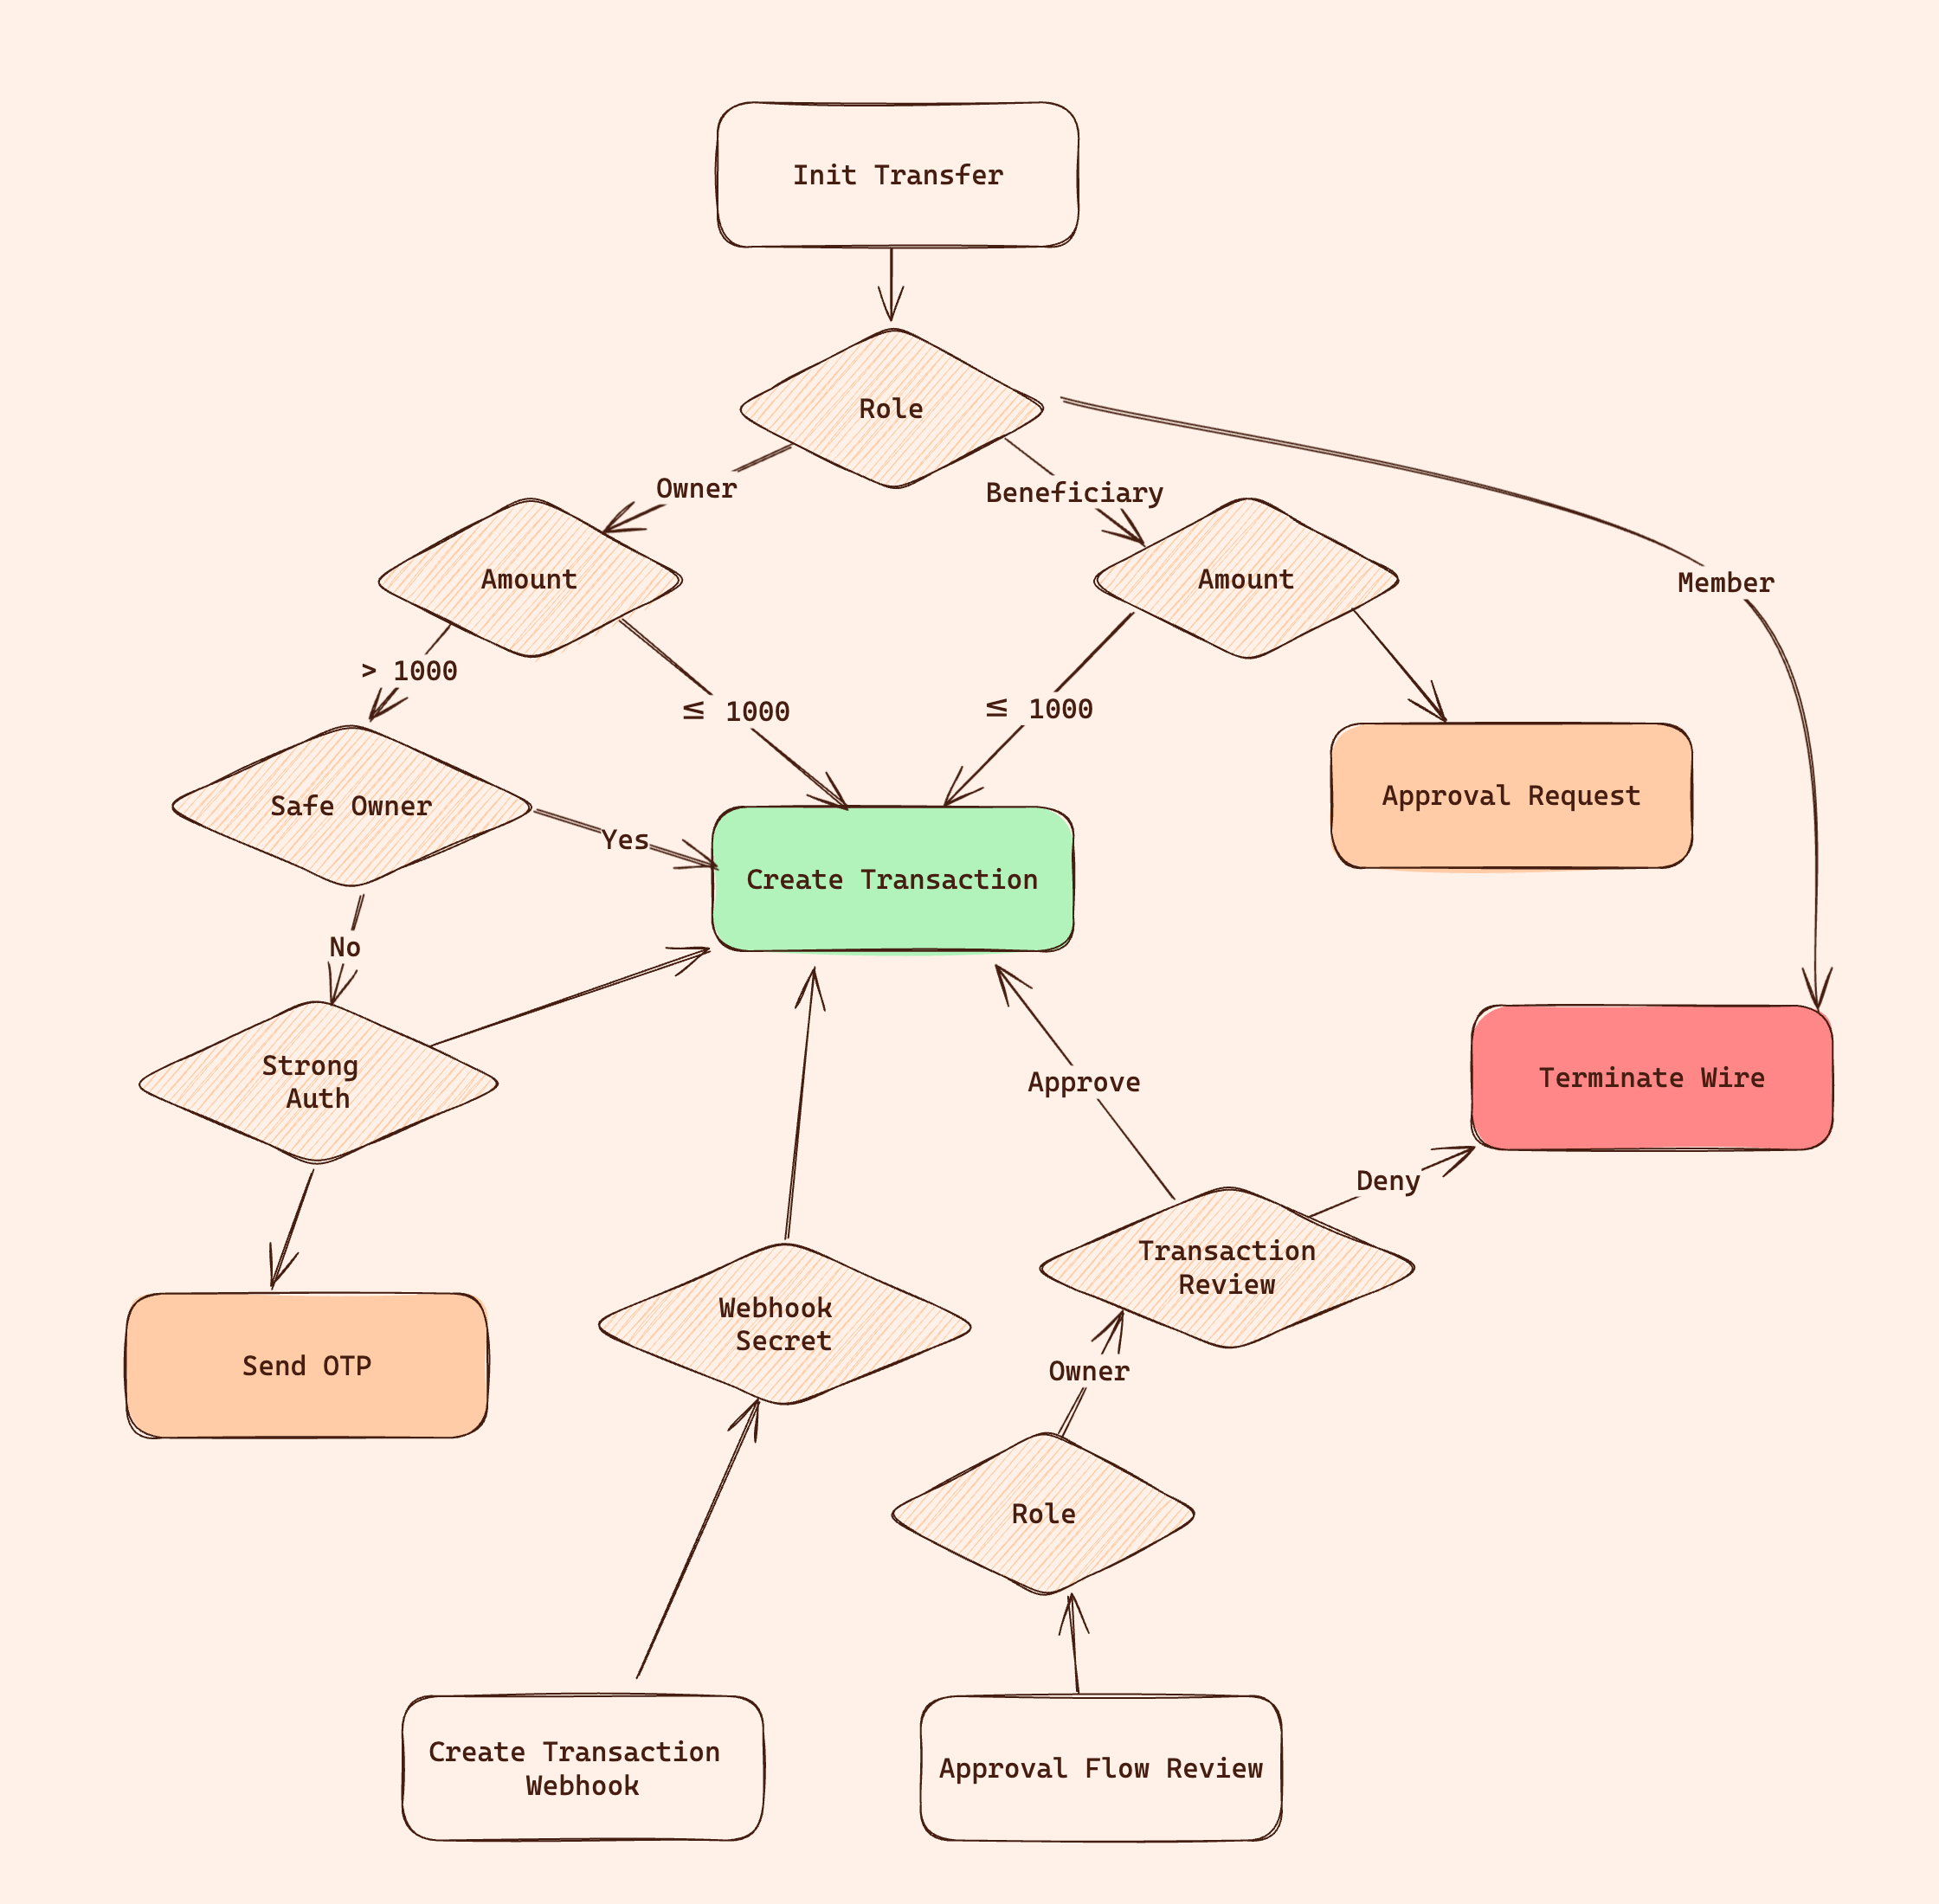
The flow uses three patterns:
- External data. The user's home
countrycomes from JSONBin.io, a stand-in for an identity provider. The app's middleware looks up the request IP address with ipinfo.io and passes the result as thelocationattribute at check time. See Load external data. - Authentication and authorization feedback. A denied check triggers a stronger authentication step (OTP), and the OTP result becomes an attribute in the next check.
- Transaction approval. Account owners approve transfers that other users can't perform on their own.
The demo doesn't check the account balance. It checks only whether the user has permission to send the transfer.
Transactions with ReBAC
Each transaction is a resource instance in Permit. The app assigns the Sender and Receiver resource roles on that instance, so each party's access comes from its relationship to the transaction, not from a tenant-wide role. To learn the ReBAC terms, see What is ReBAC?.
Access requests and approvals
The demo uses three more Permit Elements:
- Access request. A member asks for more access on an account, such as permission to view transactions.
- Operation approval request. A user asks for approval of a wire transfer that the policy denies.
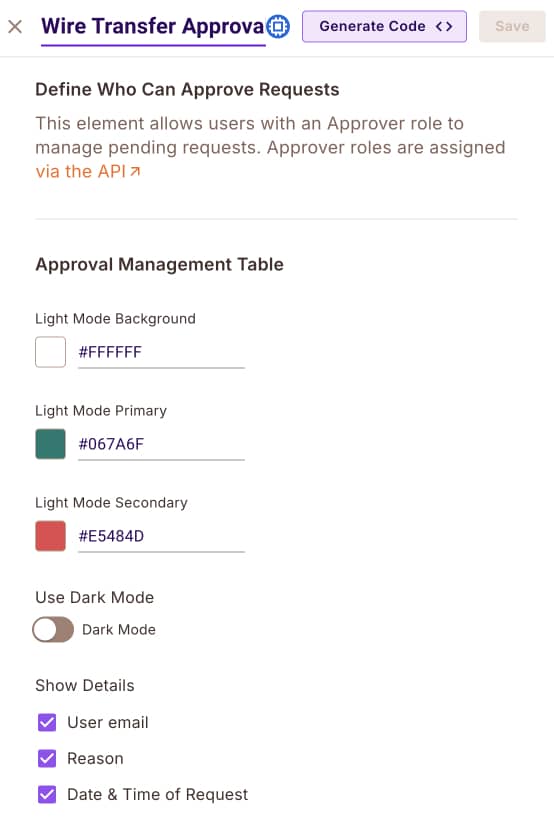
- Approval management. The account owner approves or denies the pending requests.

Configure Permit Elements describes each configuration.
Application architecture
Mesa Verde is a Next.js application. It uses these services:
| Component | Role in the demo |
|---|---|
| Stytch | Authenticates users and sends and verifies OTP codes. |
| JSONBin.io | Stores each user's home country. In a production application, this data usually comes from the identity provider. |
| Docker Compose | Runs the app, a PDP container, and ngrok. |
| ngrok | Exposes the local app so Permit can send webhooks to it. |
| ipinfo.io | Resolves the request IP address to a country. |
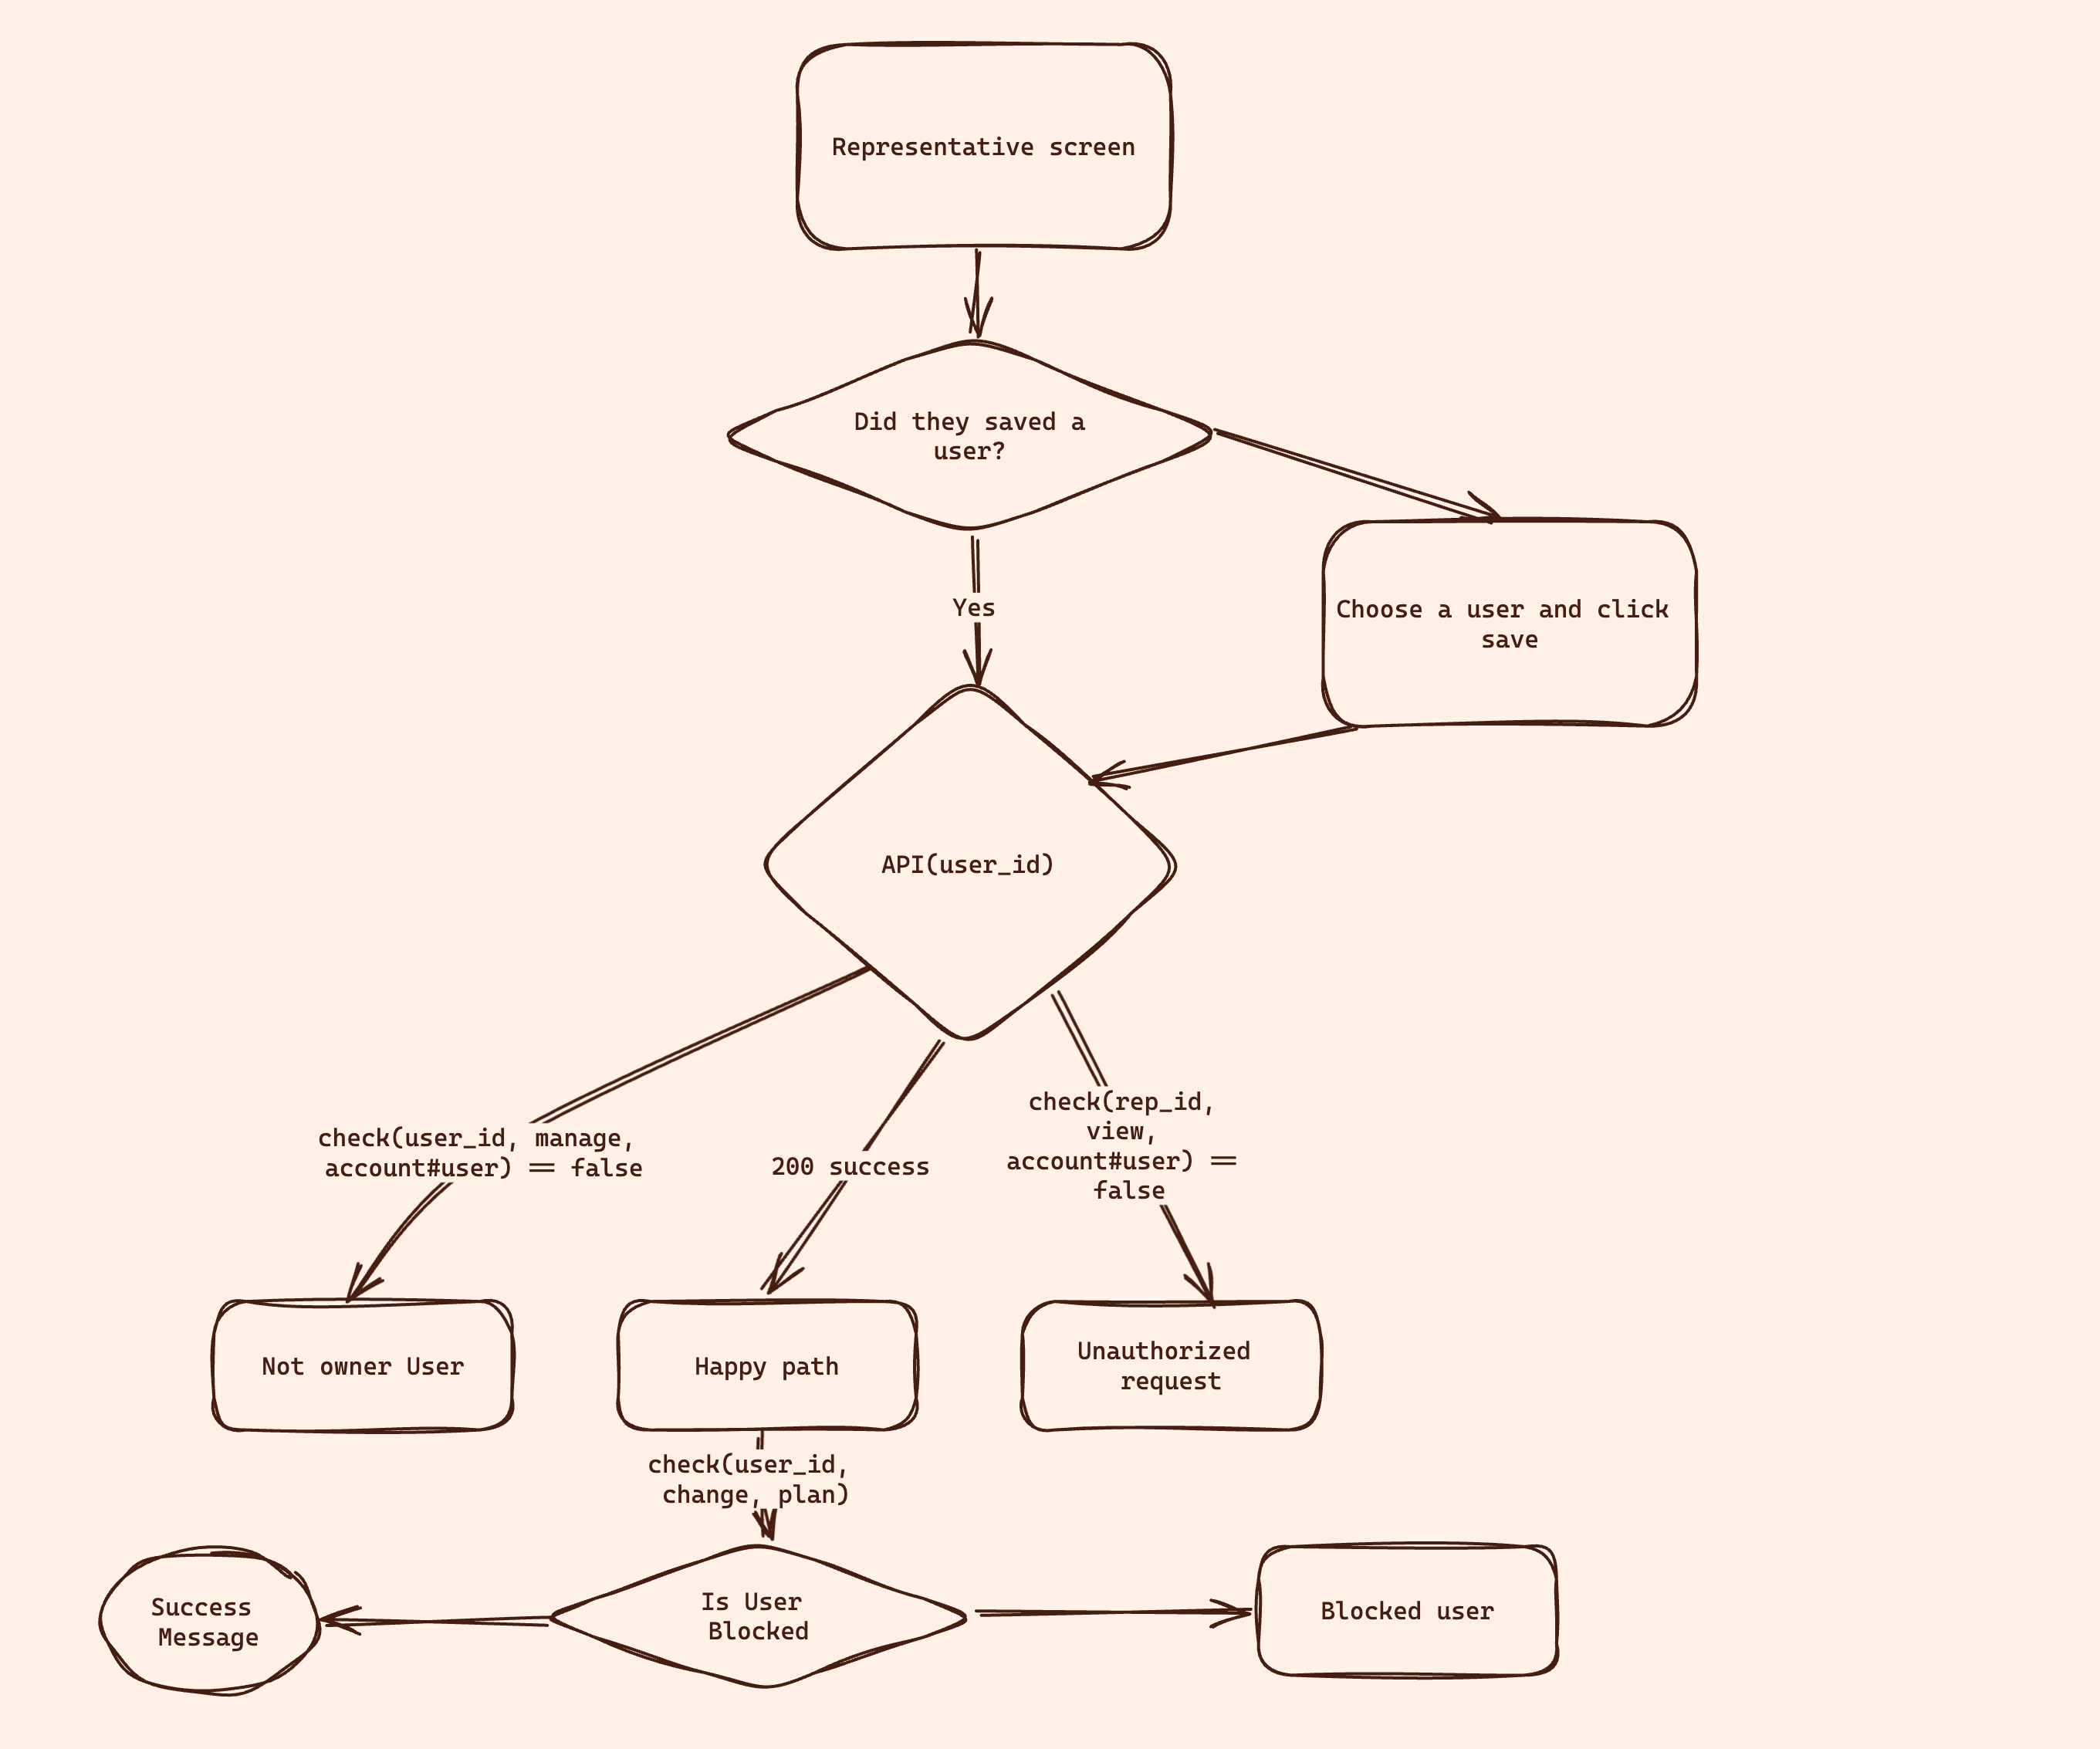
Where the authorization code lives
| Path | Contents |
|---|---|
package.json | Dependencies and the setup scripts. |
main.tf | The policy schema, applied with the Permit Terraform provider. |
setup.js | Creates the user attributes and the Permit Elements configurations. |
docker-compose.yml | Runs the app with the PDP and ngrok. |
lib/permit.ts | Initializes the Permit SDK and holds the data sync functions. |
lib/stytch.ts | Initializes the Stytch client. |
src/middleware.ts | Authenticates each request with Stytch and resolves the user's location. |
src/app/account/api/* | API routes. Most permit.check() calls are here. |
src/app/account/webhook/route.ts | Receives the approval result from Permit. |
src/components/* | UI components, including feature toggles and the embedded elements. |
Build the authorization model
Permit separates authorization into three parts. The demo configures them in this order:
- Schema. Resources, actions, roles, and condition sets. Mesa Verde defines the schema with the Permit Terraform provider. You can also use the API or the Permit dashboard.
- Data. Users, tenants, role assignments, attributes, and resource instances. Mesa Verde syncs data with the Node.js SDK from its existing sign-up and transaction code.
- Enforcement.
permit.check()decides a single request.permit.getUserPermissions()returns what a user can access.
Define the policy schema in Terraform
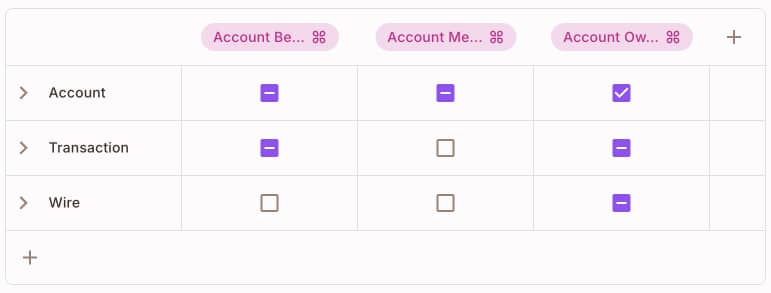
A Permit policy is a table: rows are resources (or resource sets) with their actions, and columns are roles (or user sets). Each checked cell is a permission.
The diagram shows how the schema components relate:
Resources
The Account resource covers actions on the account itself:
resource "permitio_resource" "Account" {
  key = "Account"
  name = "Account"
  actions = {
      "read" = {
          name = "Read"
      }
      "add-beneficiaries" = {
          name = "Add Beneficiaries"
      }
      "add-members" = {
          name = "Add Members"
      }
  }
  attributes = {
  }
}
The Wire_Transfer resource has attributes, so condition sets can match transfers by amount or currency. The approve, review, deny, and operate actions support the approval flow:
resource "permitio_resource" "Wire_Transfer" {
  name        = "Wire"
  key         = "Wire_Transfer"
  actions = {
      "approve" = { name = "Approve"}
      "review" = { name = "Review" }
      "deny" = { name = "Deny" }
      "operate" = { name = "Operate" }
      "create" = { name = "Operate" }
  }
  attributes = {
      "id" = {
      name = "ID"
      type = "string"
      }
      "description" = {
      name = "Description"
      type = "string"
      }
      "date" = {
      name = "Date"
      type = "string"
      }
      "currency" = {
      name = "Currency"
      type = "string"
      }
      "amount" = {
      name = "Amount"
      type = "number"
      }
  }
}
In main.tf, the create action has the display name Operate, the same display name as the operate action. Checks use the action key, so permit.check(user, "create", ...) matches create. The Policy Editor shows two columns labeled Operate for Wire_Transfer. To tell them apart in the UI, set name = "Create" on the create action.
The Transaction resource covers every money movement, including ones that aren't wire transfers. It has the actions create and list, and the same attributes as Wire_Transfer.
Resource sets
A resource set groups resource instances by their attributes at check time. Mesa Verde defines four resource sets: Small_Transaction, Large_Transaction, Small_Wire, and Large_Wire. The small transaction set matches amounts up to 1000:
resource "permitio_resource_set" "Small_Transaction" {
  key      = "Small_Transaction"
  name     = "Small Transaction"
  resource = permitio_resource.Transaction.key
  conditions = jsonencode({
    "allOf" : [
      { "resource.amount" : { "less-than-equals" : 1000 } }
    ],
  })
  depends_on = [permitio_resource.Transaction]
}
The large sets use greater-than-equals 1000, so an amount of exactly 1000 matches both the small and the large set.
Roles
Tenant roles grant permissions across the whole tenant, which in Mesa Verde is one bank account:
resource "permitio_role" "AccountOwner" {
  key  = "AccountOwner"
  name = "Account Owner"
  permissions = [
    "Account:add-members",
    "Account:add-beneficiaries",
    "Account:read",
    "Transaction:list",
    "Wire_Transfer:create",
    "Wire_Transfer:approve",
  ]
  depends_on = [permitio_resource.Wire_Transfer, permitio_resource.Transaction, permitio_resource.Account]
}

resource "permitio_role" "AccountBeneficiary" {
  key  = "AccountBeneficiary"
  name = "Account Beneficiary"
  permissions = [
    "Account:add-members",
    "Account:read",
    "Transaction:list",
  ]
  depends_on = [permitio_resource.Account, permitio_resource.Transaction]
}

resource "permitio_role" "AccountMember" {
  key  = "AccountMember"
  name = "Account Member"
  permissions = [
    "Account:read",
  ]
  depends_on = [permitio_resource.Account]
}
None of these roles grants Transaction:create. Condition set rules grant it.
User sets
A user set groups users by their attributes. The schema holds only the condition. The attribute values come from data sync or from the permit.check() call.
| User set | Matches |
|---|---|
Safe_Owners | Account owners whose request location matches their home country. |
Unsafe_Owners | Account owners whose request location doesn't match their home country. |
Strong_Auth_Owners | Account owners who entered an OTP for the request. |
The Safe_Owners user set:
resource "permitio_user_set" "Safe_Owners" {
  key  = "Safe_Owners"
  name = "Safe Owners"
  conditions = jsonencode({
    "allOf" : [
      {
        "user.location" : {
          "equals" : {
            "ref" : "user.country"
          }
        }
      },
      {
        "user.roles" : {
          "array_contains" : "AccountOwner"
        }
      }
    ]
  })
}
The condition compares two user attributes with ref, and also requires the AccountOwner role.
Condition set rules
A condition set rule grants a permission to a user set (or role) on a resource set. Each rule needs a user set, a resource set, and a permission. This rule lets Safe_Owners create large transactions:
resource "permitio_condition_set_rule" "allow_safeowners_large_transactions" {
  user_set     = permitio_user_set.Safe_Owners.key
  resource_set = permitio_resource_set.Large_Transaction.key
  permission   = "Transaction:create"
  depends_on   = [permitio_resource_set.Large_Transaction, permitio_user_set.Safe_Owners]
}
All condition set rules in main.tf:
| User set or role | Resource set | Permission |
|---|---|---|
Safe_Owners | Large_Transaction, Small_Transaction | Transaction:create |
Strong_Auth_Owners | Large_Transaction, Small_Transaction | Transaction:create |
Unsafe_Owners | Small_Transaction | Transaction:create |
AccountBeneficiary | Small_Transaction | Transaction:create |
AccountBeneficiary | Small_Wire | Wire_Transfer:create |
An account owner who signs in from outside their home country can send only small transfers until they enter an OTP.
Resource roles
A resource role grants permissions on one resource instance instead of the whole tenant. Mesa Verde defines four:
Transaction#SenderandTransaction#Receivergrantliston one transaction.Wire_Transfer#_Reviewer_grantsapprove,deny, andreviewon one transfer.Wire_Transfer#_Approved_grantsoperateon one transfer. The Operation Approval element uses the_Reviewer_and_Approved_roles. When a reviewer approves a request, Permit assigns the requesting user_Approved_on that instance.
Transaction#Sender means the Sender role on the Transaction resource type. The # separator follows the tuple notation of the Google Zanzibar paper.
The Transaction#Sender resource role:
resource "permitio_role" "Sender" {
  key         = "Sender"
  name        = "Sender"
  resource    = permitio_resource.Transaction.key
  permissions = ["list"]
  depends_on  = [permitio_resource.Transaction]
}
Apply the schema
Run terraform apply (or npm run setup:schema) in the repository root. The Policy Editor then shows the full schema:
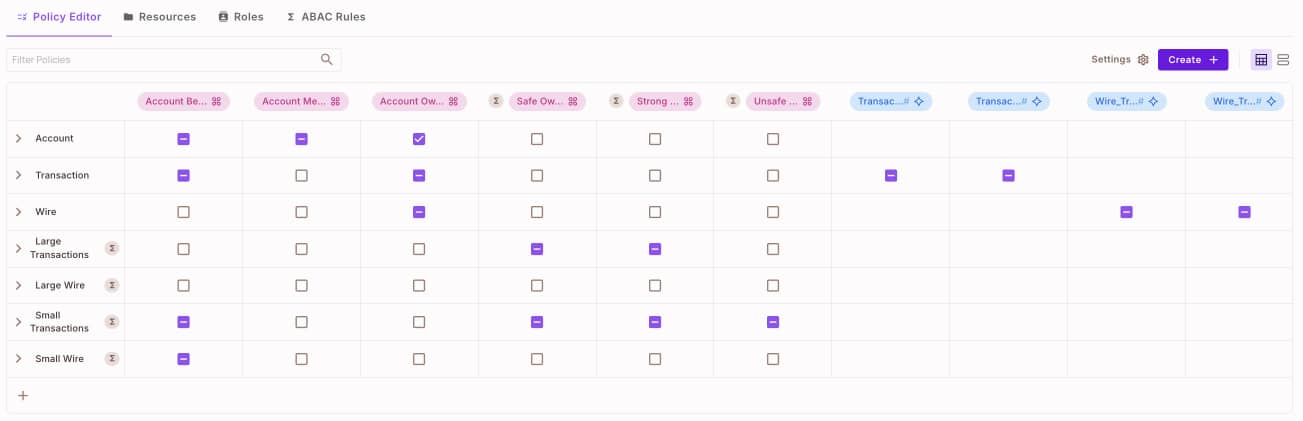
Permit generates policy code from the schema. To store and review that code in your own Git repository, see GitOps.
The applied schema enforces rules such as:
- Only account owners can add beneficiaries. Owners and beneficiaries can add members.
- Account owners and beneficiaries can list the account's transactions.
- Account owners in their home country, or with an OTP, can create large transactions.
- The sender and the receiver of a transaction can list that transaction.
- The
_Reviewer_of a wire transfer can approve or deny it.
Sync users, tenants, and roles
The PDP evaluates checks against the data it holds, so the app syncs users, tenants, role assignments, attributes, and resource instances to Permit when they change in the app. Most of the sync code is in lib/permit.ts.
Sync the user
When a user signs up through Stytch, the app syncs the user by email:
// Add User to Tenant
await permit.api.users.sync({
  key: email,
  email,
});
Create a tenant for each account
Each user gets a tenant. The tenant key is the email address with the domain and non-alphanumeric characters removed (cleanedEmail), and the tenant name is the full email:
await permit.api.tenants.create({
  key: cleanedEmail,
  name: email,
});
To list the accounts in the UI, the app lists tenants:
const tenants = await permit.api.tenants.list({
  perPage: 100,
});
Assign a tenant role
Permit has two kinds of role assignment: a tenant role applies to the whole tenant, and a resource role applies to one resource instance. The app assigns the new user AccountOwner in their tenant:
await permit.api.users.assignRole({
  role: "AccountOwner",
  tenant: cleanedEmail,
  user: email,
});
Assign a resource role
When the app records a transaction, it assigns the Sender role on that transaction instance. The resource_instance value is <resource type>:<instance key>:
await permit.api.roleAssignments.assign({
  role: "Sender",
  tenant,
  resource_instance: `Transaction:${transaction.id}`,
  user,
});
Sync user attributes
The app copies each user's home country from JSONBin.io into the country user attribute:
const response = await fetch(`https://api.jsonbin.io/v3/b/${process.env.JSONBIN_KEY}/latest`);
const data = await response.json();

const envUsers = await permit.api.users.list();
const users = envUsers.data.map((user) => user.key);

await Promise.all(
  Object.entries(data.record)
    .filter(([key]) => users.includes(key))
    .map(([key, country]) => permit.api.users.update(key, { attributes: { country } }))
);
The function updates every user in one pass. In a production application, sync the attribute when the user is created or updated. To sync attributes from your identity provider, use SCIM provisioning. Attributes that change per request, such as location and strongAuth, go in the permit.check() call instead (see Check a transaction).
Create resource instances
The app creates a Transaction resource instance with the transaction's fields as attributes. Resource roles such as Sender attach to this instance:
const resourceInstance = await permit.api.resourceInstances.create({
  resource: "Transaction",
  key: transaction.id,
  tenant,
  attributes: {
    ...transaction,
  },
});
Enforce permissions in the API routes
The app uses two SDK calls:
permit.check(user, action, resource)returnstrueorfalsefor one request.permit.getUserPermissions(user, tenants, resources, resource_types)returns the resource instances a user has permissions on, with the user's roles on each.
Each argument to permit.check() takes a key or an object:
| Argument | Key form | Object form |
|---|---|---|
| User | "john@permit.io" | { key, attributes } |
| Action | "read" | Not used in the demo |
| Resource | "Account" | { type, key, tenant, attributes } |
Check a transaction
To check whether a user can read an account, pass the user key, the action, and the resource type with the tenant:
await permit.check(user, "read", { type: "Account", tenant });
To check a transaction, pass request-time user attributes and the transaction attributes. The PDP matches them against the user sets and resource sets:
const transactionAllowed = await permit.check(
  {
    key: user,
    attributes: { strongAuth: !!OTP, location },
  },
  "create",
  {
    type: "Transaction",
    attributes: { ...transaction },
    tenant,
  }
);
List allowed transactions
To build the transaction list, the app gets the account owner's permissions on Transaction instances in the tenant:
const transactionInstances = await permit.getUserPermissions(key, [tenant], [], ["Transaction"]);
The arguments filter by tenant ([tenant]) and resource type (["Transaction"]). The empty array means no filter on specific resource instances. The app reads the Sender or Receiver role on each result to show the amount as outgoing or incoming.
Verify the enforcement
Sign up in the demo and open your account. The balance route runs permit.check(user, "read", { type: "Account", tenant }), and the account page loads because AccountOwner has Account:read. In the Permit audit log, the read decision on Account for your email is allowed.
Send a wire transfer to test the multi-step flow. A denied check returns one of the HTTP 403 messages listed in Multi-step wire transfer authorization, and the audit log shows the denied decision.
Configure Permit Elements
Permit Elements let your users manage permissions inside your application. The demo's setup.js script creates each element configuration through the Permit API. You can also edit each configuration in the Permit dashboard.
User Management
The Account Members Management element lets users invite people to an account and assign roles. Open it with the Manage Account Users button.
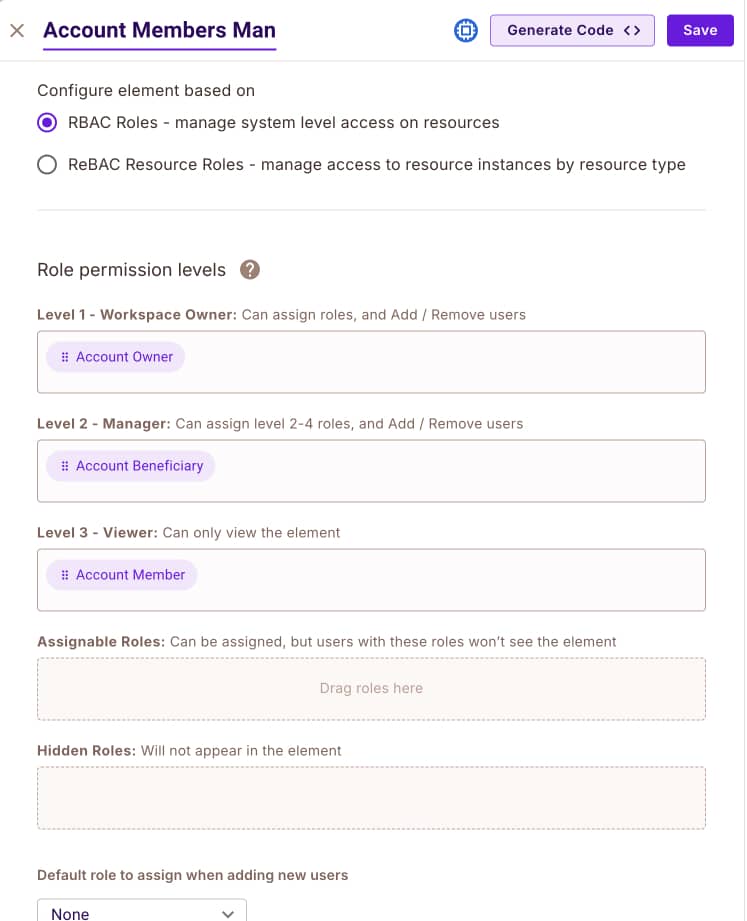
The element maps roles to permission levels: AccountOwner is level 1, AccountBeneficiary level 2, and AccountMember level 3. Owners assign the beneficiary and member roles. Beneficiaries assign only the member role.
Access Request
The Wire Transfer Request element lets a user without permission to view transactions ask for more access. The Request Access to Transactions button appears only for those users.
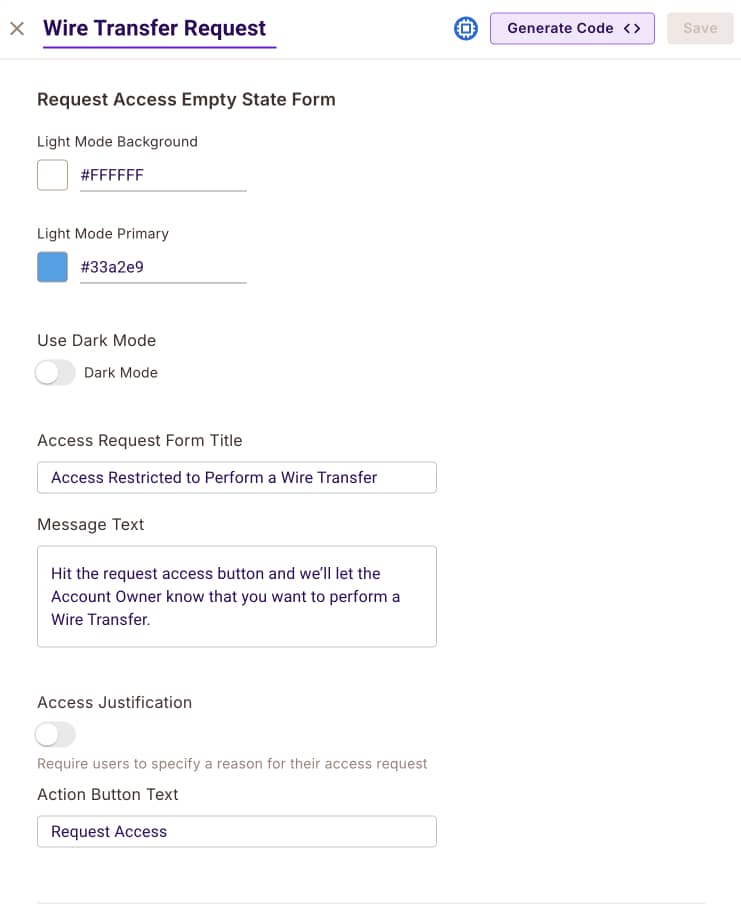
In the demo configuration, account members request the AccountBeneficiary role. See Access Request element.
Operation Approval request
The Wire Transfer Approval Request element lets a user ask for approval of one Wire_Transfer instance that the policy denies, such as a beneficiary's transfer above 1000.
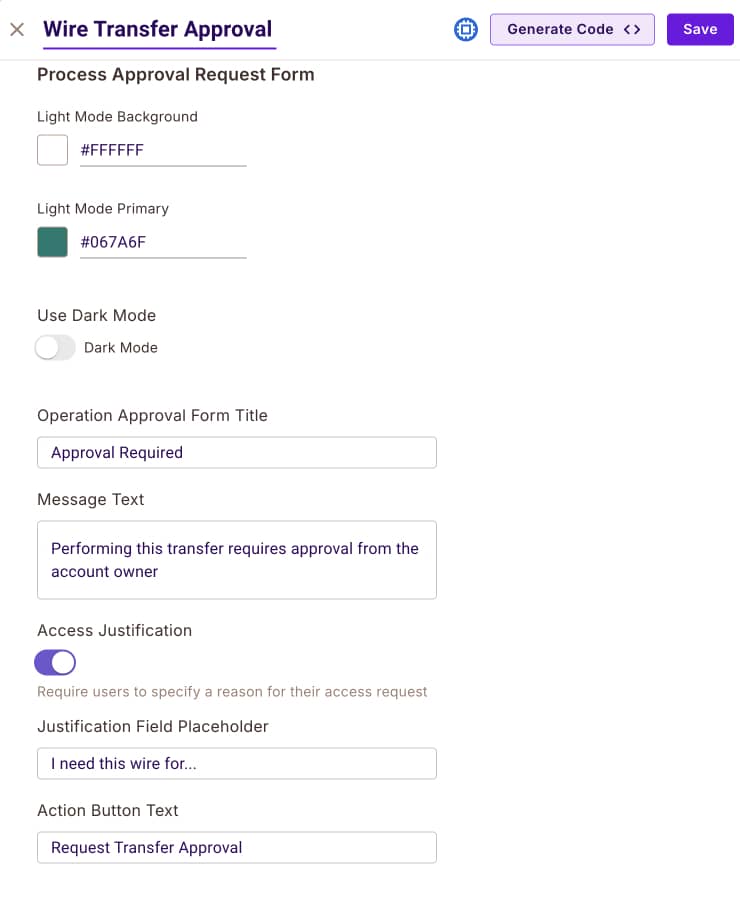
The configuration sets the resource type and a webhook. When the reviewer approves or denies, Permit calls the app's /account/webhook route with the webhook secret as a bearer token. On approval, the route records the transaction. On denial, it deletes the Wire_Transfer instance. See Operation Approval element and Webhooks.
Approval Management
The Wire Transfer Approval Management element lists pending requests for the reviewer. Account owners open it with the Review Wire Transfers button.
See Approval Management element.
Next steps
- Build a relationship graph with role derivations in Google Drive permissions with ReBAC.
- Define attribute-based rules in Build an ABAC policy.
- Manage your schema in code with the Terraform provider.
- Embed approval flows with Permit Elements.
- Ask questions about your fintech model in the Permit Slack community.