Build a secure RAG API with MongoDB Atlas and Permit.io
Run an example retrieval-augmented generation (RAG) API that answers questions only from documents the requesting user is allowed to read. This tutorial is for AI agent builders who use MongoDB Atlas as a vector store. The example applies the RAG data protection perimeter of the Four-Perimeter Framework with a relationship-based access control (ReBAC) policy in Permit.io, and the source is in permitio/permit-mongodb-secure-rag.
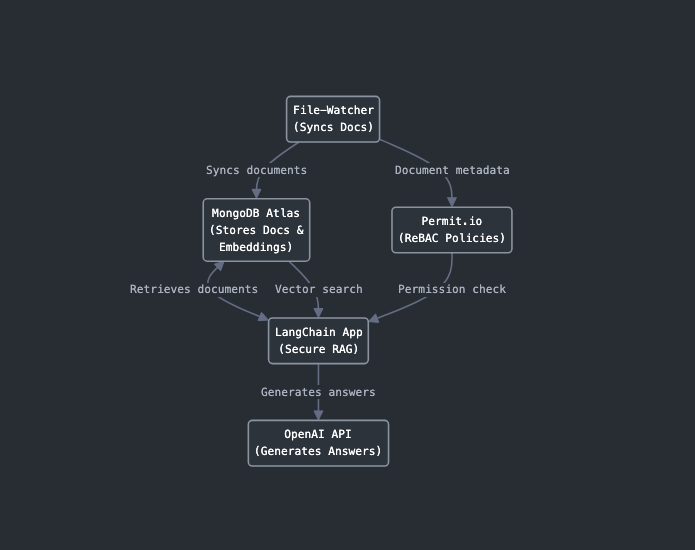
How the secure RAG API works
- Each Markdown file in the
docs/folder has frontmatter withdepartment,author, andconfidential. - A file watcher syncs each file to MongoDB Atlas and stores an OpenAI embedding in the
vector_embeddingfield. - A sync job creates each document as a
documentresource instance in Permit, with the file's department as itsparent. - A user is a
memberof a department. Permit derives thereaderrole on every document whose parent is that department, andreadergrantsread. - When a query arrives, the LangChain app asks the policy decision point (PDP) which
documentIDs the user canread, and filters the Atlas vector search to those IDs. - OpenAI generates the answer from the allowed documents only.
The policy decides access by department. The confidential attribute is synced to Permit, but no rule in the example uses it.
Project structure
| Folder or file | Purpose |
|---|---|
docs/ | Markdown documents grouped by department |
watcher/ | Syncs docs to MongoDB and generates embeddings |
scripts/ | Creates the ReBAC model, departments, users, and document instances in Permit |
app/ | The LangChain API, served with FastAPI |
Dockerfile* | Docker images for the services |
Prerequisites
| Tool or service | Purpose |
|---|---|
| MongoDB Atlas cluster (the free M0 tier works) | Stores documents and embeddings, runs vector search |
| Permit.io account and an environment API key (Get your API key) | Stores the ReBAC policy |
| OpenAI API key | Embeddings and answer generation |
| Docker and Docker Compose | Run the PDP and the example services |
| Python 3.11 or later | Run the setup scripts outside Docker (optional) |
Use a Permit environment that doesn't already have document or department resources. The sync job creates them, and it fails if they exist.
1. Set up MongoDB Atlas
-
In MongoDB Atlas, create a project and a cluster.
-
Open Browse Collections. Create a database named
secure_ragwith a collection nameddocuments. -
Open Search Indexes (or Atlas Search), click Create Search Index, and select Vector Search.
-
Select the
secure_rag.documentscollection and the JSON editor. Name the indexvector_index. The LangChain app queries an index with that name. Paste this definition:{"fields": [{"type": "vector","path": "vector_embedding","numDimensions": 1536,"similarity": "cosine"},{"type": "filter","path": "metadata.department"},{"type": "filter","path": "document_id"}]}Field Purpose vector_embeddingStores the document embedding. 1536is the dimension count of the OpenAI embedding model the watcher calls. Set it to the dimension count of your model if you change the model.cosineis the similarity metric.metadata.departmentLets vector search pre-filter by department document_idLets vector search filter to the document IDs Permit allows -
Click Save. Wait until the index status is READY.
-
Open the Indexes tab of
secure_rag.documentsand click Create Index (not Create Search Index). Create a unique index ondocument_id, which the watcher uses to find and update each document. Use these settings:Setting Value Field document_idType 1 (asc)Create unique index Checked Index name document_id_indexCreate TTL Unchecked -
Click Connect on the cluster, choose Connect your application, and copy the connection string. Replace the username and password placeholders with your Atlas database user's credentials. The string has this form:
mongodb+srv://<username>:<password>@cluster0.mongodb.net/secure_rag?retryWrites=true&w=majority
2. Clone the project
Clone the repository:
git clone https://github.com/permitio/permit-mongodb-secure-rag.git
cd permit-mongodb-secure-rag
Environment variables in the .env file
Create a .env file in the project root. Docker Compose passes these values to every service:
MONGODB_URI=<your-mongodb-uri>
OPENAI_API_KEY=<your-openai-api-key>
PERMIT_API_KEY=<your-permit-api-key>
PERMIT_PDP_URL=http://permit-pdp:7000
| Variable | Value |
|---|---|
MONGODB_URI | The Atlas connection string from Set up MongoDB Atlas |
OPENAI_API_KEY | Your OpenAI API key |
PERMIT_API_KEY | Your Permit environment API key |
PERMIT_PDP_URL | http://permit-pdp:7000, the PDP address inside the Docker Compose network |
Anyone with your environment API key can change that environment's policy through the Permit API. Keep .env out of version control.
3. Start the services
Start all services with Docker Compose:
docker-compose up --build
Docker Compose starts these services in order:
| Service | What it does |
|---|---|
permit-pdp | Runs the Permit PDP. Port 7000 in the container is published on localhost:7766. |
file-watcher | Syncs the Markdown files in docs/ to MongoDB, generates their embeddings, and watches for changes |
permit-sync | Runs scripts/setup_all.py once, after file-watcher finishes its first sync. See What permit-sync creates in Permit. |
langchain-app | Starts the RAG API on http://localhost:8000 after permit-sync completes successfully |
Verify that the API and its dependencies are up:
curl -s http://localhost:8000/health
The response reports MongoDB and Permit separately:
{ "status": "ok", "mongodb": true, "permit": true }
"status": "degraded" with "mongodb": false points at MONGODB_URI. "permit": false points at PERMIT_API_KEY or the permit-pdp container.
If permit-sync fails, for example because the resources already exist in your Permit environment, the container exits with an error and langchain-app doesn't start. Check the permit-sync logs, and use a Permit environment without document and department resources.
4. Query the RAG API
Send a query about the finance budget as the marketing user user_marketing_1:
curl -X POST http://localhost:8000/query \
 -H "Content-Type: application/json" \
 -d '{"query": "Tell me about the 2024 budget forecast", "user_id": "user_marketing_1"}'
The response is a JSON object with answer and sources. The budget document is docs/finance/budget_2024.md and user_marketing_1 is a member of the marketing department, so the PDP never returns that document's ID and the answer names the documents the user can read instead:
{
  "answer": "No documents match your query due to permission restrictions. You only have access to documents: ['marketing_plan_f5230544', 'product_roadmap_98e953e2'].",
  "sources": []
}
Run the same query as user_finance_1, a member of the finance department:
curl -X POST http://localhost:8000/query \
 -H "Content-Type: application/json" \
 -d '{"query": "Tell me about the 2024 budget forecast", "user_id": "user_finance_1"}'
The finance user gets an answer built from the budget document, and sources lists it:
{
  "answer": "The 2024 budget forecasts total revenue of $11,750K against total expenses of $9,450K, with revenue growing 22% and expenses growing 18%.",
  "sources": [
    {
      "document_id": "budget_2024_986f89f7",
      "filename": "budget_2024.md",
      "department": "finance",
      "author": "emma",
      "confidential": true,
      "snippet": "# Budget Forecast 2024\n\n## Executive Summary\n\nThe 2024 budget focuses on sustainable growth while maintaining profitability..."
    }
  ]
}
OpenAI generates answer, so its wording differs between runs. sources and document_id don't: utils/document_ids.py derives each document_id from the file's path, so the IDs above are the IDs in your environment.
The sync job creates these users:
| User key | Name | Department membership |
|---|---|---|
user_engineering_1 | Alice | department:engineering |
user_engineering_2 | Bob | department:engineering |
user_marketing_1 | Carol | department:marketing |
user_finance_1 | Dave | department:finance |
A user_id that doesn't exist in Permit gets the answer "You are not authorized to access this resource." and an empty sources array.
What permit-sync creates in Permit
scripts/setup_all.py runs four scripts. Open the Permit dashboard after permit-sync finishes to see the results.
| Script | Creates |
|---|---|
setup_rebac.py | Resources document (action read) and department (action view). The relation parent from department to document. The resource roles department#member (grants view) and document#reader (grants read). The role derivation: a member of a department is a reader of each document that department is parent of. |
setup_departments.py | Resource instances department:engineering, department:marketing, and department:finance in the default tenant, each with a name attribute |
setup_users.py | The four users in Query the RAG API, each assigned member on their department |
sync_documents.py | A document resource instance for each Markdown file, with author, confidential, department, and title attributes, and a parent relationship tuple from the file's department |
For a walkthrough of the same model in the dashboard, see the ReBAC overview.
Build the ReBAC model in the dashboard
To create the same model by hand in a Permit environment you don't use with permit-sync:
-
In the Policy screen, create a
departmentresource with theviewaction and adocumentresource with thereadaction. -
On
document, add a relation namedparentwithdepartmentas the subject resource. -
Create the resource role
memberondepartmentand grant it theviewaction. Create the resource rolereaderondocumentand grant it thereadaction. -
On
document#reader, add a role derivation frommemberon thedepartmentlinked byparent. -
Create the department instances
department:engineering,department:marketing, anddepartment:financein thedefaulttenant, each with anameattribute such asEngineering Department. -
Create the four users from Query the RAG API and assign each one the
memberrole on their department instance:User key Email Role assignment user_engineering_1alice@example.commemberondepartment:engineeringuser_engineering_2bob@example.commemberondepartment:engineeringuser_marketing_1carol@example.commemberondepartment:marketinguser_finance_1dave@example.commemberondepartment:finance -
Create a
documentinstance for each file and aparentrelationship tuple from its department.scripts/sync_documents.pyshows the exact keys and attribute values.
Verify the model in Directory > Instances: each document instance lists its department under Relations, and the role assignment of user_engineering_1 reads member on department:engineering.
Run the setup scripts outside Docker
Run the scripts yourself when you change the model, or when you run the services without Docker Compose. The scripts are in the scripts/ folder and read PERMIT_API_KEY and PERMIT_PDP_URL from the environment.
-
Install the Permit SDK:
pip install permit -
Set the environment variables. Outside the Docker Compose network the PDP answers on the published port,
7766, not onpermit-pdp:7000. Get thePERMIT_API_KEYfrom Settings > API Keys in the Permit dashboard.PERMIT_API_KEY=<your-permit-api-key>PERMIT_PDP_URL=http://localhost:7766 -
Create the ReBAC model, including the role derivation:
python scripts/setup_rebac.py -
Create the department instances:
python scripts/setup_departments.py -
Create the users and their department memberships:
python scripts/setup_users.pyThe script creates
user_engineering_1,user_engineering_2,user_marketing_1, anduser_finance_1. -
Check the dashboard:
departmentanddocumentinstances under Directory, the users and their role assignments, and the role derivation ondocumentin the Policy screen.
Run the pipeline step by step
The file-watcher and permit-sync containers run the document sync and the embedding generation for you. Run them yourself to see each stage, or after you add documents to docs/ while the services are down. Start from a checkout and running services, as in Clone the project and Start the services.
-
Install the script dependencies. Docker builds install the service dependencies for you.
pip install -r requirements.txtpip install -r requirements.watcher.txt -
Sync documents to Permit.
sync_documents.pysyncs every Markdown file under./docswhen you run it directly:python scripts/sync_documents.py -
Generate embeddings for all documents in MongoDB. The script stores each embedding in the
vector_embeddingfield:python scripts/generate_embeddings.py --all -
Query the API as
user_engineering_1, a member of engineering:curl -X POST http://localhost:8000/query \-H "Content-Type: application/json" \-d '{"query": "What is API design?", "user_id": "user_engineering_1"}'sourcesholds the engineering API design document:{"answer": "The API design guidelines require REST-based design with appropriate HTTP methods, versioning in the URL path, and JWT or OAuth 2.0 authentication.","sources": [{"document_id": "api_design_546b025f","filename": "api_design.md","department": "engineering","author": "dave","confidential": false,"snippet": "# API Design Guidelines\n\n## Core Principles\n\n1. **REST-based Design**..."}]}Run the same query as
user_marketing_1to confirm the filter: a member of marketing gets no content fromdocs/engineering/api_design.mdand an emptysourcesarray.
Next steps
- Read how the four perimeters fit together in the Four-Perimeter Framework.
- Learn how relations and role derivations work in the ReBAC overview.
- Filter other data sources by permission with data filtering.
- Read the MongoDB Atlas Vector Search documentation.
- Ask questions in the Permit Slack community.