Filter AI prompts with OpenAI classification and Permit.io
Classify a user's free-text prompt into a structured access request with OpenAI, then check that request with permit.check() before your app answers. This tutorial is for AI agent builders who write Node.js and need to decide whether a chat user can see what they ask for. It applies the prompt filtering perimeter of the Four-Perimeter Framework.
A chat interface receives open-ended requests like these:
- "What's the IATA rate for this hotel?"
- "Help me diversify my investment portfolio"
- "Show me my financial data for Q1"
Some of these requests are fine for every user, and some need a specific role. A prompt has no endpoint or parameter that a rule can match, so the app first turns it into a resource type, a resource key, attributes, and an action.
What you build
A Node.js project with three files:
| File | Contents |
|---|---|
src/classifier.js | The AccessClassifier class, which sends the prompt to OpenAI and returns JSON with resourceType, resourceKey, attributes, and action |
src/permit.js | The Permit client and the checkAccess function, which turns that JSON into a Permit resource and calls permit.check() on a policy decision point (PDP) |
index.js | The entry script, which runs five prompts through both modules and prints each decision |
The example covers two domains:
| Domain | Resource types | Rule |
|---|---|---|
| Hotel rates | HotelType with the rateType attribute (IATA, premium, public) | Every role sees public rates. premium_user also sees premium rates, and iata_agent also sees IATA rates. |
| Financial requests | FinancialAdvice, FinancialData | viewer sees financial data. Only ai_advisor receives AI-generated financial advice. |
A policy decision point (PDP) is the Permit service that evaluates each permission check against your policy. This tutorial runs one as a local Docker container.
The source this tutorial is based on is in the permit-prompt-filtering repository, which keeps the entry script in server.js instead of index.js.
Prerequisites
| Tool or service | Purpose |
|---|---|
| Node.js | Runs the app |
| Permit.io account and an environment API key (Get your API key) | Stores the policy |
| OpenAI API key | Classifies prompts |
| Docker | Runs the PDP locally |
Required credentials
Create a .env file in the project root and add these values:
OPENAI_API_KEY=<your_openai_key>
PERMIT_API_KEY=<your_permit_api_key>
PDP_URL=http://localhost:7766
OPENAI_MODEL=gpt-4o-mini
| Variable | Required | Value |
|---|---|---|
OPENAI_API_KEY | Yes | Your OpenAI API key |
PERMIT_API_KEY | Yes | Your environment API key from the Permit dashboard |
PDP_URL | Yes | Your Edge PDP, for example http://localhost:7766. The resource sets in this tutorial need an Edge PDP, so don't point PDP_URL at the Cloud PDP. See Why this tutorial uses an Edge PDP. |
OPENAI_MODEL | No | The OpenAI model that classifies prompts. The classifier falls back to gpt-4o-mini when OPENAI_MODEL isn't set. |
Both modules load .env with dotenv. Anyone with your environment API key can change that environment's policy through the Permit API, so keep .env out of version control.
Dependencies
Install the packages from the project root:
npm install openai permitio dotenv
| Package | Purpose |
|---|---|
openai | Calls the OpenAI chat completions API to classify prompts |
permitio | The Permit Node.js SDK, which calls the PDP |
dotenv | Loads .env into process.env |
How prompt filtering works
A role check needs structured input: a user, an action, and a resource. A chat prompt is unstructured text. Prompt filtering puts a classifier between the two. The classifier maps the prompt to a resource type and attributes, and the PDP evaluates that structured request against your policy before the app processes the prompt.
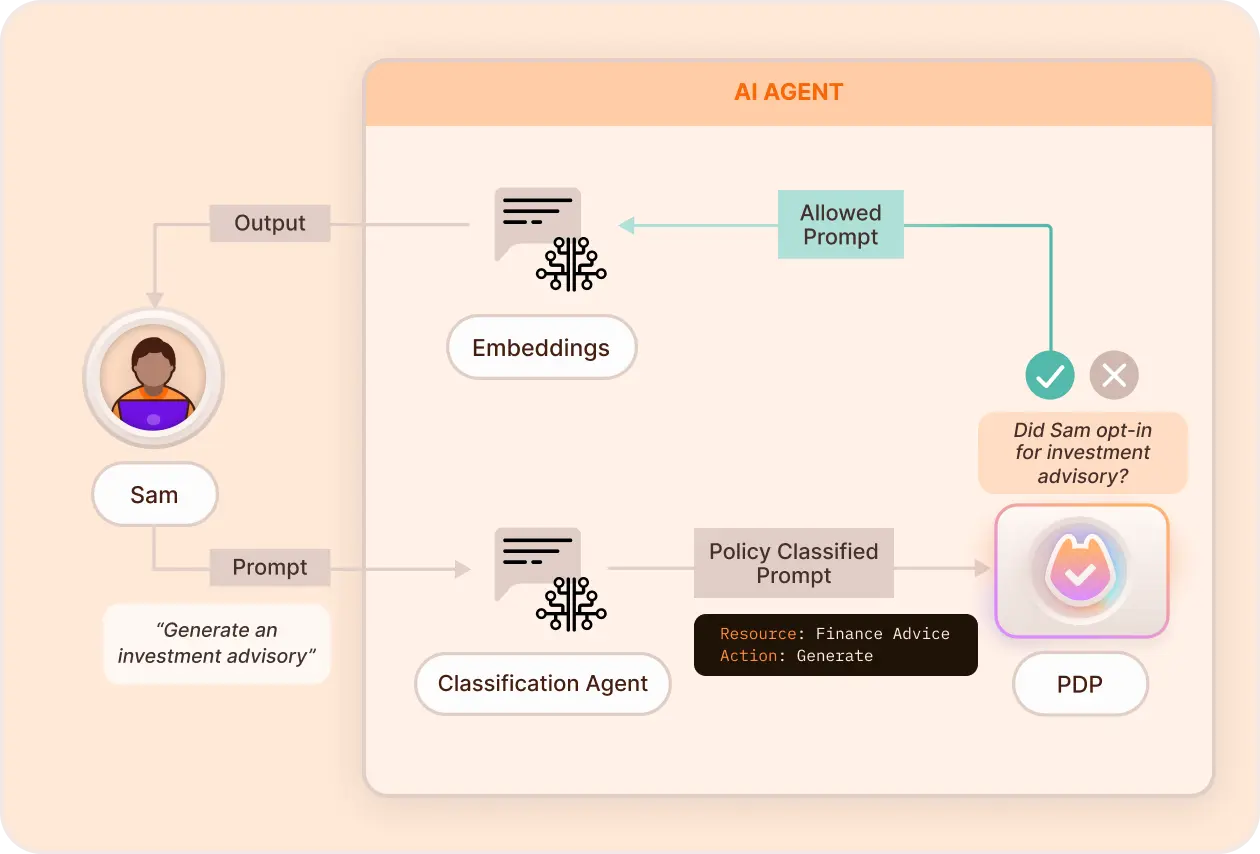
Why classify prompts with a large language model
- No keyword lists: the classifier maps different phrasings of the same request to the same resource type, without regular expressions.
- Defaults for missing details: the system prompt tells the classifier which value to use when the prompt doesn't name one, for example
rateType: "public". - One classifier, several domains: you configure the resource type and attributes per classifier instance.
A large language model (LLM) classifier can return a wrong resource type or attribute, and the PDP decides on whatever the classifier returns. If the classifier labels a premium-rate question as rateType: "public", the PDP allows the request and the app answers with the public rate. Write the system prompt so a missing value defaults to the least privileged one, and check the audit logs when a decision looks wrong.
Configure the policy in Permit
Create the roles, resources, resource sets, and rules in the Policy screen of the Permit dashboard.
1. Create the roles
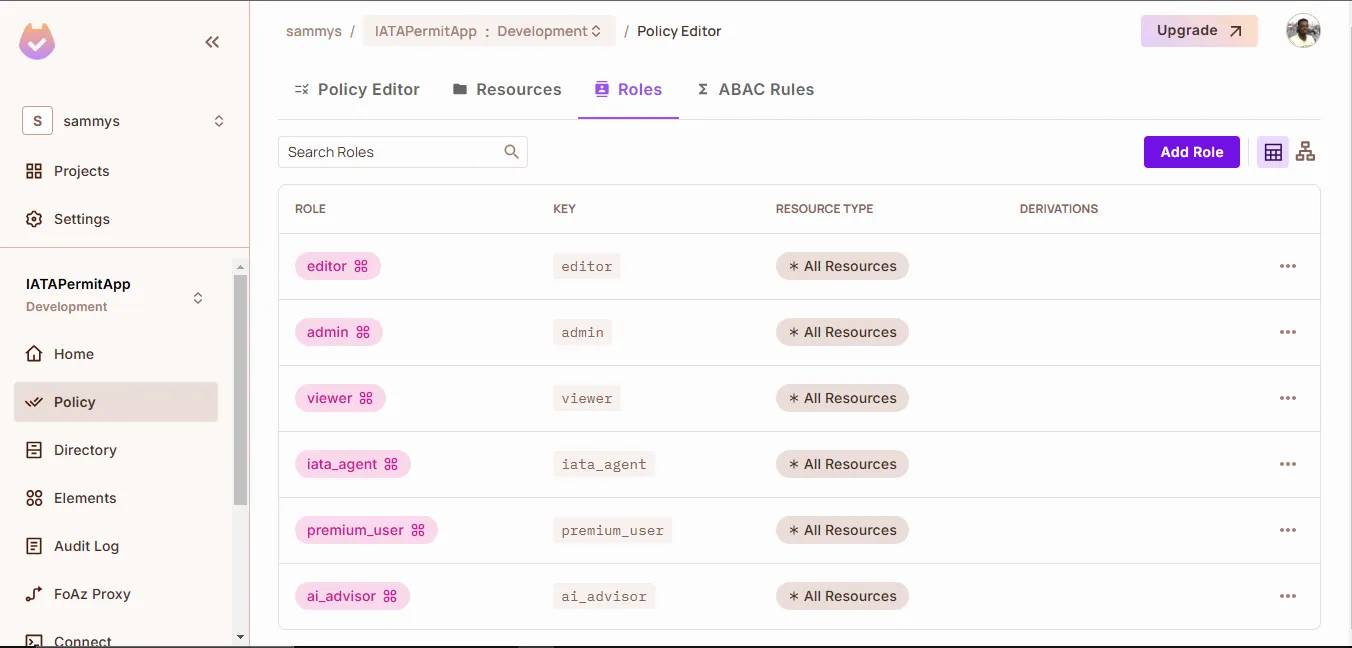
Open Policy > Roles and add these roles:
| Role | Can access |
|---|---|
iata_agent | IATA hotel rates |
premium_user | Premium hotel rates |
ai_advisor | AI-generated financial advice |
viewer | Public data |
2. Create the resources
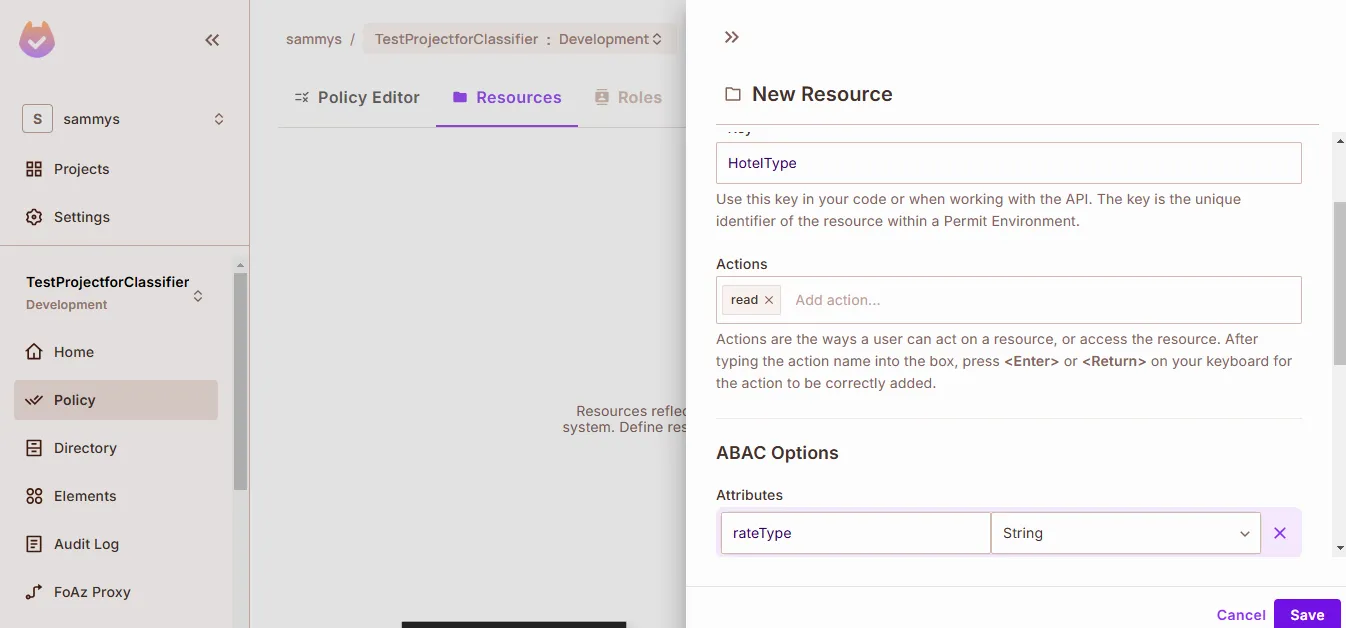
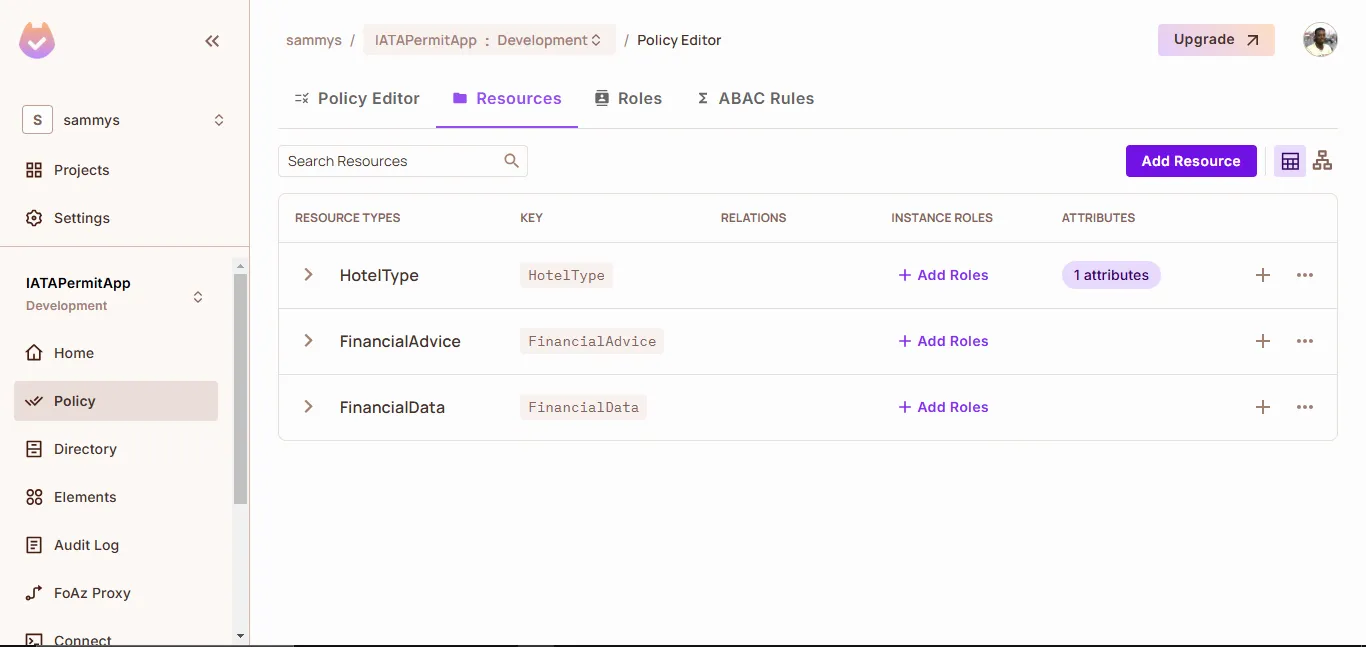
Open Policy > Resources and create:
| Resource | Action | Attributes |
|---|---|---|
HotelType | read | rateType (String): IATA, premium, or public |
FinancialData | read | None |
FinancialAdvice | read | None |
3. Create the resource sets
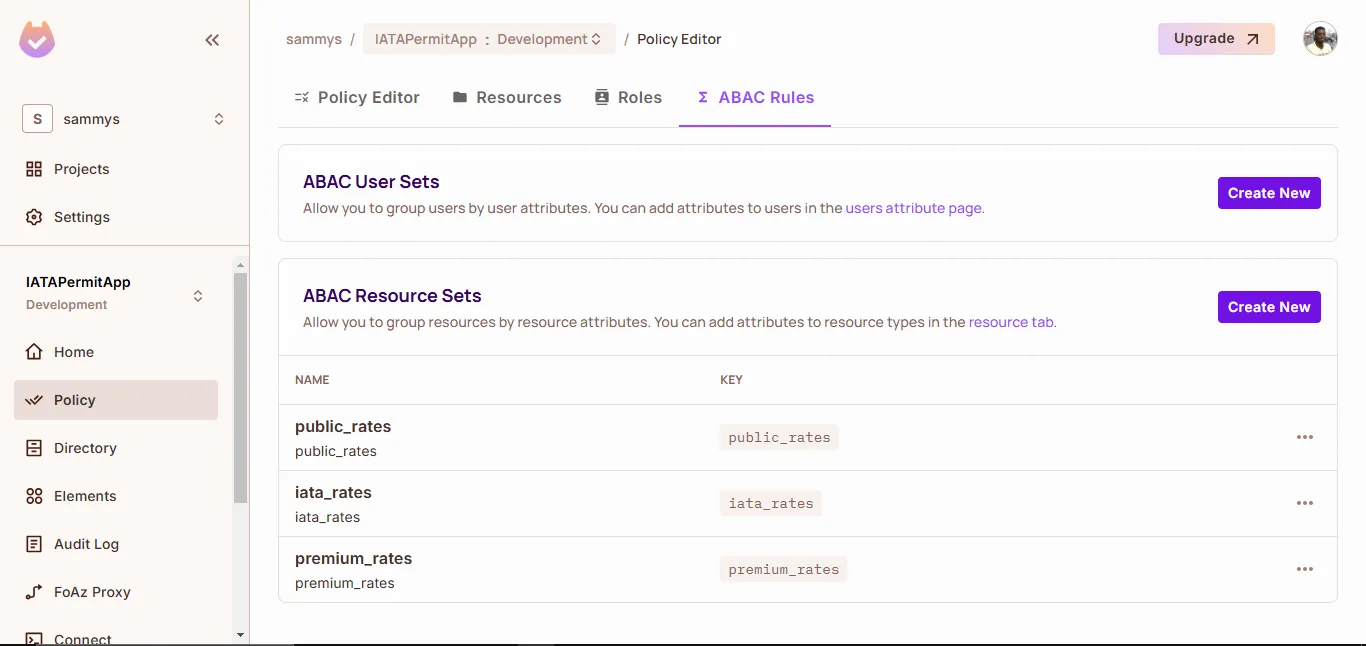
Open Policy > ABAC Rules and create three ABAC resource sets on HotelType:
| Resource set | Condition |
|---|---|
iata_rates | resource.rateType == "IATA" |
premium_rates | resource.rateType == "premium" |
public_rates | resource.rateType == "public" |
FinancialAdvice and FinancialData don't need resource sets. The rules reference them directly.
4. Grant permissions
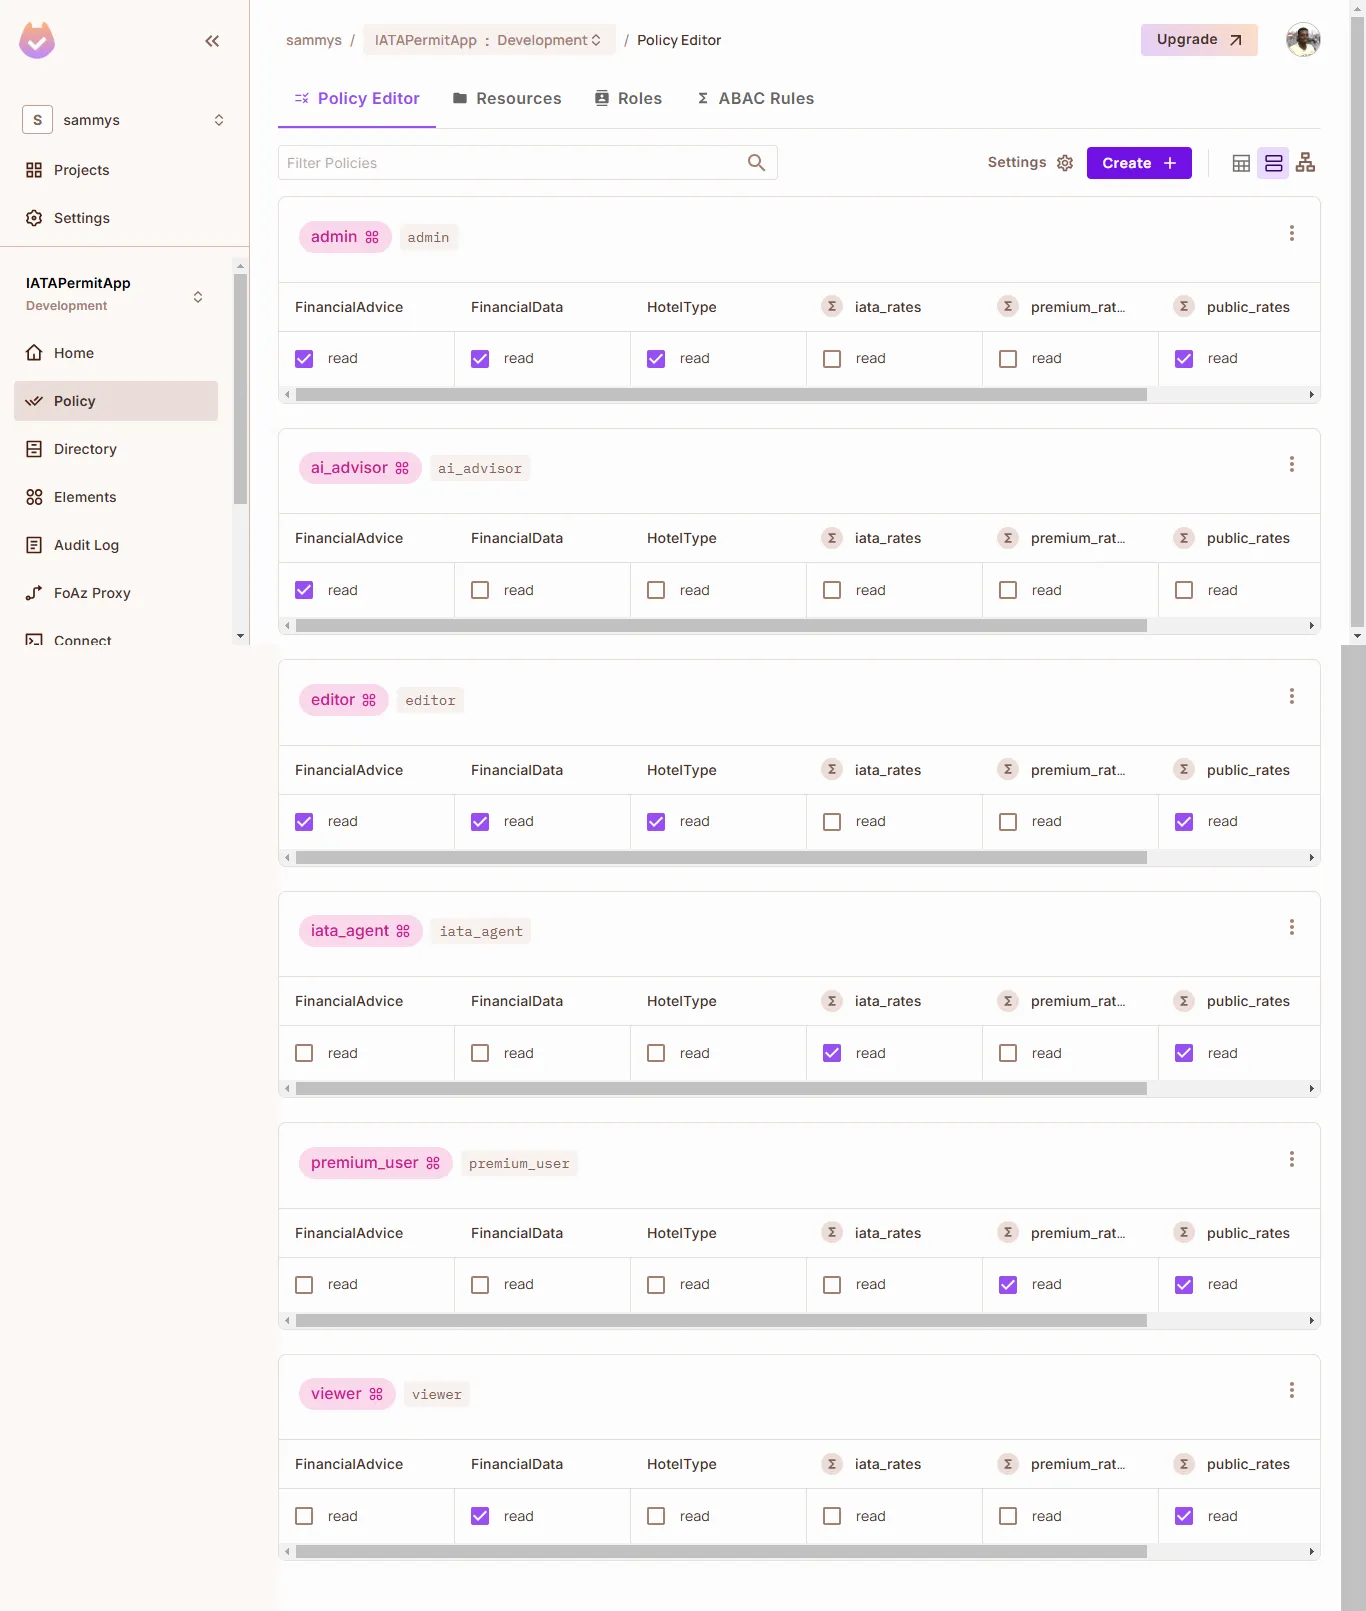
In the Policy Editor, check read for these role and resource pairs:
| Role | read on |
|---|---|
viewer | public_rates, FinancialData |
premium_user | premium_rates, public_rates |
iata_agent | iata_rates, public_rates |
ai_advisor | FinancialAdvice |
5. Create test users
In the Directory screen, create the users that the test code checks and assign each user a role in the default tenant. See Sync users.
| User key | Role |
|---|---|
iata_agent_1 | iata_agent |
premium_user_001 | premium_user |
regular_user_1 | viewer |
regular_user_2 | viewer |
If a user key doesn't exist in Permit, the PDP denies every check for that user.
Run the PDP
-
Pull the PDP image:
docker pull permitio/pdp-v2:latest -
Run the PDP container. Replace
<YOUR_API_KEY>with your environment API key:docker run -it -p 7766:7000 \--env PDP_DEBUG=True \--env PDP_API_KEY=<YOUR_API_KEY> \permitio/pdp-v2:latest -
Verify the PDP answers its health check:
curl -s -o /dev/null -w '%{http_code}\n' http://localhost:7766/healthyA healthy PDP prints
200. The PDP serves the same check on/healthand/ready, and the check needs no API key. See Verify the PDP is healthy. -
If the health check doesn't print
200, read the container logs. Find the container ID, then print its logs:docker psdocker logs <container_id>A wrong
PDP_API_KEYshows as an authentication error in the logs, and everypermit.check()call fails.
Why this tutorial uses an Edge PDP
The resource sets iata_rates, premium_rates, and public_rates match on a resource attribute, which is attribute-based access control (ABAC). The Cloud PDP evaluates role-based access control (RBAC) and relationship-based access control (ReBAC), but not ABAC, so hotel rate checks on the Cloud PDP don't return the results in this tutorial. See Cloud PDP capabilities. A local container PDP also lets you develop without a network round trip to the Cloud PDP.
Build the OpenAI classifier
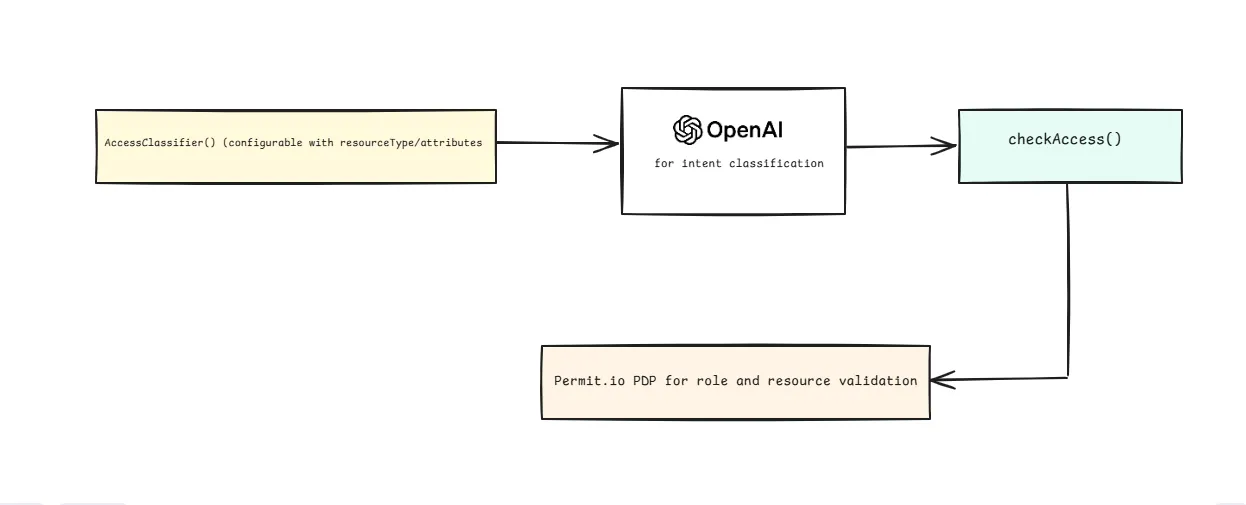
The AccessClassifier class turns a prompt into a structured request.
What the classifier does
- Reads a natural language request, such as "What's the price of Hilton Budapest?"
- Infers the resource type and attributes, such as
resourceType: HotelTypeandrateType: public - Returns a JSON object that the permission check uses
Configure a classifier instance
The constructor takes an optional resource type and a list of attributes to look for. The class adds them to the system prompt it sends to OpenAI:
// A classifier for hotel rate requests, which reads the rateType attribute.
const hotelClassifier = new AccessClassifier('HotelType', ['rateType']);

// A classifier for financial requests, which picks the resource type from the prompt.
const financeClassifier = new AccessClassifier();
Pass a resource type when every prompt for that classifier maps to one resource type. Leave the resource type out when the classifier has to choose, as it does between FinancialAdvice and FinancialData.
Save the module as src/classifier.js, in three parts. Start with the OpenAI client, the model constant, and the constructor. The constructor stores the resource type and the attribute list, then builds the system prompt once per instance:
const OpenAI = require('openai');
require('dotenv').config();

// Any chat completions model that supports JSON mode works here.
const MODEL = process.env.OPENAI_MODEL || 'gpt-4o-mini';

class AccessClassifier {
  constructor(resourceType = null, attributes = []) {
    this.openai = new OpenAI({ apiKey: process.env.OPENAI_API_KEY });
    this.resourceType = resourceType;
    this.attributes = attributes;
    this.systemPrompt = this.buildSystemPrompt();
  }
Add buildSystemPrompt to the same class body. The system prompt defines the output format, the allowed rateType values, the rule that a missing rate type becomes public, and the routing rules between FinancialAdvice and FinancialData:
  buildSystemPrompt() {
    const resourceLine = this.resourceType
      ? `Classify every request as resource type: ${this.resourceType}`
      : 'Choose the resource type from the request.';

    const attributeLine = this.attributes.length
      ? `Fill in these attributes: ${this.attributes.join(', ')}`
      : 'Return an empty attributes object.';

    const attributeFields = this.attributes
      .map((attr) => `"${attr}": "value"`)
      .join(', ');

    return `You are a request classifier that maps a user request to an access request.

${resourceLine}
${attributeLine}

Rules:
- For HotelType, rateType is one of "IATA", "premium", or "public".
- When the request does not name a rate type, use "public".
- Use FinancialAdvice when the request asks for a recommendation, guidance, or a strategy.
- Use FinancialData when the request asks for a current value, a statistic, or a status.

Examples:
"Show me IATA rates" -> HotelType with rateType "IATA"
"What's the price?" -> HotelType with rateType "public"
"How should I invest?" -> FinancialAdvice
"Show my portfolio value" -> FinancialData

Answer with JSON in this shape and nothing else:
{
  "resourceType": "${this.resourceType || 'HotelType, FinancialAdvice, or FinancialData'}",
  "resourceKey": "identifier",
  "attributes": {${attributeFields}},
  "action": "read"
}`;
  }
End src/classifier.js with the classify method, the closing brace of the class, and the export:
  async classify(userPrompt) {
    const response = await this.openai.chat.completions.create({
      model: MODEL,
      messages: [
        { role: 'system', content: this.systemPrompt },
        { role: 'user', content: userPrompt }
      ],
      response_format: { type: 'json_object' },
      temperature: 0
    });

    return JSON.parse(response.choices[0].message.content);
  }
}

module.exports = AccessClassifier;
classify(userPrompt) sends the system prompt and the user prompt to the OpenAI chat completions API with temperature: 0 and response_format: { type: 'json_object' }, so the response body is always parsable JSON. MODEL defaults to gpt-4o-mini. Set OPENAI_MODEL to use a different model. The version in the example repository is src/classifier.js.
Classifier output
For a hotel classifier, classify() returns an object like the one in this block. Run the await call inside an async function:
const classifier = new AccessClassifier('HotelType', ['rateType']);

const result = await classifier.classify("What's the price for Hilton?");
// result:
// {
//   resourceType: 'HotelType',
//   resourceKey: 'hilton',
//   attributes: { rateType: 'public' },
//   action: 'read'
// }
Check permissions on the classified request
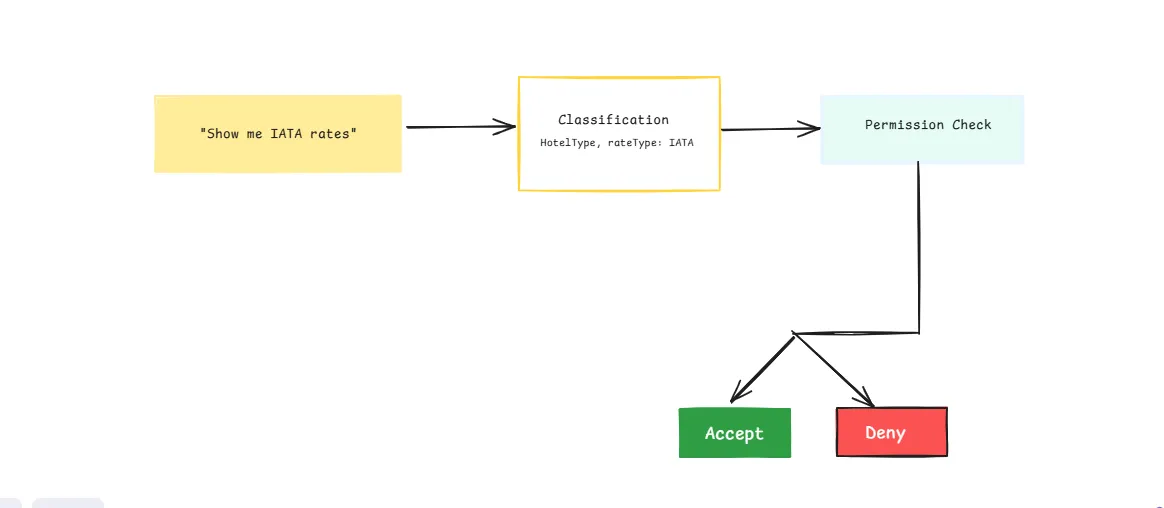
After the classifier returns a structured request, checkAccess builds a Permit resource from it and calls permit.check().
The checkAccess function
checkAccess takes a user key and the classified request. It builds a resource with type and key, adds attributes when the classifier returned any, and calls permit.check(). When the PDP denies the request, the function logs a reason based on the resource type. Save the module as src/permit.js, in two parts.
Start with the Permit client and the part of checkAccess that builds the resource. The client reads the API key and the PDP URL from the environment, so one client serves every check:
const { Permit } = require('permitio');
require('dotenv').config();

const permit = new Permit({
  token: process.env.PERMIT_API_KEY,
  pdp: process.env.PDP_URL
});

async function checkAccess(userId, parsedRequest) {
  console.log('Checking permission:');
  console.log(`  User: ${userId}`);
  console.log(`  Resource type: ${parsedRequest.resourceType}`);
  console.log(`  Action: ${parsedRequest.action}`);

  const resource = {
    type: parsedRequest.resourceType,
    key: parsedRequest.resourceKey
  };

  // Send attributes only when the classifier returned any.
  if (Object.keys(parsedRequest.attributes || {}).length > 0) {
    resource.attributes = parsedRequest.attributes;
    console.log('  Attributes:', parsedRequest.attributes);
  }
End the same function body with the check itself, and export the client and the function. The catch block logs the error message and rethrows, so a connection failure doesn't reach the caller as a denial:
  try {
    const permitted = await permit.check(userId, parsedRequest.action, resource);

    if (permitted) {
      console.log('  Access granted');
    } else if (parsedRequest.resourceType === 'HotelType') {
      console.log('  Access denied: the user has no permission for this rate type');
    } else if (parsedRequest.resourceType === 'FinancialAdvice') {
      console.log('  Access denied: the user is not authorized for financial advice');
    } else {
      console.log('  Access denied: insufficient permissions');
    }

    return permitted;
  } catch (checkError) {
    console.error(`  Permission check failed: ${checkError.message}`);
    throw checkError;
  }
}

module.exports = { permit, checkAccess };
Three details of permit.check() matter here:
- Errors throw by default. The Node.js SDK sets
throwOnErrortotrue, so a PDP that is unreachable or that rejects the API key makespermit.check()throw instead of returningfalse. Thecatchblock logs the message and rethrows, which keeps a connection failure from looking like a denial. - The check runs in the
defaulttenant. The SDK fills in the tenantdefaultwhen the resource has none, which is why Create test users assigns each role in thedefaulttenant. - The resource key can be any string. The resource sets in this tutorial match on the
rateTypeattribute thatcheckAccesssends with the request, not on a resource instance stored in Permit, so theresourceKeythe classifier invents doesn't have to exist in your Permit directory.
The version in the example repository is src/permit.js.
Run the classifier and the policy together
index.js ties the classifier, the Permit client, and checkAccess together. It creates one classifier per domain, runs five prompts, and prints the decision for each one. Save it in the project root, in three parts.
Start with the imports and the two classifier instances. The hotel classifier is fixed to HotelType and reads rateType, and the finance classifier picks the resource type from the prompt:
require('dotenv').config();

const AccessClassifier = require('./src/classifier');
const { checkAccess } = require('./src/permit');

const hotelClassifier = new AccessClassifier('HotelType', ['rateType']);
const financeClassifier = new AccessClassifier();
Add the five scenarios. Each entry names the classifier to use, the user key to check, and the prompt to classify:
const scenarios = [
  {
    description: 'IATA agent asks for an IATA rate',
    classifier: hotelClassifier,
    userId: 'iata_agent_1',
    prompt: 'Give me the IATA rate for Hilton Budapest tonight'
  },
  {
    description: 'Viewer asks for an IATA rate',
    classifier: hotelClassifier,
    userId: 'regular_user_1',
    prompt: 'Show me IATA rates for Marriott'
  },
  {
    description: 'Premium user asks for a premium rate',
    classifier: hotelClassifier,
    userId: 'premium_user_001',
    prompt: 'Show me the premium rate for Hilton Budapest'
  },
  {
    description: 'Viewer asks for a portfolio value',
    classifier: financeClassifier,
    userId: 'regular_user_1',
    prompt: 'Show me my current portfolio value'
  },
  {
    description: 'Viewer asks for investment advice',
    classifier: financeClassifier,
    userId: 'regular_user_2',
    prompt: 'How should I diversify my investments?'
  }
];
End index.js with the loop that classifies each prompt, checks it, and prints the decision. A failure in either step exits with code 1:
async function main() {
  for (const scenario of scenarios) {
    console.log(`\n=== ${scenario.description} ===`);

    const classification = await scenario.classifier.classify(scenario.prompt);
    console.log('Classification:', JSON.stringify(classification));

    const allowed = await checkAccess(scenario.userId, classification);
    console.log(`Result: ${allowed ? 'ALLOWED' : 'DENIED'}`);
  }
}

main().catch((error) => {
  console.error(error);
  process.exit(1);
});
Run it with the PDP container running and the environment variables set:
node index.js
Expected output
=== IATA agent asks for an IATA rate ===
Classification: {"resourceType":"HotelType","resourceKey":"hilton-budapest","attributes":{"rateType":"IATA"},"action":"read"}
Checking permission:
  User: iata_agent_1
  Resource type: HotelType
  Action: read
  Attributes: { rateType: 'IATA' }
  Access granted
Result: ALLOWED

=== Viewer asks for an IATA rate ===
Classification: {"resourceType":"HotelType","resourceKey":"marriott","attributes":{"rateType":"IATA"},"action":"read"}
Checking permission:
  User: regular_user_1
  Resource type: HotelType
  Action: read
  Attributes: { rateType: 'IATA' }
  Access denied: the user has no permission for this rate type
Result: DENIED

=== Premium user asks for a premium rate ===
Classification: {"resourceType":"HotelType","resourceKey":"hilton-budapest","attributes":{"rateType":"premium"},"action":"read"}
Checking permission:
  User: premium_user_001
  Resource type: HotelType
  Action: read
  Attributes: { rateType: 'premium' }
  Access granted
Result: ALLOWED

=== Viewer asks for a portfolio value ===
Classification: {"resourceType":"FinancialData","resourceKey":"portfolio","attributes":{},"action":"read"}
Checking permission:
  User: regular_user_1
  Resource type: FinancialData
  Action: read
  Access granted
Result: ALLOWED

=== Viewer asks for investment advice ===
Classification: {"resourceType":"FinancialAdvice","resourceKey":"investments","attributes":{},"action":"read"}
Checking permission:
  User: regular_user_2
  Resource type: FinancialAdvice
  Action: read
  Access denied: the user is not authorized for financial advice
Result: DENIED
The resourceKey values come from the model, so they can differ between runs. The resourceType, the attributes, and the Result lines are what the policy depends on, and they stay the same for these five prompts.
Change a role to confirm the policy drives the decision
Assign the ai_advisor role to regular_user_2 in the Directory screen, then run node index.js again. The last scenario prints Access granted and Result: ALLOWED while the other four stay the same. No code changed between the two runs, so the policy produced the different decision.
View decisions in the audit logs
Open audit logs in the Permit dashboard to see each check. Each entry shows the user, action, resource, and whether the PDP allowed or denied the request. Use the audit logs to find out why a classified request was denied, for example when the classifier returned an unexpected rateType.
Next steps
- Read how prompt filtering fits with the other perimeters in the Four-Perimeter Framework.
- Learn how resource sets and conditions work in Build ABAC policies.
- Read more about
permit.check()in Check permissions. - Run the full example from the permit-prompt-filtering repository, or read the prompt classification post on the Permit blog.
- Ask questions in the Permit Slack community.