Secure a Langflow app with Permit.io
Build a flight booking assistant in Langflow that checks Permit.io policies before it searches flights, answers policy questions, or books a ticket. This tutorial is for AI agent builders who design flows in the Langflow visual editor. It applies the Four-Perimeter Framework with three Permit components for Langflow: JWT Validator, Permissions Check, and Data Protection.
You build three flows:
| Flow | What it enforces | Perimeter |
|---|---|---|
| Flight Search | Only users allowed to search on flight reach the agent and the flight database | Prompt filtering |
| Flight Information | Only users allowed to info on flight get baggage and service policy answers | Secure external access |
| Flight Booking | Only users allowed to create on booking can call the booking API | Secure external access, response enforcement |
Prerequisites and tech stack
- A Permit.io account and your environment API key. See Get your API key.
- Docker, to run an Edge policy decision point (PDP). The policies in this tutorial use attribute-based access control (ABAC), which the Cloud PDP doesn't evaluate. See Cloud PDP capabilities.
- A Langflow instance. See the Langflow installation guide.
- The Permit components for Langflow. Langflow doesn't include them. Get the component files from the permit-langflow-framework repository and add them to Langflow as custom components. See Custom components in the Langflow docs. The
permit-langflow0.1.0 package on PyPI pinslangflow==1.1.4.post1, so check the pin against your Langflow version before you install it. Two of the components need a patch before the flows can allow anything: see Patch the components before you build the flows. - Python 3.9 or later, to generate the RS256-signed JSON Web Tokens (JWTs) and the JSON Web Key Set (JWKS) endpoint that the JWT Validator component needs. See Create the test JWTs and the JWKS endpoint.
- An OpenAI API key for the agent components, and an Astra DB database with a
flightscollection for the Flight Search flow.
Tools and services
| Tool | Role in this tutorial |
|---|---|
| Langflow | Visual editor for the three flows |
| Permit.io | Stores the policy and evaluates checks on the PDP |
| OpenAI | Model for the agent components |
| Astra DB | Vector store for flight search |
| Docker | Runs the Edge PDP locally |
Required environment variables
Collect these values. You enter them in the component settings in Langflow:
PERMIT_API_KEY=your_api_key
PERMIT_PDP_URL=http://localhost:7766
JWKS_URL=http://localhost:8080/jwks.json
OPENAI_API_KEY=sk-...
| Variable | Used in |
|---|---|
PERMIT_API_KEY | API Key field of Permissions Check and Data Protection |
PERMIT_PDP_URL | PDP URL field of Permissions Check and Data Protection. Point it at your Edge PDP. The Cloud PDP returns a denial for every ABAC check in this tutorial. |
JWKS_URL | JWKS URL field of JWT Validator |
OPENAI_API_KEY | The agent and OpenAI components |
Plan the access model
The assistant searches flights, answers questions about flight policies, and books tickets. User attributes decide what each user can do.
Resources and actions
| Resource | What it covers | Actions |
|---|---|---|
flight | Flight search and flight policy information | search, info, viewprice, viewavailability |
booking | Ticket bookings | create, modify, cancel, view |
User attributes
| Attribute | Type | Values |
|---|---|---|
membership_tier | array | For example ["basic"] or ["premium"] |
region | string | domestic or international |
verified | bool | true when the user's identity is confirmed |
Condition sets
An ABAC user set is a named condition over user attributes. Permit evaluates the set on every check and grants the actions you check for that set in the Policy Editor.
| User set | Key | Condition |
|---|---|---|
| membership tier access | membership_tier_access | user.verified equals true |
| regional restrictions | regional_restrictions | user.region equals domestic |
| sensitive data access | sensitive_data_access | user.membership_tier equals premium |
Configure the policy in Permit
Create the schema in the Permit dashboard.
1. Create the resources
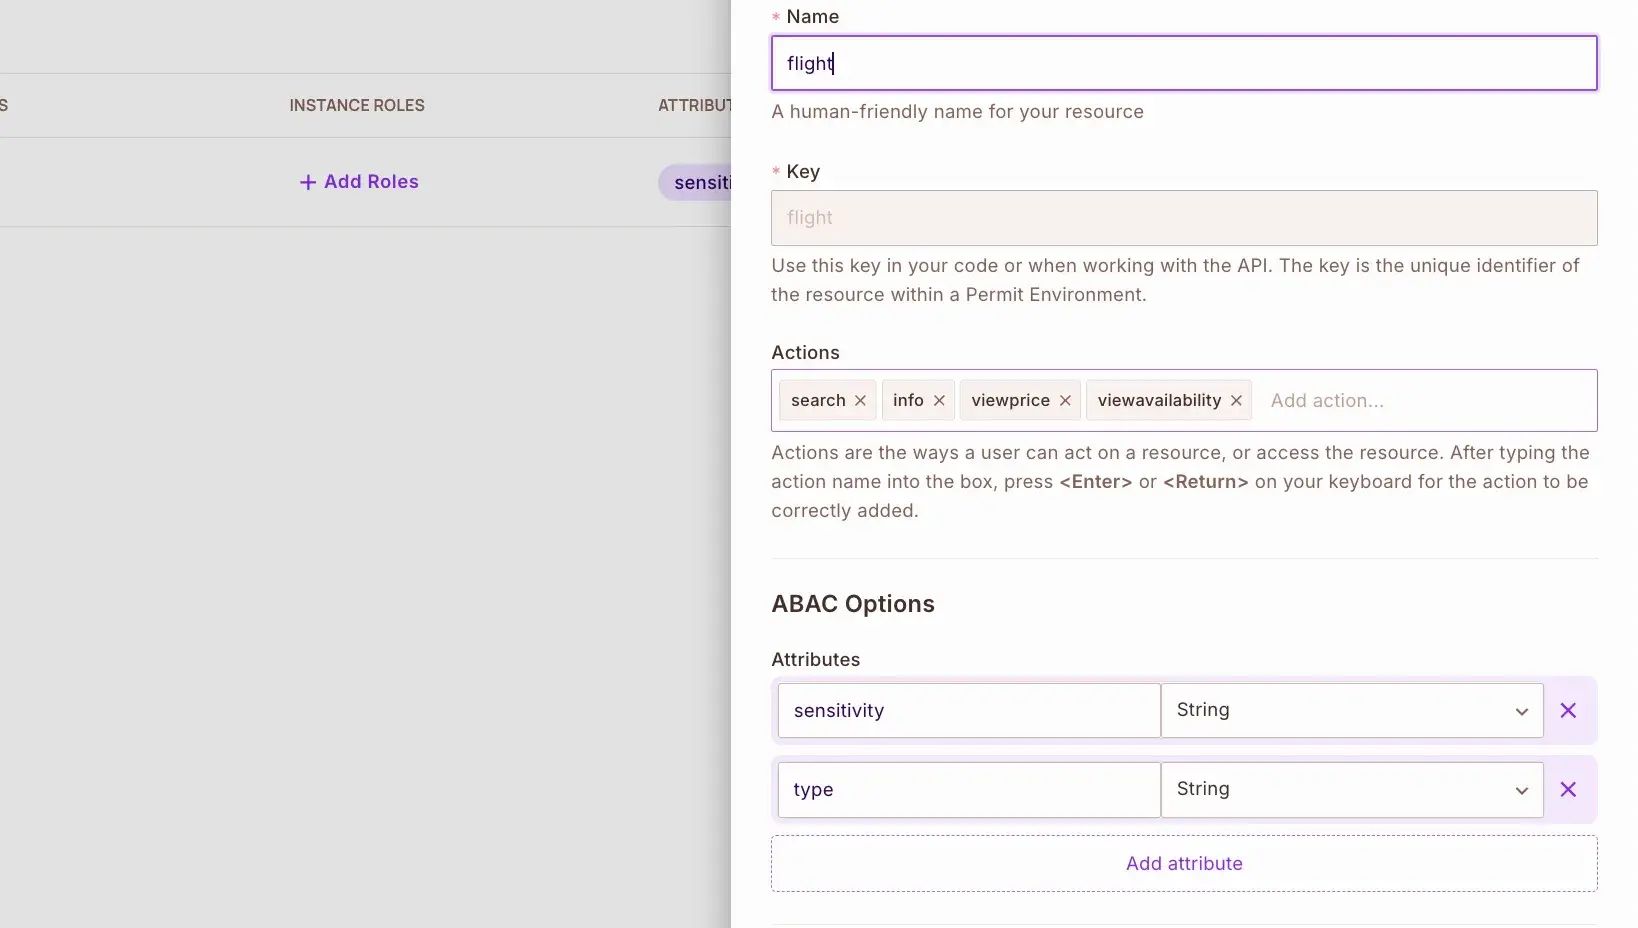
Open Policy > Resources and click Create a Resource. Set Name and Key to flight, add the four actions, and add the two attributes under ABAC Options:
| Action | What it covers |
|---|---|
search | Search for available flights |
info | Read flight details and policy information |
viewprice | Read pricing information |
viewavailability | Read seat availability |
| Attribute | Type | What it holds |
|---|---|---|
type | String | The operation type: info, search, or booking |
sensitivity | String | The data sensitivity: public, protected, or private |
Repeat with Name and Key set to booking:
| Action | What it covers |
|---|---|
create | Create a booking |
modify | Change an existing booking |
cancel | Cancel a booking |
view | Read booking details |
| Attribute | Type | What it holds |
|---|---|---|
type | String | The booking operation type |
sensitivity | String | The sensitivity of the booking data |
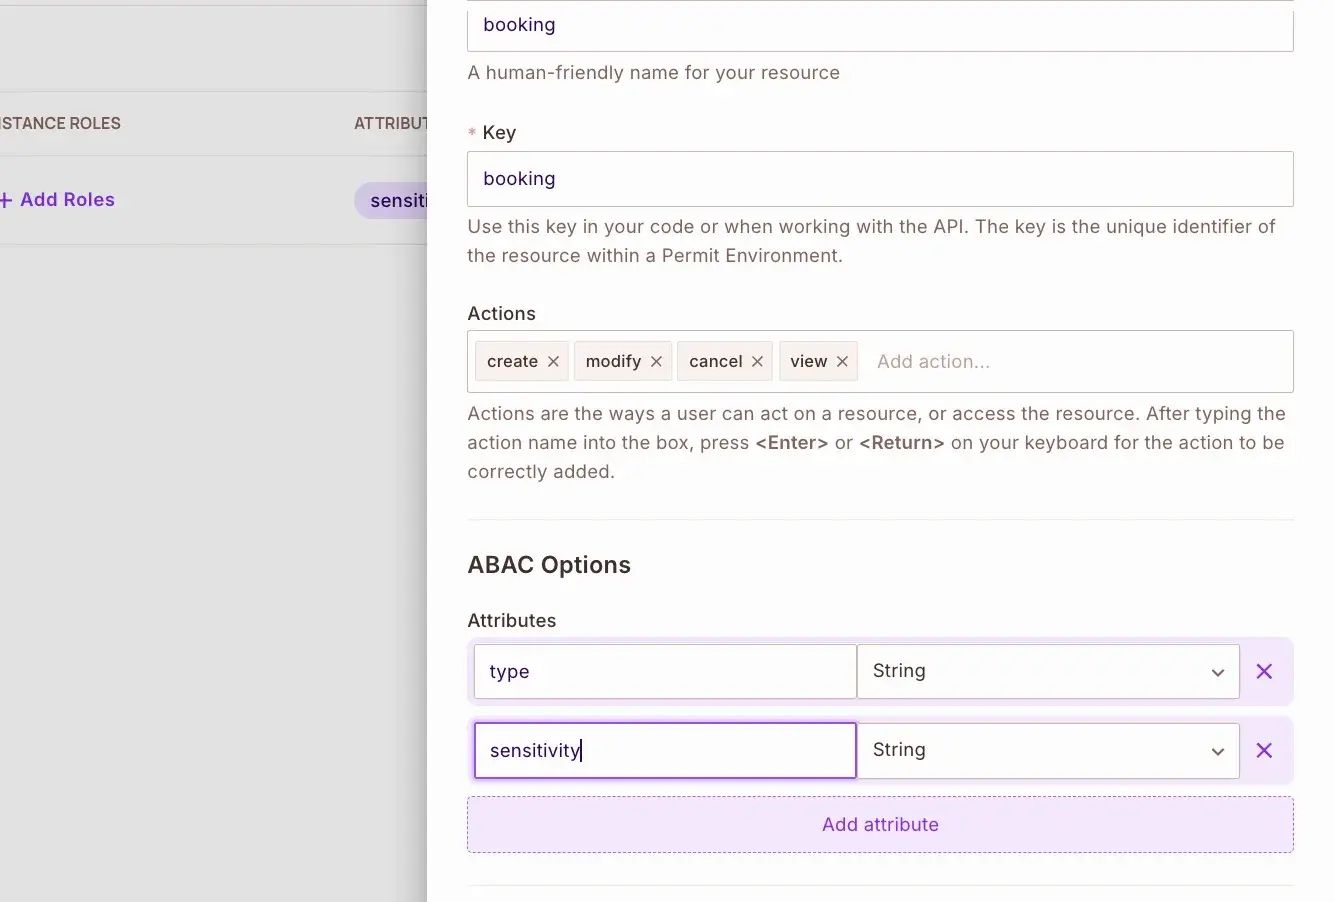
The three flows in this tutorial check flight:search, flight:info, and booking:create. The other actions exist so you can extend the policy later.
2. Define user attributes
Open Directory > Settings > User Attributes, click Add Attribute, and add these three attributes. key, roles, and email are built in.
| Key | Type |
|---|---|
verified | bool |
membership_tier | array |
region | string |
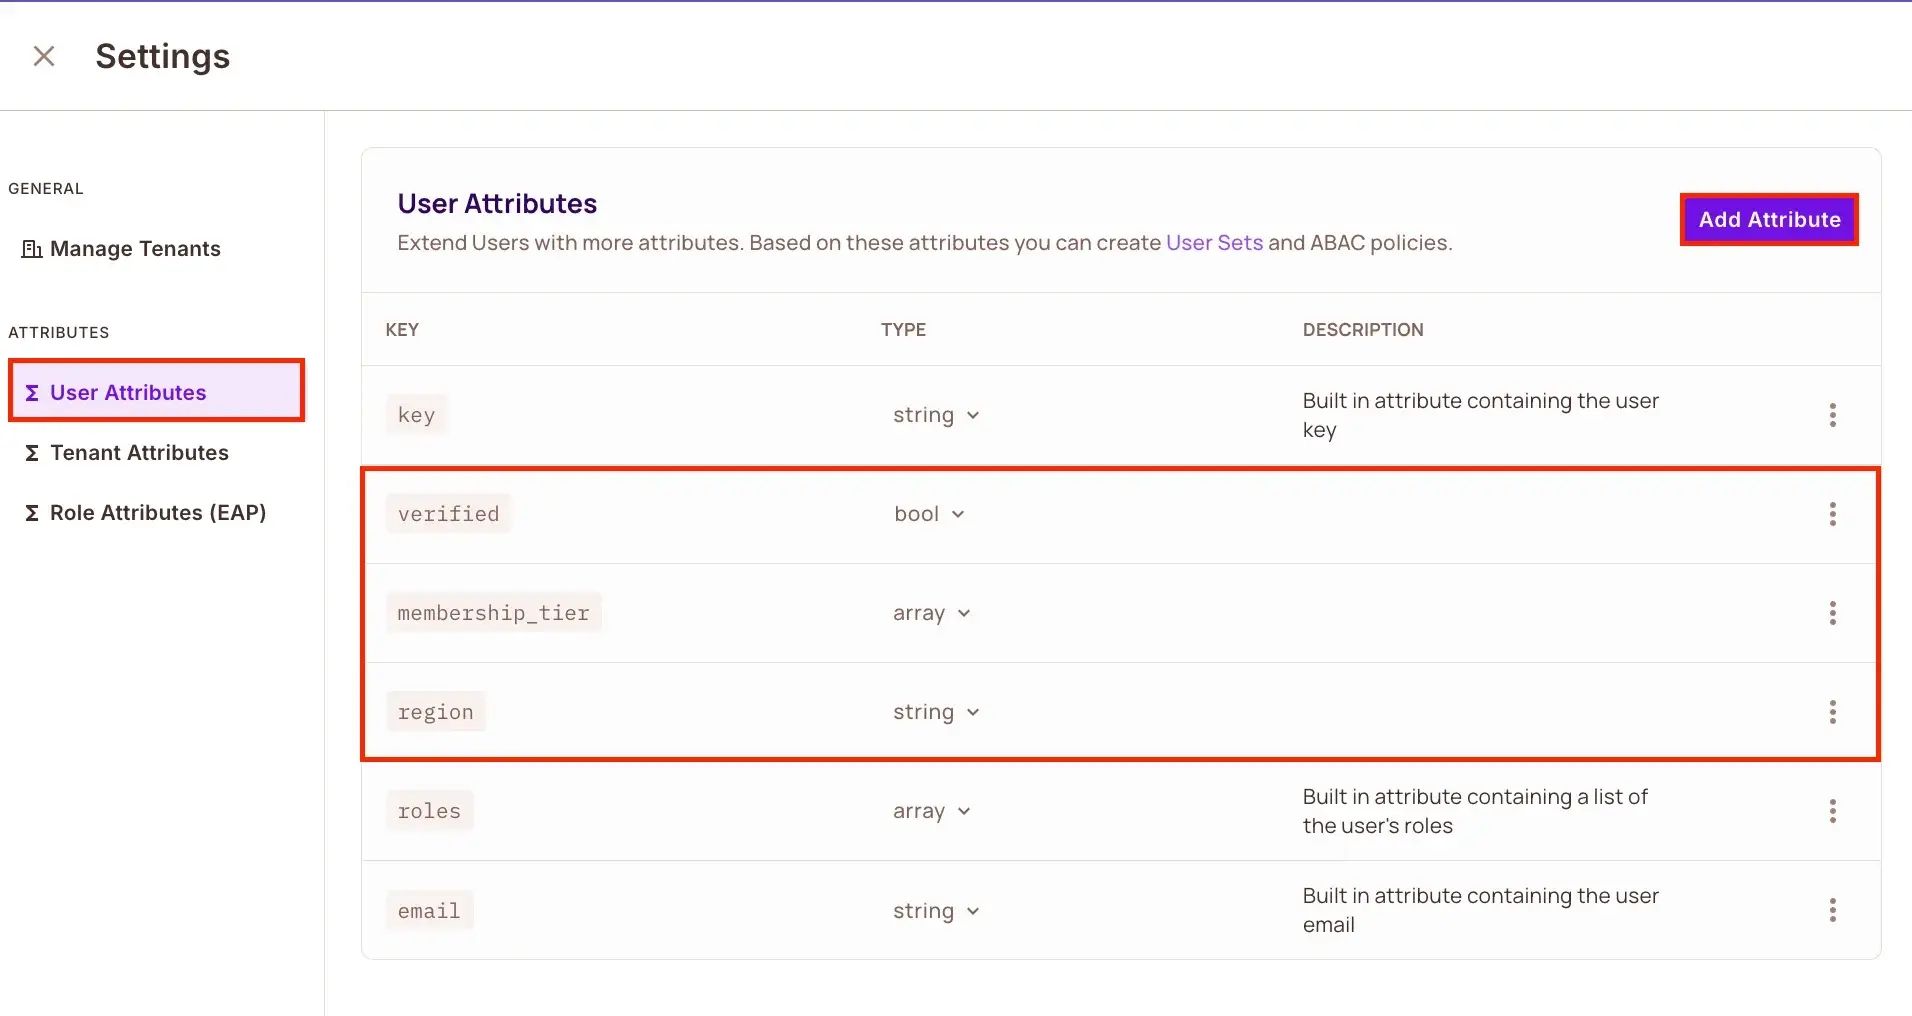
3. Create the ABAC user sets
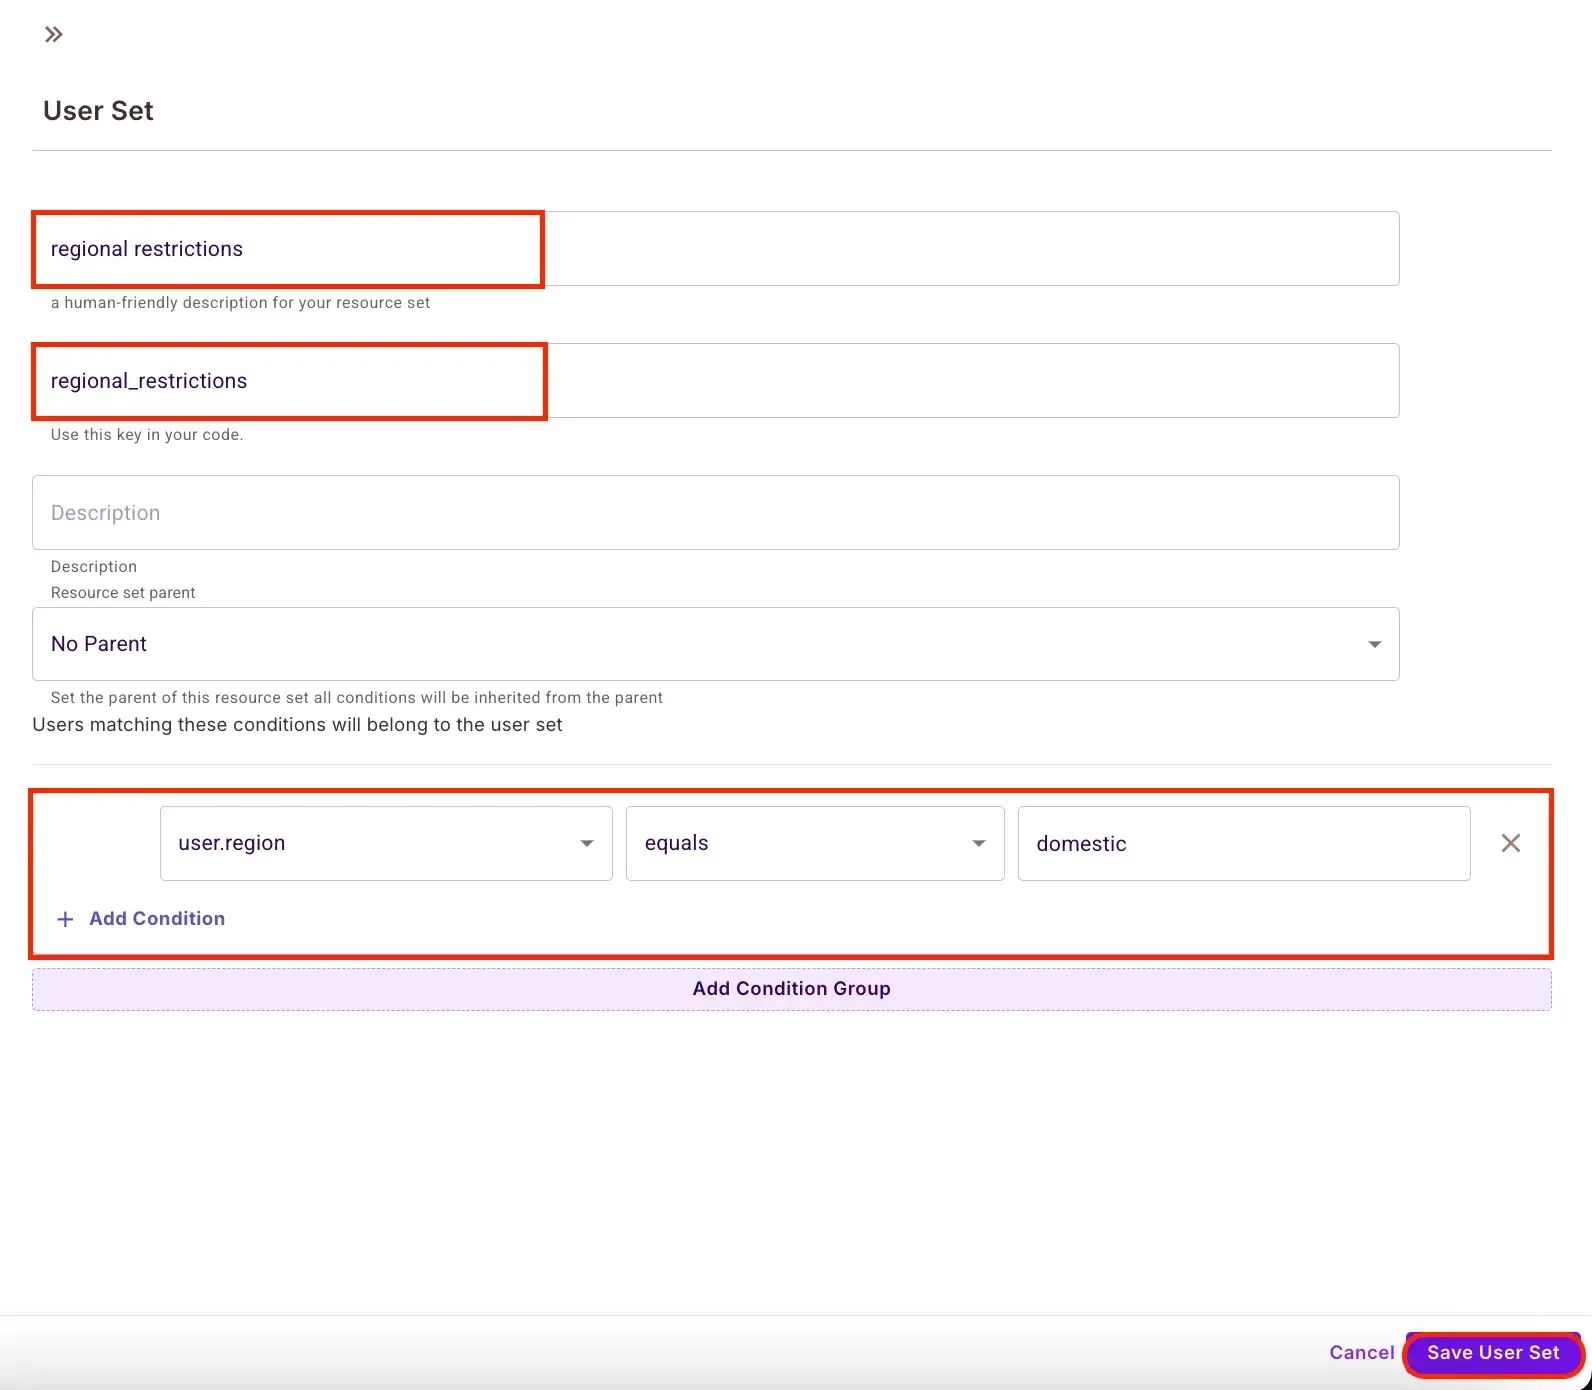
Open Policy > ABAC Rules, click ABAC User Sets, and create the three sets from Condition sets. For each set, enter the name, keep the generated key, leave Resource set parent as No Parent, add the condition, and click Save User Set.
membership tier access: one condition, user.verified equals True.
regional restrictions: one condition, user.region equals domestic.
sensitive data access: one condition, user.membership_tier equals premium.
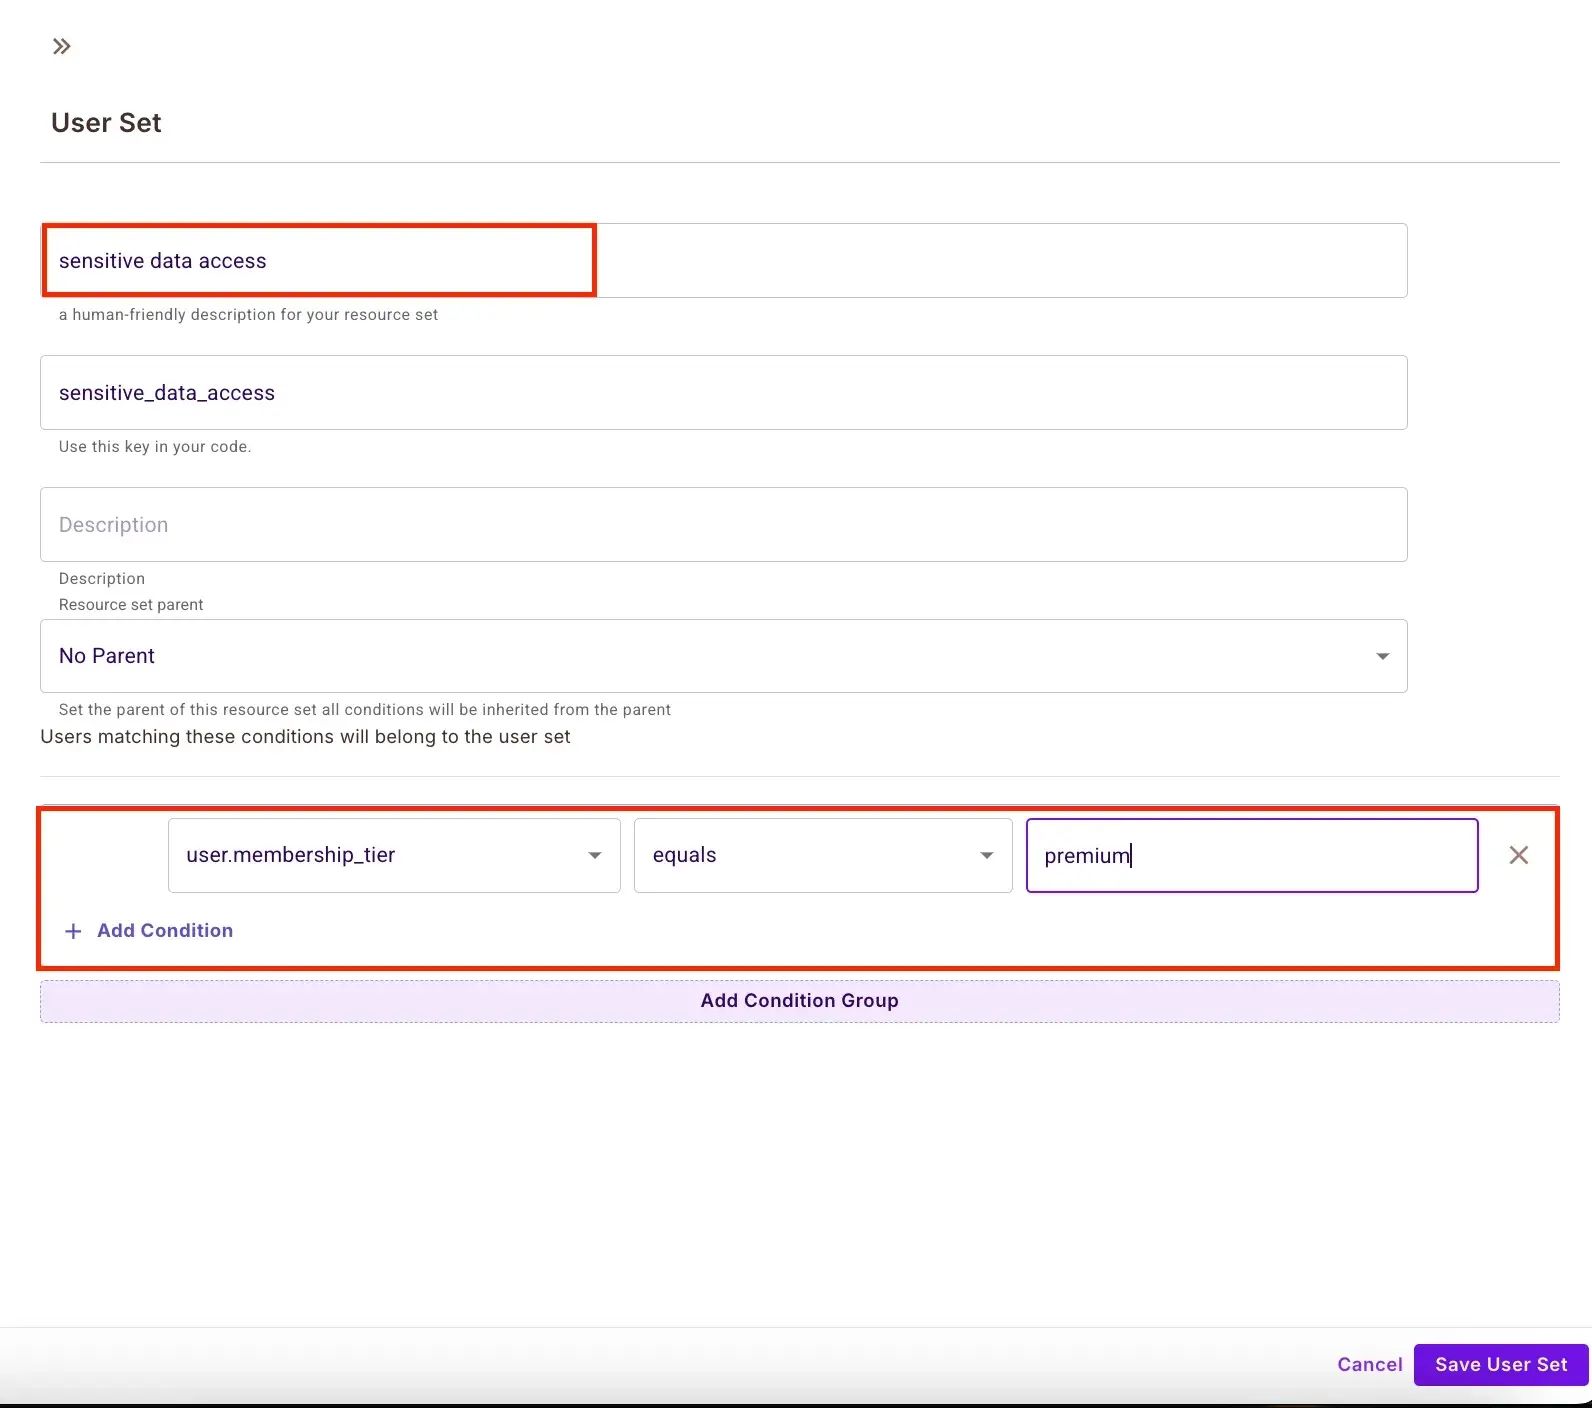
membership_tier is an array attribute, and equals compares the whole value, so user.membership_tier equals premium does not match a user whose membership_tier is ["premium"]. No test user in this tutorial matches sensitive data access, and the actions granted to that set alone never reach a test user. The three flows in this tutorial don't depend on it: regional restrictions grants flight:search, flight:info, and booking:create. To make the set match, either store membership_tier as a string attribute, or keep the array and build the condition with the array contains operator, which Permit sends as array_contains. For array conditions in the dashboard, see Ownership via list on resource.
4. Grant permissions in the Policy Editor
Open Policy > Policy Editor. The columns are your three user sets and the rows are the actions of booking and flight. Check a box to grant that action to users in that user set. Check these boxes:
| Action | membership tier access | regional restrictions | sensitive data access |
|---|---|---|---|
booking:create | Yes | Yes | Yes |
booking:modify | Yes | No | Yes |
booking:cancel | Yes | No | No |
booking:view | Yes | No | No |
flight:search | No | Yes | No |
flight:info | No | Yes | No |
flight:viewavailability | Yes | No | No |
flight:viewprice | Yes | No | Yes |
flight:info has to be checked for at least one user set. If no user set grants flight:info, the PDP denies every request in the Flight Information flow and that flow always returns its denial output.
5. Add test users
The JWT Validator component reads only the sub claim from the token. The Permissions Check component sends that user key to the PDP without attributes, so the PDP uses the attributes stored on the user in Permit. Open Directory > Users, create a user for each test JWT sub, and set the user's attributes. See Sync users.
Fully authorized premium user:
{
  "key": "user-001",
  "attributes": {
    "membership_tier": ["premium"],
    "region": "domestic",
    "verified": true
  }
}
Limited basic user:
{
  "key": "user-002",
  "attributes": {
    "membership_tier": ["basic"],
    "region": "international",
    "verified": false
  }
}
user-001 matches membership tier access and regional restrictions. user-002 matches none of the three user sets, so the PDP denies every check for that user.
Create the test JWTs and the JWKS endpoint
The JWT Validator component fetches the JSON Web Key Set (JWKS) from its JWKS URL, looks up the key whose kid matches the token header, verifies the RS256 signature, and returns the sub claim as the user key. The component rejects any other algorithm, so the tokens have to be signed with RS256.
For a local run, generate one RSA key pair, publish its public key as a JWKS file, and sign one token per test user.
-
Install the signing libraries:
pip install "pyjwt[crypto]" -
Save this script as
make_test_jwt.py:import jsonimport jwtfrom cryptography.hazmat.primitives.asymmetric import rsafrom jwt.algorithms import RSAAlgorithmKEY_ID = "flight-demo-key"USER_KEYS = ["user-001", "user-002"]private_key = rsa.generate_private_key(public_exponent=65537, key_size=2048)jwk = json.loads(RSAAlgorithm.to_jwk(private_key.public_key()))jwk.update({"kid": KEY_ID, "alg": "RS256", "use": "sig"})with open("jwks.json", "w", encoding="utf-8") as handle:json.dump({"keys": [jwk]}, handle, indent=2)for user_key in USER_KEYS:token = jwt.encode({"sub": user_key},private_key,algorithm="RS256",headers={"kid": KEY_ID},)print(f"{user_key}: {token}")The
USER_KEYSlist holds the user keys you created in Add test users.KEY_IDis thekidthat the script writes into both the JWKS entry and every token header. -
Run the script. It writes
jwks.jsonnext to itself and prints one token per user:python make_test_jwt.pyuser-001: eyJhbGciOiJSUzI1NiIsImtpZCI6ImZsaWdodC1kZW1vLWtleSIsInR5cCI6IkpXVCJ9...user-002: eyJhbGciOiJSUzI1NiIsImtpZCI6ImZsaWdodC1kZW1vLWtleSIsInR5cCI6IkpXVCJ9...Copy both tokens. You paste them into the Text Input component of each flow.
-
Serve
jwks.jsonover HTTP from the folder that holds it, so the JWT Validator can fetch it:python -m http.server 8080 -
Verify that the JWKS endpoint answers:
curl -s http://localhost:8080/jwks.jsonThe response is a JSON object with a
keysarray whose single entry has"kty": "RSA","kid": "flight-demo-key", and"alg": "RS256". Usehttp://localhost:8080/jwks.jsonas the JWKS URL in every JWT Validator component.
The private key exists only in memory while make_test_jwt.py runs, so every run signs the tokens with a new key and invalidates the tokens from the previous run. Regenerate jwks.json and the tokens together, and restart the JWKS server afterwards. These tokens have no exp claim and no audience, which is acceptable for a local test and not for production. For production, issue tokens from your identity provider and point JWKS URL at its JWKS endpoint.
Run the Edge PDP locally
The Permissions Check and Data Protection components send checks to the PDP. Run an Edge PDP in Docker:
-
Pull the PDP image:
docker pull permitio/pdp-v2:latest -
Start the PDP container. Replace
<YOUR_API_KEY>with your environment API key.docker run -it -p 7766:7000 \--env PDP_DEBUG=True \--env PDP_API_KEY=<YOUR_API_KEY> \permitio/pdp-v2:latest -
Verify that the PDP is up:
curl -s http://localhost:7766/healthyA healthy PDP answers with a JSON body whose top-level
statusfield isok, together with a status for the PDP's internal API service (Horizon) and its policy engine, Open Policy Agent (OPA). See Verify the PDP is healthy. Enterhttp://localhost:7766in the PDP URL field of every Permissions Check and Data Protection component.
For more deployment options, see the PDP overview.
Build the flows
Each flow starts with the same two identity components: a Text Input for the JWT and a JWT Validator that turns the JWT into a user key. The User ID output of JWT Validator connects to the User ID input of Permissions Check.
Permissions Check has two outputs, Allowed and Denied. When the PDP allows the check, Allowed carries the text Permission granted for <user> to <action> on <resource> and Denied is empty. When the PDP denies the check, Denied carries Permission denied for <user> to <action> on <resource> and Allowed is empty. The If-Else component routes on that text: its Text Input takes the Allowed output, and its True and False outputs drive the allowed and denied paths.
Permissions Check emits text, not a boolean. An If-Else set to Operator equals and Match Text True never matches either output, so every request takes the False branch and the allowed path never runs. Set Operator to contains and Match Text to Permission granted.
Two components in permit-langflow-framework don't reach the PDP as this page describes. Patch both in your copy of the component files, or the flows always deny.
- Permissions Check never calls the PDP.
components/permissions_check.pyregisters onlyallowed_resultanddenied_resultas output methods, and setsself._permission_resultinsidevalidate_auth(), which no output method calls._permission_resulttherefore keeps theFalseit gets in__init__, so Allowed stays empty and Denied fires for every user, whatever the policy says. Fix:await self.validate_auth()at the start ofallowed_resultanddenied_result, and make both methodsasync. - Data Protection raises on the PDP response.
components/data_protection.pyiterates the return value ofpermit.get_user_permissions()as objects and readsp.resource_id. That method returns a dictionary, so the loop iterates its keys and the component raisesAttributeError: 'str' object has no attribute 'resource'. Fix: read the resource keys out of the dictionary instead of iterating it as a list of objects.
Flight Search flow
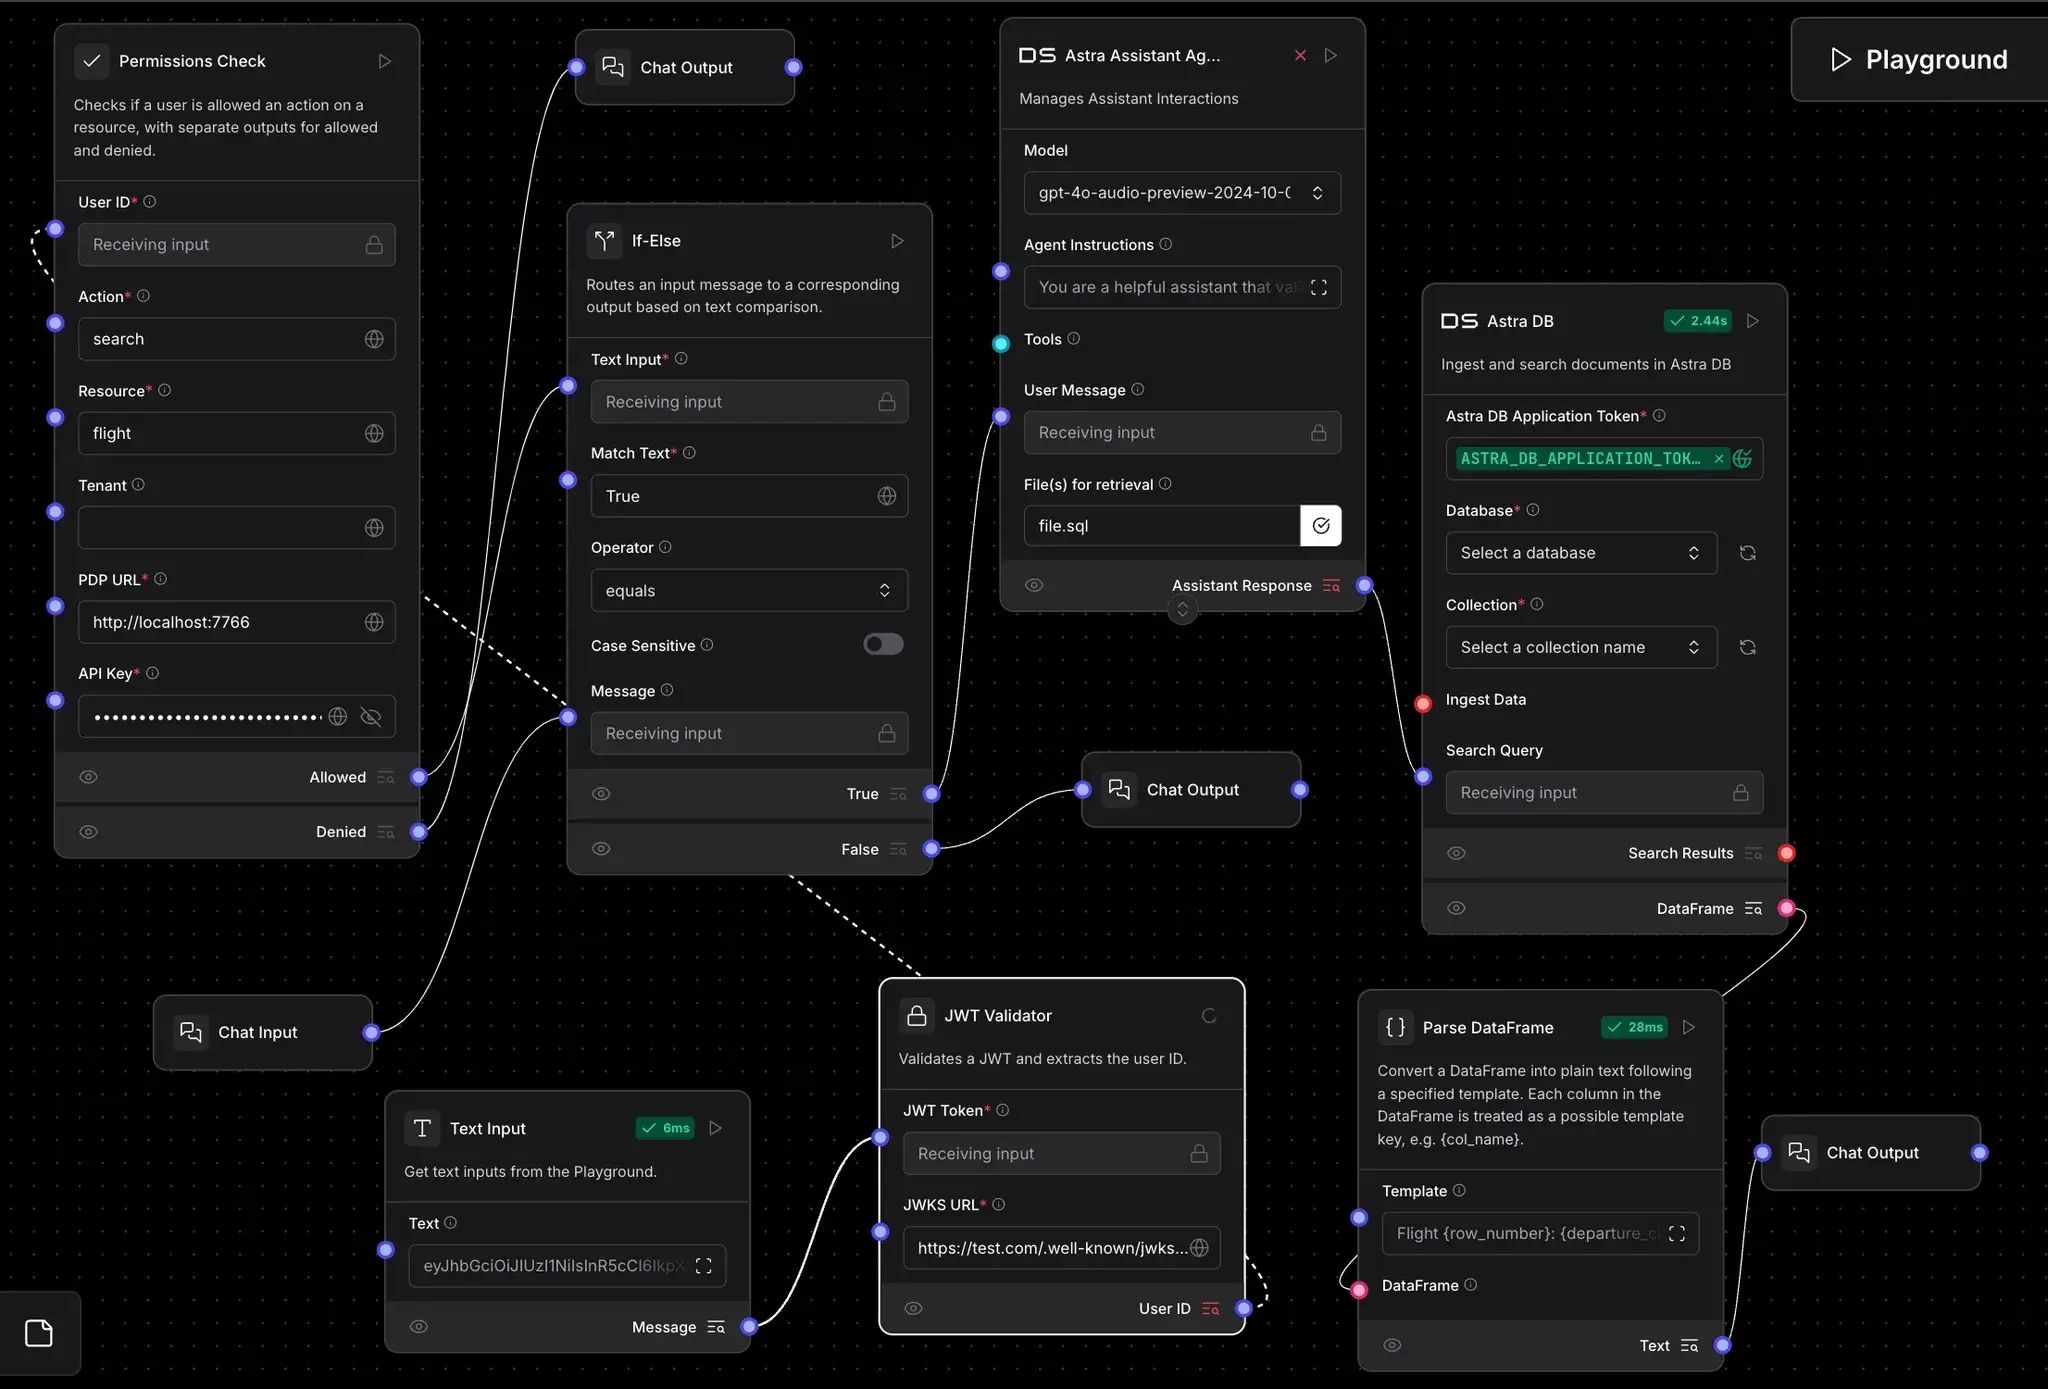
The Flight Search flow applies prompt filtering. The flow checks search on flight before the agent or the database receives the user's query.
Flight Search components
Add these components to the canvas:
| Component | Purpose |
|---|---|
| Text Input | Receives the JWT |
| Chat Input | Receives the flight search query |
| JWT Validator | Verifies the JWT and outputs the user key |
| Permissions Check | Checks search on flight for the user |
| If-Else | Routes the query on the Permissions Check result |
| Astra Assistant Agent | Extracts and validates the departure and arrival cities |
| Astra DB | Retrieves flight data |
| Parse DataFrame | Formats the results as text |
| Two Chat Outputs | Show the allowed response or the denial |
Flight Search component configuration
JWT Validator
- JWT Token: connected from Text Input
- JWKS URL:
http://localhost:8080/jwks.json
Permissions Check
- User ID: connected from the User ID output of JWT Validator
- Action:
search - Resource:
flight - Tenant: leave empty to use the default tenant
- PDP URL:
http://localhost:7766 - API Key: your Permit environment API key
If-Else
- Text Input: connected from the Allowed output of Permissions Check
- Operator:
contains - Match Text:
Permission granted - Message: connected from Chat Input
Astra Assistant Agent
-
Model: an OpenAI chat model your
OPENAI_API_KEYcan reach, for examplegpt-4o-mini -
Agent Instructions:
You are a flight search assistant. Your job is to:1. Extract departure and arrival cities from user queries2. Validate that these are real cities with airports3. Format the search request for our database4. Handle cases where cities are unclear or invalid
Astra DB
- Astra DB Application Token: your Astra DB application token
- Database: your Astra DB database, for example
flight_db - Collection:
flights
Parse DataFrame
-
Template:
Flight {row_number}: {departure_city} to {arrival_city}Departure: {departure_time}Airline: {airline}Flight Number: {flight_number}Price: ${price}Available Seats: {seats}Each placeholder is a column of the DataFrame that Astra DB returns.
Connect the Flight Search flow
- Connect Text Input to the JWT Token input of JWT Validator.
- Connect the User ID output of JWT Validator to the User ID input of Permissions Check.
- Connect the Allowed output of Permissions Check to the Text Input input of If-Else.
- Connect Chat Input to the Message input of If-Else.
- Connect the True output of If-Else to Astra Assistant Agent, then to Astra DB, then to Parse DataFrame, then to the allowed Chat Output.
- Connect the False output of If-Else to the denied Chat Output.
With these connections, a query reaches the agent and Astra DB only when the JWT is valid and the PDP allows search on flight.
Flight Search results
| User | Query | Result |
|---|---|---|
A user in a user set that grants flight:search, such as user-001 | "Find flights from NYC to Paris next week" | A formatted list of flights |
| Any other user | Any query | The denied Chat Output, before the agent or the database runs |
Flight Information flow
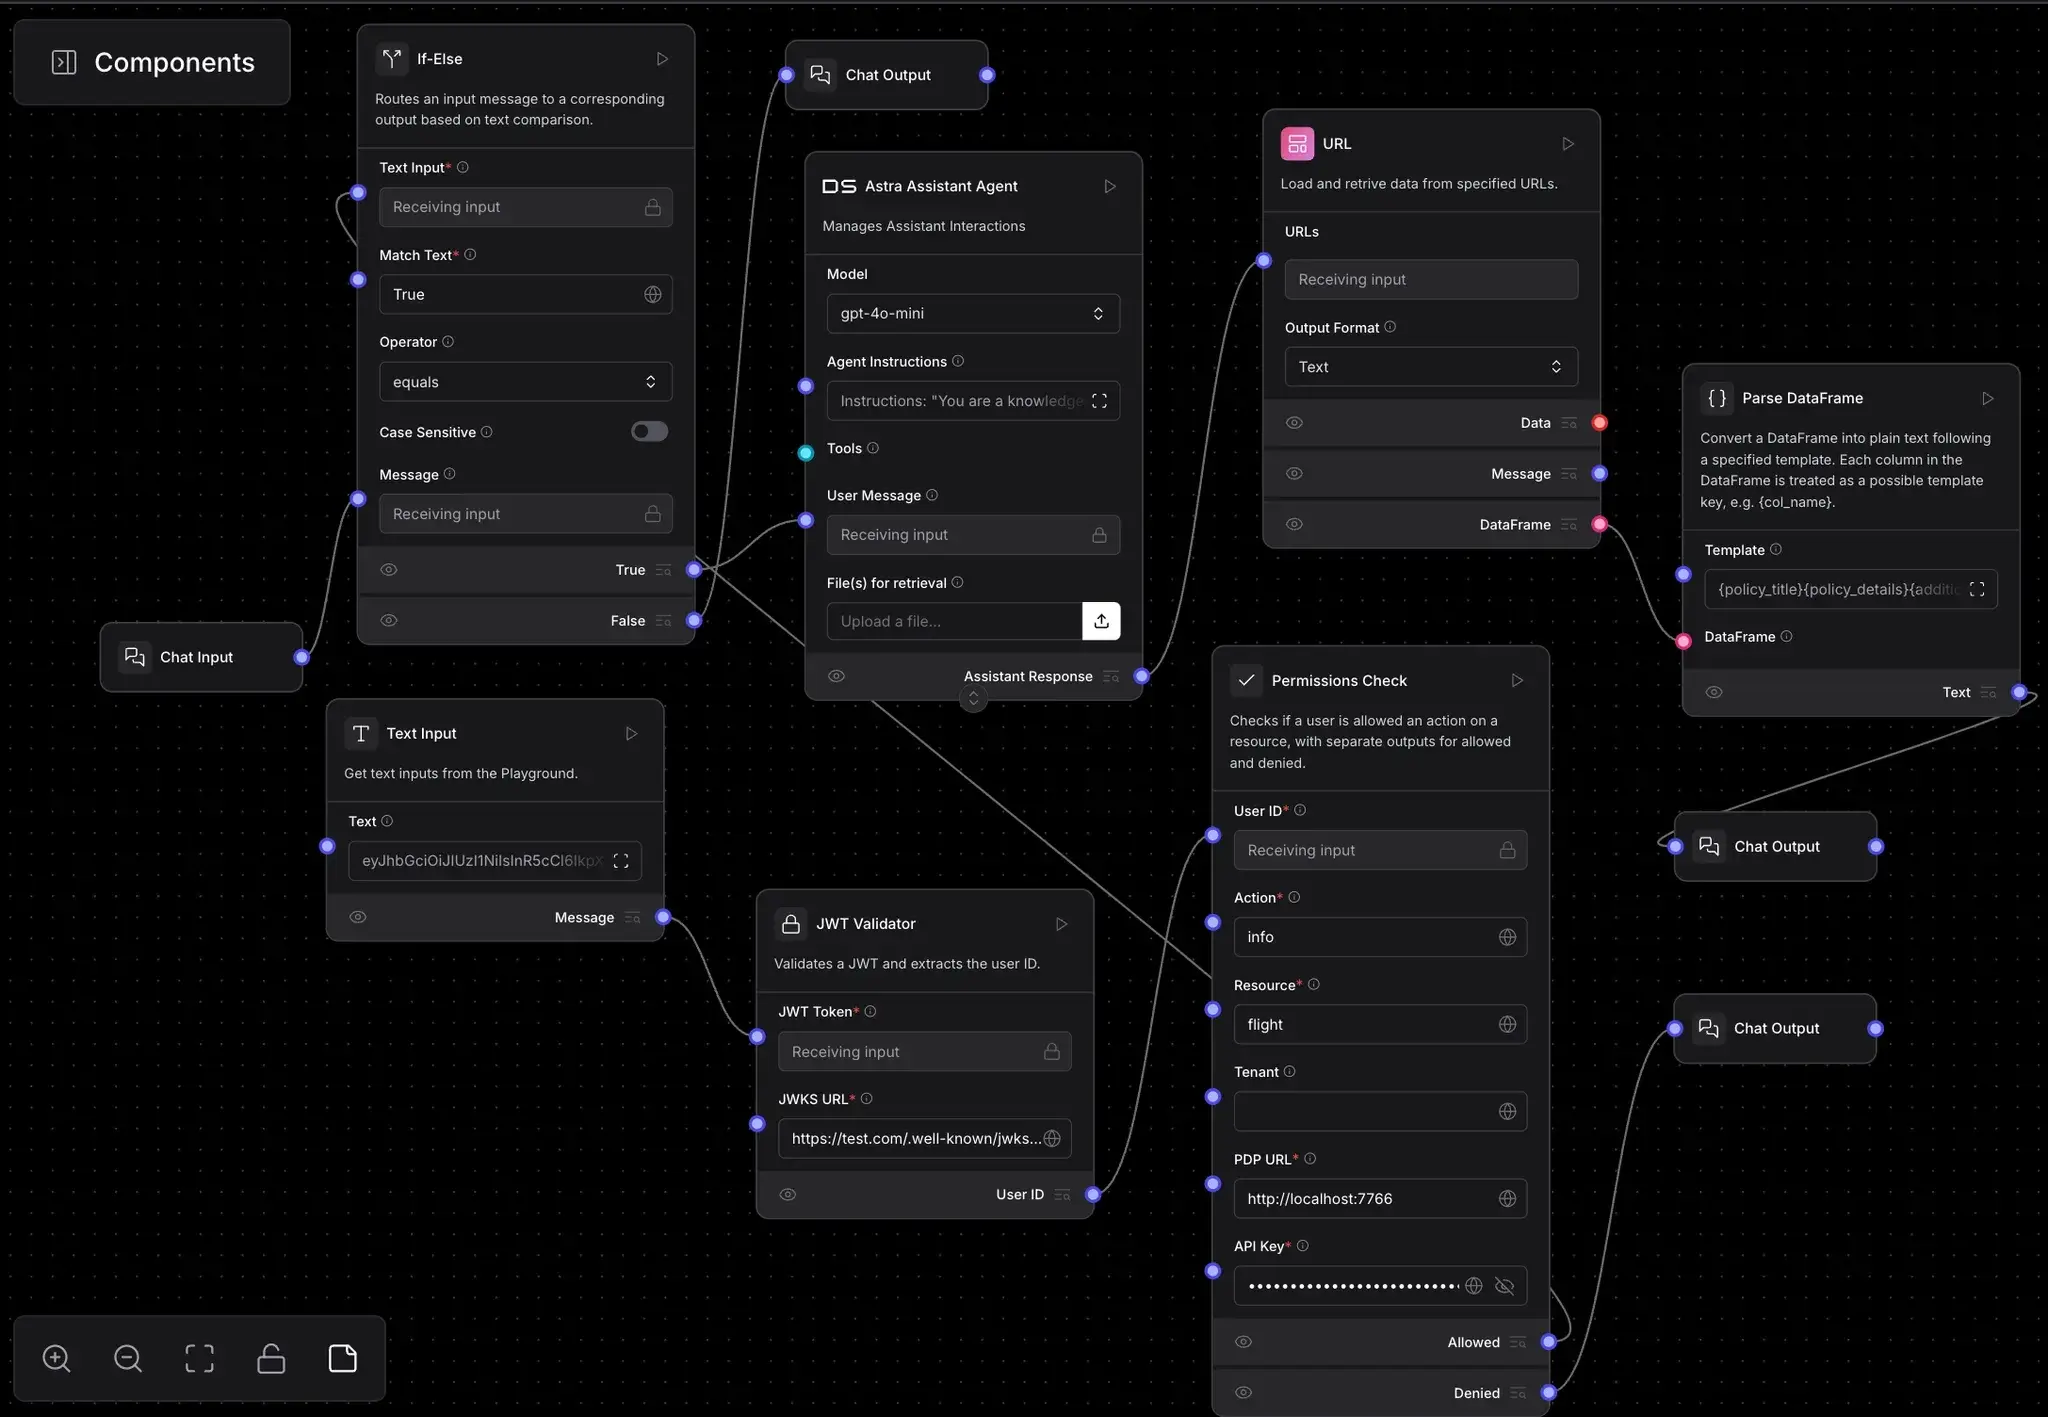
The Flight Information flow answers questions about travel policies, baggage allowances, and services. It applies secure external access: the flow checks info on flight before the agent fetches data from external policy URLs.
Flight Information components
| Component | Purpose |
|---|---|
| Text Input | Receives the JWT |
| Chat Input | Receives the policy question |
| JWT Validator | Verifies the JWT and outputs the user key |
| Permissions Check | Checks info on flight for the user |
| If-Else | Routes the question on the Permissions Check result |
| Astra Assistant Agent | Answers the policy question |
| URL | Loads policy content from your policy pages |
| Parse DataFrame | Formats the policy content as text |
| Two Chat Outputs | Show the allowed response or the denial |
Flight Information component configuration
JWT Validator
- JWKS URL:
http://localhost:8080/jwks.json
Permissions Check
- User ID: connected from the User ID output of JWT Validator
- Action:
info - Resource:
flight - PDP URL:
http://localhost:7766 - API Key: your Permit environment API key
If-Else
- Text Input: connected from the Allowed output of Permissions Check
- Operator:
contains - Match Text:
Permission granted
Astra Assistant Agent
-
Model:
gpt-4o-mini -
Agent Instructions:
You are a knowledgeable Local Expert that provides accurate flight policy and service information. You should:1. Answer questions about baggage policies2. Explain flight rules and restrictions3. Provide information about services and amenities4. Always maintain privacy by not revealing sensitive pricing or route details without authorization
URL
- URLs: the pages that hold your baggage and service policies, for example
https://<your-policy-site>/baggageandhttps://<your-policy-site>/services - Output Format:
Text
Parse DataFrame
-
Template:
Policy Information:------------------{policy_title}Details:{policy_details}Additional Information:{additional_info}------------------
Connect the Flight Information flow
- Connect Text Input to the JWT Token input of JWT Validator.
- Connect the User ID output of JWT Validator to the User ID input of Permissions Check.
- Connect the Allowed output of Permissions Check to the Text Input input of If-Else.
- Connect Chat Input to the Message input of If-Else.
- Connect the True output of If-Else to Astra Assistant Agent, then to URL, then to Parse DataFrame, then to the allowed Chat Output.
- Connect the False output of If-Else to the denied Chat Output.
Flight Information results
Example questions:
- "What's the baggage allowance for international flights?"
- "What are the rules for pet travel?"
| User | Result |
|---|---|
A user in a user set that grants flight:info, such as user-001 | The agent answers from the policy content |
| Any other user | The denied Chat Output |
Flight Booking flow
The Flight Booking flow completes a booking, which changes data in an external system. The flow applies two perimeters:
- Secure external access: Permissions Check allows the booking API call only when the PDP allows
createonbooking. - Response enforcement: Data Protection outputs the
bookingresource instance IDs the user cancreate, and Filter Data keeps only those IDs in the response.
Flight Booking components
| Component | Purpose |
|---|---|
| Text Input | Receives the JWT |
| Chat Input | Receives the booking request |
| JWT Validator | Verifies the JWT and outputs the user key |
| Permissions Check | Checks create on booking for the user |
| Data Protection | Outputs the IDs of booking resource instances the user can create |
| If-Else | Routes the request on the Permissions Check result |
| API Request | Calls your booking API |
| Astra Assistant Agent | Processes the booking request |
| Filter Data | Keeps only the allowed booking IDs in the API response |
| Chat Output | Shows the booking result |
Flight Booking component configuration
JWT Validator
- JWKS URL:
http://localhost:8080/jwks.json
Permissions Check
- User ID: connected from the User ID output of JWT Validator
- Action:
create - Resource:
booking - PDP URL:
http://localhost:7766 - API Key: your Permit environment API key
Data Protection
- User ID: connected from the User ID output of JWT Validator
- Action:
create - Resource Type:
booking - PDP URL and API Key: the same values as Permissions Check
API Request
- URL: your booking API endpoint, for example
https://<your-booking-api>/v1/bookings. Use a mock endpoint while you test. - Method:
POST
Astra Assistant Agent
-
Model:
gpt-4o-mini -
Agent Instructions:
You are a booking assistant that helps process flight booking requests.Always ensure the user is authorized before confirming anything.
Filter Data
- JSON: connected from the API Request response
- Filter Criteria: connected from the Allowed IDs output of Data Protection
Connect the Flight Booking flow
- Connect Text Input to the JWT Token input of JWT Validator.
- Connect the User ID output of JWT Validator to the User ID input of both Permissions Check and Data Protection.
- Connect the Allowed output of Permissions Check to the Text Input input of If-Else, and Chat Input to the Message input of If-Else.
- Connect the True output of If-Else to API Request, then to Astra Assistant Agent, then to the Chat Output.
- Connect the False output of If-Else to the denied Chat Output.
- Connect the API Request response to the JSON input of Filter Data, and the Allowed IDs output of Data Protection to the Filter Criteria input of Filter Data.
Data Protection calls the PDP for the user's permissions and emits the list of booking instance IDs that the user can create. Filter Data drops every top-level key of its JSON input that is not in that list, so a response keyed by booking ID comes out holding only the bookings the user is allowed to create. A user the PDP denies never reaches the booking API, because the False branch of If-Else skips API Request.
Flight Booking results
Request: "Book me a flight from NYC to LA for next Monday."
| User | Result |
|---|---|
user-001 (membership_tier: ["premium"], region: domestic, verified: true) | The PDP allows create. API Request runs and the agent confirms the booking. |
user-002 (membership_tier: ["basic"], region: international, verified: false) | The PDP denies create. The flow returns the denied Chat Output before the API call. |
Run the flows and verify access
-
Start the Edge PDP. Replace
<YOUR_API_KEY>with your environment API key:docker run -it -p 7766:7000 \--env PDP_DEBUG=True \--env PDP_API_KEY=<YOUR_API_KEY> \permitio/pdp-v2:latest -
Start the JWKS server from the folder that holds
jwks.json:python -m http.server 8080 -
Install and start Langflow. For other installation options, see the Langflow installation guide:
uv pip install langflowuv run langflow run -
Check that each Permit component uses these values: PDP URL
http://localhost:7766, API Key your Permit environment API key, and JWKS URLhttp://localhost:8080/jwks.json. -
Paste the JWT for
user-001oruser-002into the Text Input of each flow.
Interact with the flows
In the Langflow Playground, send these messages:
| Flow | Message |
|---|---|
| Flight Search | "Flights from NYC to LA" |
| Flight Information | "What's the pet travel policy?" |
| Flight Booking | "Book a ticket for me from LAX to BOS" |
Expected results
These results assume the policy from Grant permissions in the Policy Editor:
| Flow | user-001 (premium, domestic, verified) | user-002 (basic, international, unverified) |
|---|---|---|
| Flight Search | Allowed. regional restrictions matches region: domestic and grants flight:search. | Denied. No user set matches user-002. |
| Flight Information | Allowed. regional restrictions grants flight:info. | Denied. |
| Flight Booking | Allowed. regional restrictions grants booking:create. | Denied. |
A denied flow shows the text Permission denied for user-002 to <action> on <resource> in its denial Chat Output, and the agent, database, and API components stay unexecuted on the canvas.
View decisions in the audit logs
Open audit logs in the Permit dashboard to see each check and why the PDP allowed or denied it. Each entry names the user, the action, the resource, and the decision. When you change a condition in the Policy Editor, the PDP receives the updated policy and the next check uses it.
Next steps
- Read how the four perimeters fit together in the Four-Perimeter Framework.
- Learn how user sets and conditions work in Build ABAC policies.
- Review the component inputs and outputs in the permit-langflow-framework README.
- Read the flight booking agent walkthrough on the Permit blog.
- Ask questions in the Permit Slack community.