Fine-Grained Authorization with Logto.io and Permit.io
Add Logto sign-in to a Next.js app (Pages Router), sync each new Logto user into Permit.io with a webhook, and show or hide dashboard actions based on Permit permission checks. This tutorial is for developers who use Logto for authentication and want role-based access control (RBAC) from Permit.
What you build
- Sign-in and sign-out with Logto.
- A Logto webhook that syncs each newly registered user to Permit and assigns the
viewerrole. - An API route that checks a permission with Permit.
- A dashboard that shows the view, edit, and delete controls for a
Reportsresource only when the user's role allows them.
Prerequisites
- A Logto Cloud account.
- A Permit.io account.
- Node.js and npm, and basic familiarity with the Next.js Pages Router.
- A way to expose your local app on a public URL for the Logto webhook, such as ngrok.
1. Create a Logto application
- Sign in to the Logto Console.
- Open Applications and create an application:
- Select Next.js (Pages Router) as the framework.
- Name the application, for example
Next.js Demo. - Set the redirect URI to
http://localhost:3000/api/logto/sign-in-callback. - Set the post sign-out redirect URI to
http://localhost:3000/.
- Copy the App ID, App Secret, and Endpoint. Generate a random cookie secret of at least 32 characters.
2. Install and configure the Logto SDK
Create a Next.js project if you don't have one:
npx create-next-app my-auth-app
cd my-auth-app
Install the Logto Next.js SDK and SWR, which the pages use to fetch the signed-in user:
npm install @logto/next swr
Create a .env.local file in the project root. Replace each value with your Logto values from step 1 and your Permit environment API key (Get your API key):
LOGTO_ENDPOINT=your-logto-endpoint
LOGTO_APP_ID=your-app-id
LOGTO_APP_SECRET=your-app-secret
LOGTO_COOKIE_SECRET=complex_password_at_least_32_characters_long
PERMIT_API_KEY=your-permit-api-key
NODE_ENV="development"
Install the Permit Node.js SDK as well, because step 6 imports it: npm install permitio.
3. Create the Logto client
Create a configuration file for the Logto client. The UserScope.Email scope adds the user's email to the ID token claims.
// libraries/logto.js
import LogtoClient, { UserScope } from "@logto/next";

export const logtoClient = new LogtoClient({
  scopes: [UserScope.Email], // Request email scope for user identification
  endpoint: process.env.LOGTO_ENDPOINT,
  appId: process.env.LOGTO_APP_ID,
  appSecret: process.env.LOGTO_APP_SECRET,
  baseUrl: "http://localhost:3000",
  cookieSecret: process.env.LOGTO_COOKIE_SECRET,
  cookieSecure: process.env.NODE_ENV === "production",
});
4. Create the Logto authentication routes
Add a dynamic API route that hands every /api/logto/* request to the Logto client:
// pages/api/logto/[action].js
import { logtoClient } from "../../../libraries/logto";

export default logtoClient.handleAuthRoutes();
The route handles these endpoints:
| Endpoint | What it does |
|---|---|
/api/logto/sign-in | Starts the sign-in flow |
/api/logto/sign-in-callback | Handles the redirect from Logto after sign-in |
/api/logto/sign-out | Signs the user out |
/api/logto/user | Returns the current user's authentication state and claims |
5. Create the policy in Permit.io
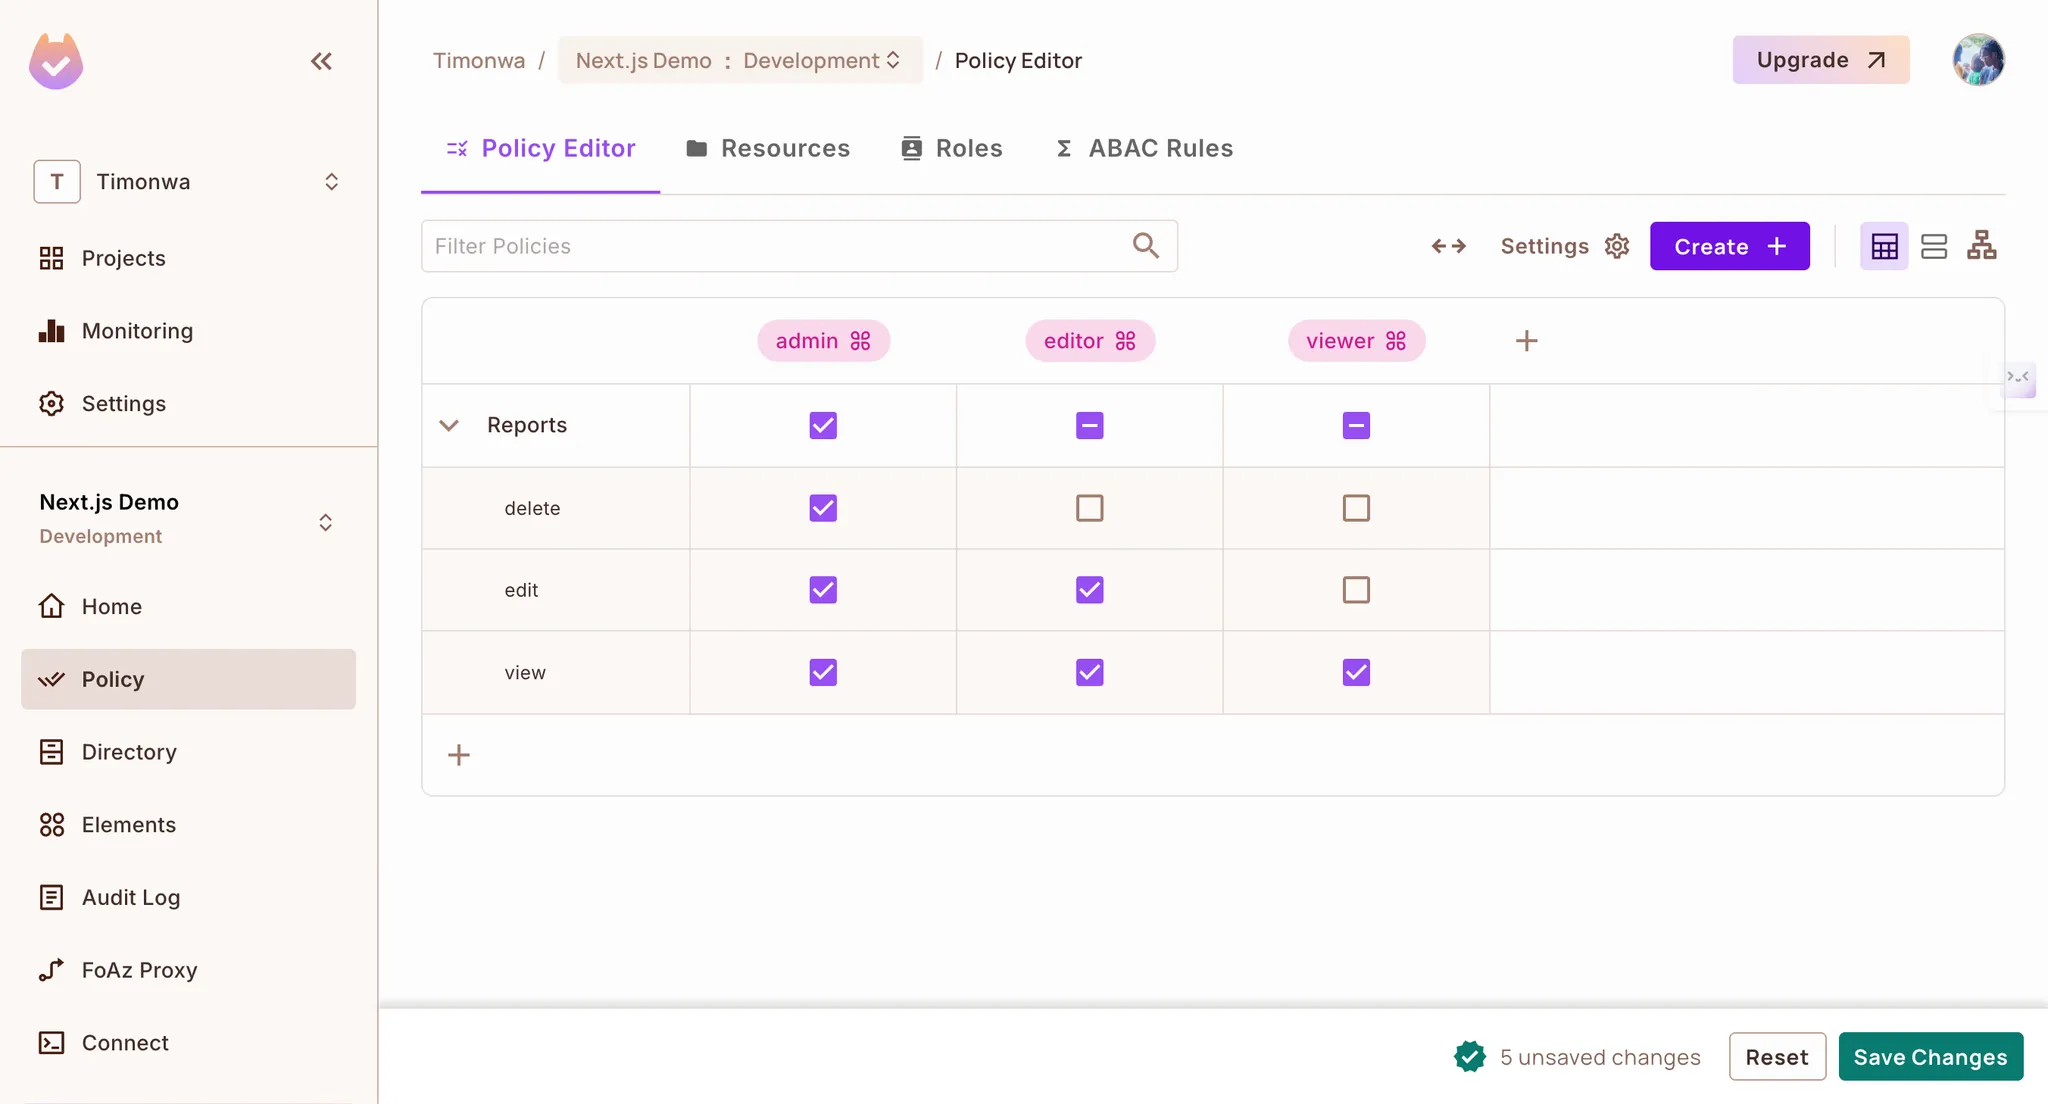
Create the resource and roles that the dashboard checks. The Quickstart shows each screen in detail.
- In the Permit dashboard, open the project and environment that match your API key.
- Create a resource with the key
Reportsand the actionsview,edit, anddelete. Resource keys are case-sensitive. - Create the roles
admin,editor, andviewer. - In the Policy Editor, allow actions for each role. For example:
viewercanview,editorcanviewandedit, andadmincan do all three.
6. Add the Permit.io client
Create a module that initializes the Permit SDK and exports two helpers: syncUserToPermit syncs a user and assigns a role in the default tenant, and checkPermission calls permit.check().
// libraries/permit.js
const { Permit } = require("permitio");

// Initialize the Permit.io client
const permit = new Permit({
  pdp: "https://cloudpdp.api.permit.io",
  token: process.env.PERMIT_API_KEY,
});

// Sync a user with Permit.io
export const syncUserToPermit = async (
  userId,
  email,
  firstName,
  lastName,
  role
) => {
  // First, sync the user
  await permit.api.syncUser({
    key: userId,
    email: email || undefined,
    first_name: firstName || undefined,
    last_name: lastName || undefined,
  });

  // Then assign a role to the user (in the default tenant)
  if (role) {
    await permit.api.assignRole({
      user: userId,
      role: role,
      tenant: "default",
    });
  }

  return true;
};

// Check if a user has permission to perform an action on a resource
export const checkPermission = async (userId, action, resource) => {
  return await permit.check(userId, action, resource);
};
The pdp value points to the Cloud policy decision point (PDP), which evaluates RBAC policies. Replace it with the address of your own PDP if you run one.
7. Create a permission check API route
Add an API route that the browser calls to check one permission:
// pages/api/check-permission.js
import { checkPermission } from "../../libraries/permit";

export default async function handler(req, res) {
  const { userId, action, resource } = req.query;

  if (!userId || !action || !resource) {
    return res.status(400).json({ error: "Missing required parameters" });
  }

  try {
    const isPermitted = await checkPermission(userId, action, resource);
    return res.status(200).json({ isPermitted });
  } catch (error) {
    console.error("Error checking permission:", error);
    return res.status(500).json({ error: "Failed to check permission" });
  }
}
This route takes userId from the query string, so any browser can ask about any user's permissions. In production, read the user ID from the Logto session on the server instead of trusting a request parameter.
8. Sync new users with a webhook
Add an API route that receives Logto webhooks. When the event is PostRegister, the route syncs the new user to Permit with the Logto user ID as the user key, and assigns the viewer role:
// pages/api/webhooks/logto.js
import { syncUserToPermit } from "../../../libraries/permit";

export default async function handler(req, res) {
  // Log the webhook payload for debugging
  console.log("Webhook payload:", req.body);

  const { event, user } = req.body;

  // Only process user registration events
  if (event === "PostRegister") {
    try {
      // Assign a default role - customize this logic as needed
      let role = "viewer";

      // Sync the user to Permit.io
      await syncUserToPermit(
        user.id,
        user.primaryEmail,
        user.name,
        undefined,
        role
      );

      return res.status(200).json({ success: true });
    } catch (error) {
      console.error("Error syncing user:", error);
      return res.status(500).json({ error: "Failed to sync user" });
    }
  }

  return res.status(200).json({ message: "Event ignored" });
}
This route accepts any request that reaches it. Logto signs webhook requests with the webhook's signing key. Verify the signature before you sync the user, or anyone who finds the URL can create users and role assignments in your Permit environment.
9. Register the webhook in Logto
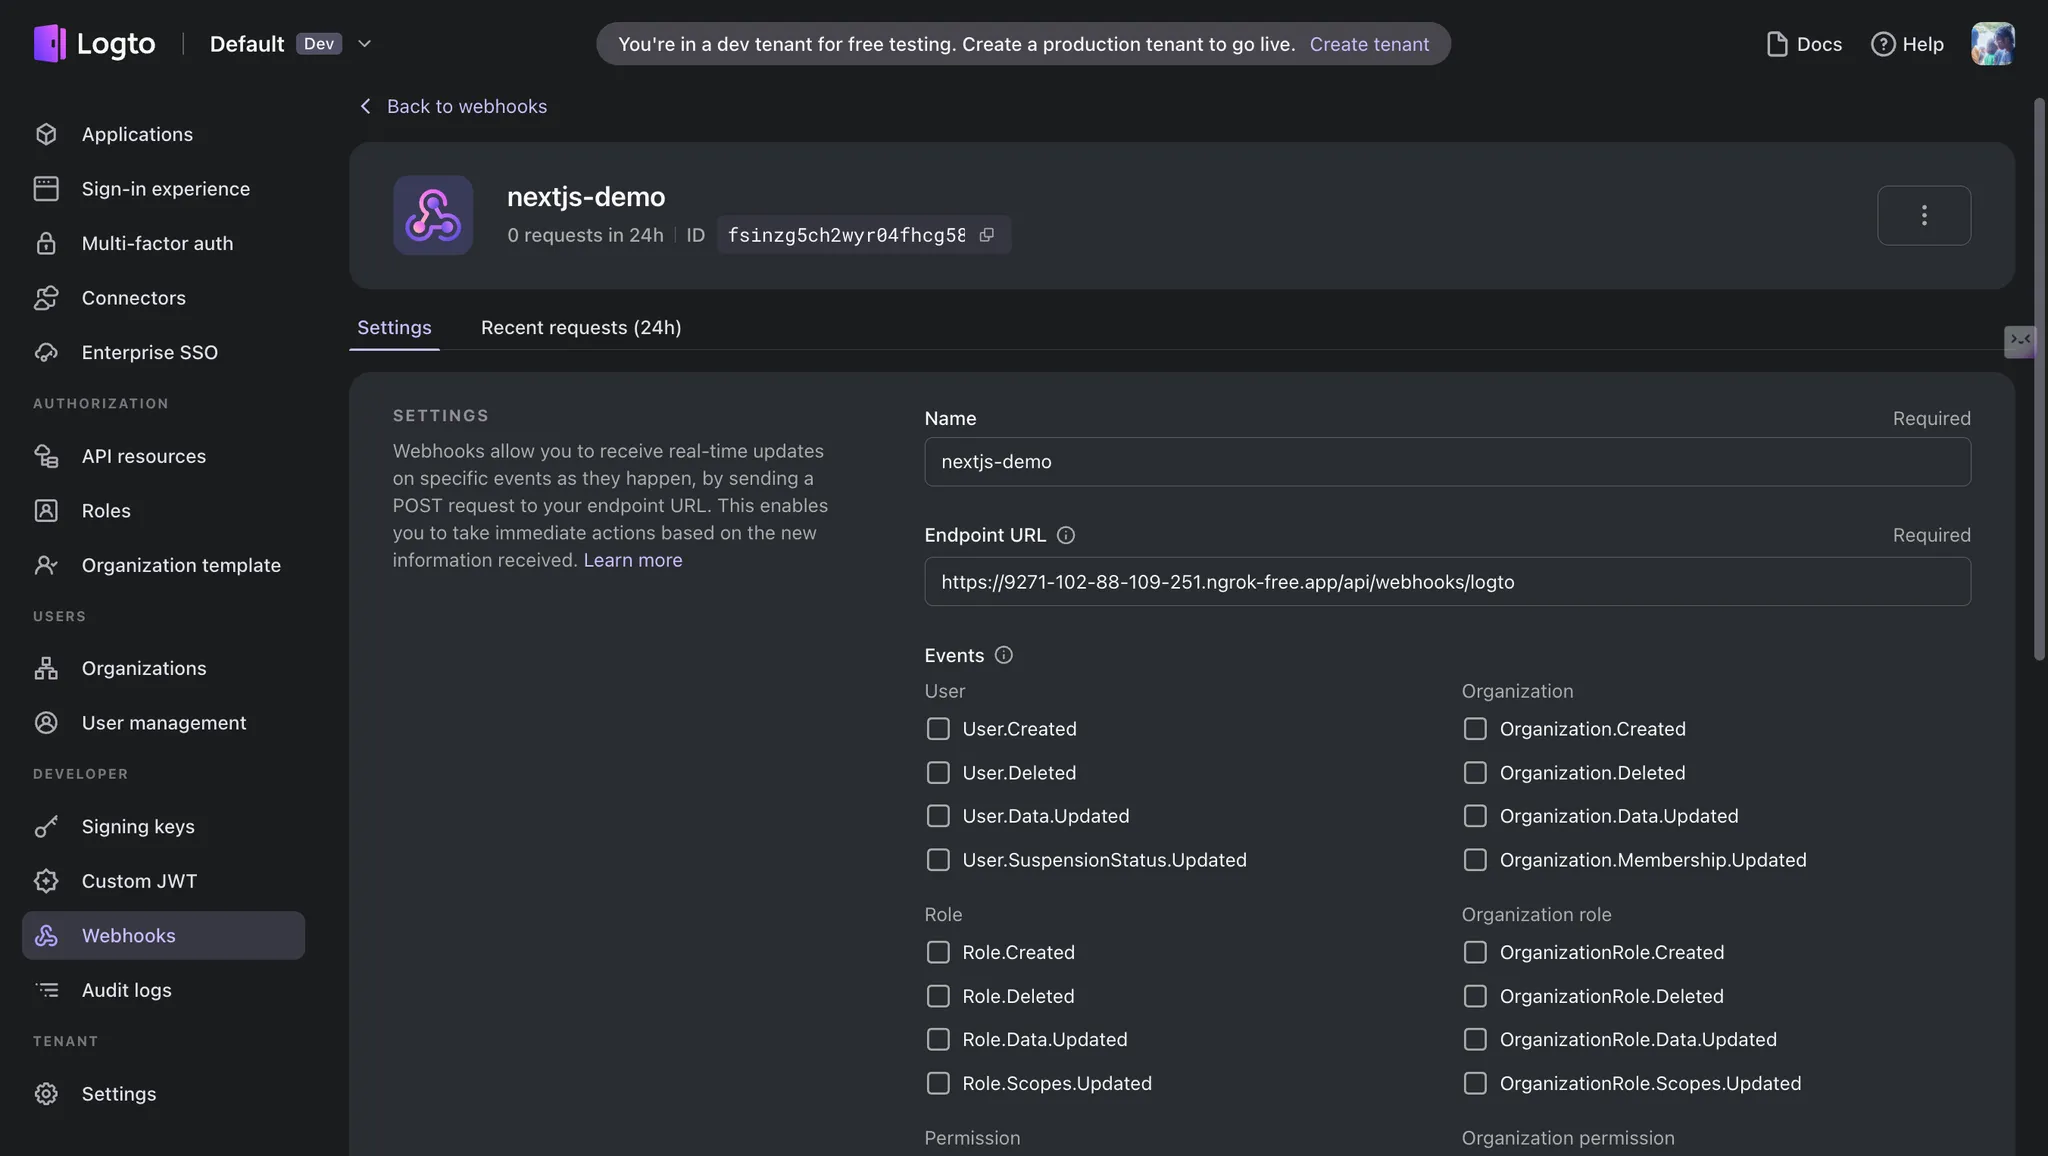
- In the Logto Console, open Webhooks and click Create Webhook.
- Enter a name and description.
- Enter the public URL of the route, for example
https://your-domain.com/api/webhooks/logto. For local development, exposehttp://localhost:3000with a tunnel such as ngrok and use that URL. - Select the
PostRegisterevent. - Save the webhook.
10. Add a permission hook for UI components
Add a React hook that calls the permission check route and returns whether the action is allowed:
// hooks/usePermission.js
import { useState, useEffect } from "react";

export function usePermission(userId, action, resource) {
  const [isAllowed, setIsAllowed] = useState(false);
  const [loading, setLoading] = useState(true);

  useEffect(() => {
    if (!userId) {
      setLoading(false);
      return;
    }

    const checkPermission = async () => {
      try {
        const response = await fetch(
          `/api/check-permission?userId=${userId}&action=${action}&resource=${resource}`
        );
        const data = await response.json();
        setIsAllowed(data.isPermitted);
      } catch (err) {
        console.error("Error checking permission:", err);
      } finally {
        setLoading(false);
      }
    };

    checkPermission();
  }, [userId, action, resource]);

  return { isAllowed, loading };
}
11. Create the login and dashboard pages
Create a login page. The page redirects signed-in users to the dashboard and shows a Sign in with Logto button to everyone else:
// pages/login.js
import { useEffect } from "react";
import { useRouter } from "next/router";
import useSWR from "swr";

export default function Login() {
  const router = useRouter();
  const fetcher = url => fetch(url).then(r => r.json());
  const { data, error } = useSWR("/api/logto/user", fetcher);

  useEffect(() => {
    if (data?.isAuthenticated) {
      router.push("/dashboard");
    }
  }, [data, router]);

  const handleSignIn = () => {
    window.location.assign("/api/logto/sign-in");
  };

  if (error) return <div>Error loading user data</div>;
  if (!data) return <div>Loading...</div>;

  return (
    <div className="min-h-screen flex items-center justify-center bg-gray-100">
      <div className="max-w-md w-full space-y-8 p-10 bg-white rounded-lg shadow-md">
        <div className="text-center">
          <h1 className="text-2xl font-bold">Welcome</h1>
          <p className="mt-2 text-gray-600">Please sign in to continue</p>
        </div>
        <button
          onClick={handleSignIn}
          className="w-full flex justify-center py-2 px-4 border border-transparent rounded-md shadow-sm text-white bg-blue-600 hover:bg-blue-700">
          Sign in with Logto
        </button>
      </div>
    </div>
  );
}
Create a dashboard page. The page reads the user ID from the sub claim, checks view, edit, and delete on Reports, and renders only the controls the user is allowed to use:
// pages/dashboard.js
import { useEffect } from "react";
import { useRouter } from "next/router";
import useSWR from "swr";
import { usePermission } from "../hooks/usePermission";

export default function Dashboard() {
  const router = useRouter();
  const fetcher = url => fetch(url).then(r => r.json());
  const { data, error } = useSWR("/api/logto/user", fetcher);

  const userId = data?.claims?.sub;

  // Check different permissions
  const { isAllowed: canViewReports, loading: viewLoading } = usePermission(
    userId,
    "view",
    "Reports"
  );
  const { isAllowed: canEditReports } = usePermission(
    userId,
    "edit",
    "Reports"
  );
  const { isAllowed: canDeleteReports } = usePermission(
    userId,
    "delete",
    "Reports"
  );

  // Redirect to login if not authenticated
  useEffect(() => {
    if (data && !data.isAuthenticated) {
      router.push("/login");
    }
  }, [data, router]);

  const handleSignOut = () => {
    window.location.assign("/api/logto/sign-out");
  };

  if (error) return <div>Error loading user data</div>;
  if (!data || viewLoading) return <div>Loading...</div>;

  return (
    <div className="min-h-screen bg-gray-100">
      <header className="bg-white shadow p-4">
        <div className="max-w-4xl mx-auto flex justify-between">
          <h1 className="text-xl font-bold">Dashboard</h1>
          <button onClick={handleSignOut} className="text-blue-600">
            Sign Out
          </button>
        </div>
      </header>

      <main className="max-w-4xl mx-auto p-4 mt-4">
        {canViewReports ? (
          <div className="bg-white p-6 rounded shadow">
            <h2 className="text-lg font-medium mb-4">Monthly Report</h2>
            <p className="mb-4">
              This is a report that you have permission to view.
            </p>

            <div className="flex space-x-2">
              {canEditReports && (
                <button className="px-4 py-2 bg-blue-600 text-white rounded">
                  Edit Report
                </button>
              )}

              {canDeleteReports && (
                <button className="px-4 py-2 bg-red-600 text-white rounded">
                  Delete Report
                </button>
              )}
            </div>
          </div>
        ) : (
          <div className="bg-white p-6 rounded shadow">
            <p>You don't have permission to view reports.</p>
          </div>
        )}
      </main>
    </div>
  );
}
12. Verify the integration
-
Start your Next.js application:
npm run dev -
Open
http://localhost:3000/loginand sign up with a new user through Logto. ThePostRegisterwebhook runs only for new registrations. -
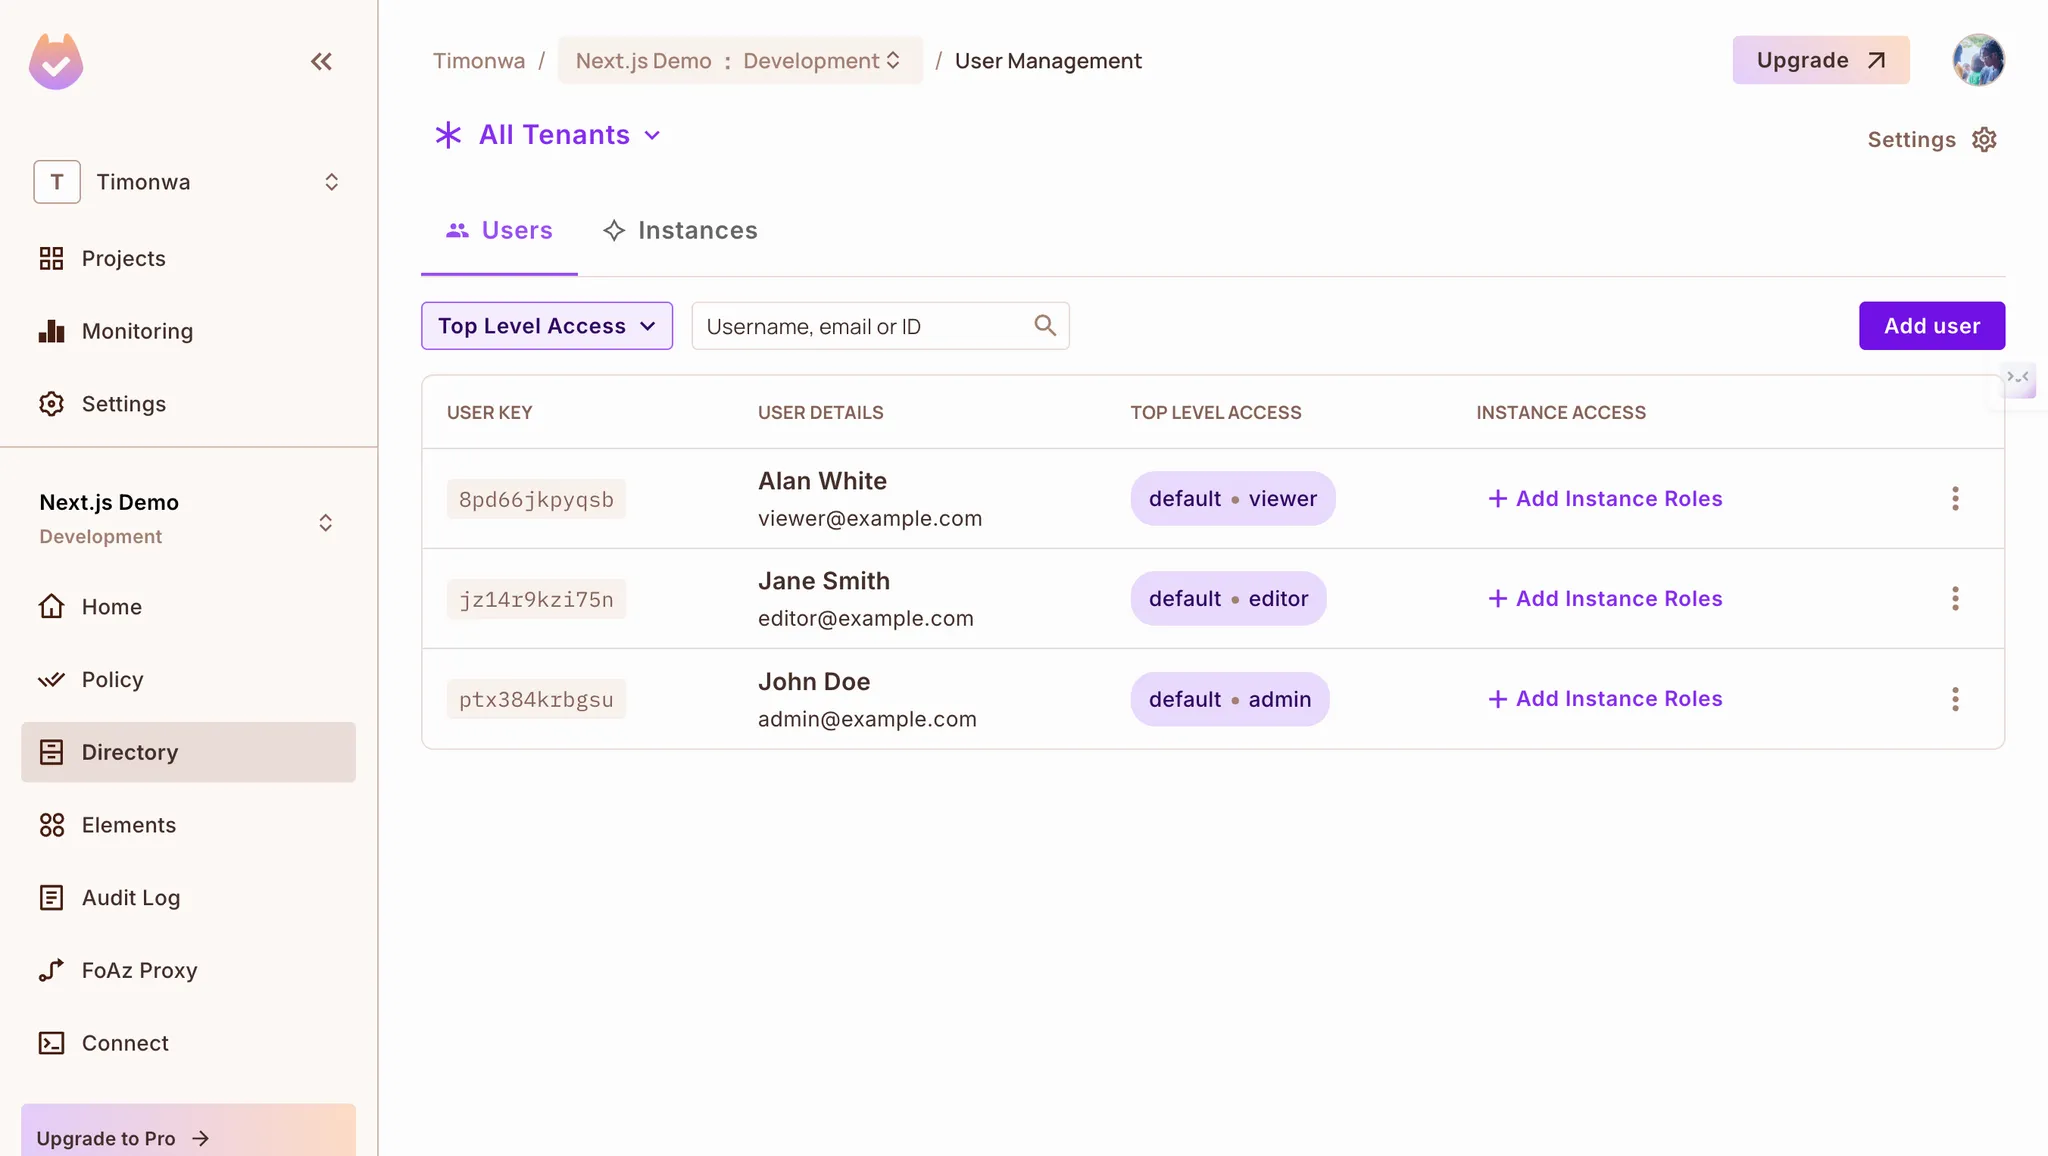
In the Permit dashboard, open Directory. The new user appears with the Logto user ID as its key and the
viewerrole in thedefaulttenant. -
On the dashboard page, the Monthly Report card appears without the Edit Report and Delete Report buttons, because
viewercan onlyview. -
In Permit, assign the
adminrole to the user and reload the dashboard. The Edit Report and Delete Report buttons appear.
Check permissions in server-side code
You can also check permissions before a page renders. The example below redirects users who aren't allowed to view a data resource. withLogtoSsr loads the Logto session into req.user before your handler runs.
// pages/reports.js
import { logtoClient } from "../libraries/logto";
import { checkPermission } from "../libraries/permit";

export const getServerSideProps = logtoClient.withLogtoSsr(async function ({ req }) {
  const { user } = req;
  if (!user.isAuthenticated) {
    return { redirect: { destination: "/login", permanent: false } };
  }

  const canAccessData = await checkPermission(user.claims.sub, "view", "data");
  if (!canAccessData) {
    return { redirect: { destination: "/unauthorized", permanent: false } };
  }

  return { props: {} };
});
Next steps
- How authentication connects to Permit.io: the handoff point, the user key, and where to manage roles.
- Check permissions: pass tenants, resource instances, and attributes to
permit.check(). - Set up attribute-based access control (ABAC): write policies based on user and resource attributes.
- Ask questions in the Permit Slack community or the Logto Discord server.