Stytch and Permit Integration
Add Stytch sign-in to a Next.js app (Pages Router), then connect it to Permit.io authorization at the handoff point: after Stytch authenticates a session, your backend creates a Permit tenant for the user, syncs the user, and assigns a role. This tutorial is for developers who use Stytch Consumer authentication and want role-based access control (RBAC) from Permit. It shows one way to set up Stytch. Stytch also has example apps for other languages and frameworks.
What you build
- Email magic link and Google OAuth sign-in with the Stytch Next.js SDK.
- A redirect page that completes the Stytch authentication.
- A protected frontend page and a protected server-side route.
- A handoff point that creates a Permit tenant, syncs the Stytch user, and assigns the
AccountOwnerrole. - A
permit.check()call that decides whether the user canview-allon anAccountresource.
Prerequisites
- A Stytch account with a Consumer project. See the Stytch Next.js quickstart.
- A Permit.io account and your environment API key. See Get your API key.
- A Next.js project that uses the Pages Router. To create one, run
npx create-next-app@latest. - The Permit Node.js SDK:
npm install permitio. - A policy decision point (PDP) for the SDK to send checks to: the Cloud PDP at
https://cloudpdp.api.permit.io, or a container PDP of your own. See PDP overview.
1. Install the Stytch SDKs and set your API keys
Install the Stytch frontend SDKs and the Stytch backend Node.js SDK:
npm install @stytch/nextjs @stytch/vanilla-js stytch --save
Add your Stytch project's API keys to your application's environment variables, for example in .env.local. Copy the values from the Stytch dashboard:
STYTCH_PROJECT_ENV=test
STYTCH_PROJECT_ID="YOUR_STYTCH_PROJECT_ID"
NEXT_PUBLIC_STYTCH_PUBLIC_TOKEN="YOUR_STYTCH_PUBLIC_TOKEN"
STYTCH_SECRET="YOUR_STYTCH_SECRET"
2. Wrap your application in a StytchProvider
In pages/_app.js, create the Stytch client and wrap the app in StytchProvider, so every page can use the Stytch frontend SDK:
import { StytchProvider, createStytchUIClient } from "@stytch/nextjs";
import Head from "next/head";

const stytch = createStytchUIClient(process.env.NEXT_PUBLIC_STYTCH_PUBLIC_TOKEN);

export default function App({ Component, pageProps }) {
  return (
    <>
      <Head>{/* Truncated */}</Head>
      <StytchProvider stytch={stytch}>
        <Component {...pageProps} />
      </StytchProvider>
    </>
  );
}
3. Add the Stytch login component
Create a Login component. The products array sets the sign-in methods. This example offers email magic links and Google OAuth:
import { StytchLogin } from "@stytch/nextjs";
import { Products } from "@stytch/vanilla-js";

const Login = () => {
  // the redirect page you create in step 4
  const REDIRECT_URL = "http://localhost:3000/authenticate";

  const config = {
    products: [Products.emailMagicLinks, Products.oauth],
    emailMagicLinksOptions: {
      loginRedirectURL: REDIRECT_URL,
      loginExpirationMinutes: 60,
      signupRedirectURL: REDIRECT_URL,
      signupExpirationMinutes: 60,
    },
    oauthOptions: {
      providers: [{ type: "google" }],
      loginRedirectURL: REDIRECT_URL,
      signupRedirectURL: REDIRECT_URL,
    },
  };

  return <StytchLogin config={config} styles={{}} />;
};
REDIRECT_URL is the full URL of the redirect page you create in 4. Create the redirect page. The value http://localhost:3000/authenticate matches a page at pages/authenticate.js on a development server. Stytch sends users to that URL after they click a magic link or finish OAuth, so add the same URL on the Redirect URLs tab of the Stytch dashboard, and change it to your deployed URL in production.
Add the Login component to your login page. The page sends users who are already signed in to /profile:
import { useStytchUser } from "@stytch/nextjs";
import { useRouter } from "next/router";
import { useEffect } from "react";

export default function LoginPage() {
  const { user, isInitialized } = useStytchUser();
  const router = useRouter();

  useEffect(() => {
    if (isInitialized && user) {
      router.replace("/profile");
    }
  }, [user, isInitialized, router]);

  return <Login />;
}
4. Create the redirect page
The redirect page reads the token and stytch_token_type query parameters that Stytch adds to the redirect URL. It authenticates the token with the OAuth method or the magic link method, and creates a session that lasts 60 minutes:
import { useRouter } from "next/router";
import { useEffect } from "react";
import { useStytch } from "@stytch/nextjs";

export default function RedirectPage() {
  const router = useRouter();
  const stytch = useStytch();

  useEffect(() => {
    const stytch_token_type = router?.query?.stytch_token_type?.toString();
    const token = router?.query?.token?.toString();

    if (token && stytch_token_type === "oauth") {
      stytch.oauth.authenticate(token, {
        session_duration_minutes: 60,
      });
    } else if (token && stytch_token_type === "magic_links") {
      stytch.magicLinks.authenticate(token, {
        session_duration_minutes: 60,
      });
    }
  }, [router, stytch]);

  return <div>Loading...</div>;
}
After Stytch creates the session, the login page from 3. Add the Stytch login component sends the signed-in user to /profile.
5. Protect frontend pages
The Stytch frontend SDK fills in the session and user objects after sign-in. Use the useStytchUser hook to send users who aren't signed in back to the home page:
import { useStytchUser, useStytchSession } from "@stytch/nextjs";
import { useEffect } from "react";
import { useRouter } from "next/router";

export default function ProfilePage() {
  const { user, isInitialized } = useStytchUser();
  const router = useRouter();

  useEffect(() => {
    if (isInitialized && !user) {
      router.replace("/");
    }
  }, [user, isInitialized, router]);

  return <div>Profile Page Content</div>;
}
6. Protect server-side routes
Frontend checks only hide pages. Protect data on the server as well. This getServerSideProps function reads the stytch_session_jwt cookie, authenticates it with the Stytch backend SDK, and redirects to / when the cookie is missing or invalid:
import stytch from "stytch";

let client;

const loadStytch = () => {
  if (!client) {
    client = new stytch.Client({
      project_id: process.env.STYTCH_PROJECT_ID || "",
      secret: process.env.STYTCH_SECRET || "",
      env: process.env.STYTCH_PROJECT_ENV === "live" ? stytch.envs.live : stytch.envs.test,
    });
  }
  return client;
};

export async function getServerSideProps({ req }) {
  const redirectRes = {
    redirect: {
      destination: "/",
      permanent: false,
    },
  };

  const sessionJWT = req.cookies["stytch_session_jwt"];

  if (!sessionJWT) {
    return redirectRes;
  }

  const stytchClient = loadStytch();

  try {
    await stytchClient.sessions.authenticateJwt({ session_jwt: sessionJWT });
    return { props: {} };
  } catch (e) {
    return redirectRes;
  }
}
When authenticateJwt() succeeds, the session is valid and your backend knows the Stytch user ID. This is the handoff point: the place to sync the user into Permit before you show the user any content. 9. Sync the user at the handoff point shows the same function with the Permit calls added.
Permit evaluates a permission check against the roles assigned to the user. If the user doesn't exist in Permit, the user has no roles, and every role-based check returns deny.
7. Create the policy in Permit
Create the resource, the role, and the permission that the Permit calls on this page use. In the Permit dashboard:
- Create a resource with the key
Accountand the actionview-all. - Create a role with the key
AccountOwnerand the display name Account Owner. - Allow the
view-allaction on theAccountresource for theAccountOwnerrole.
The Quickstart walks through the same three screens in more detail.
The Policy Editor shows a role's key next to its display name. This screenshot shows the Account Owner role in a larger policy, one with four resources, where the account resource carries the display name Current Account:
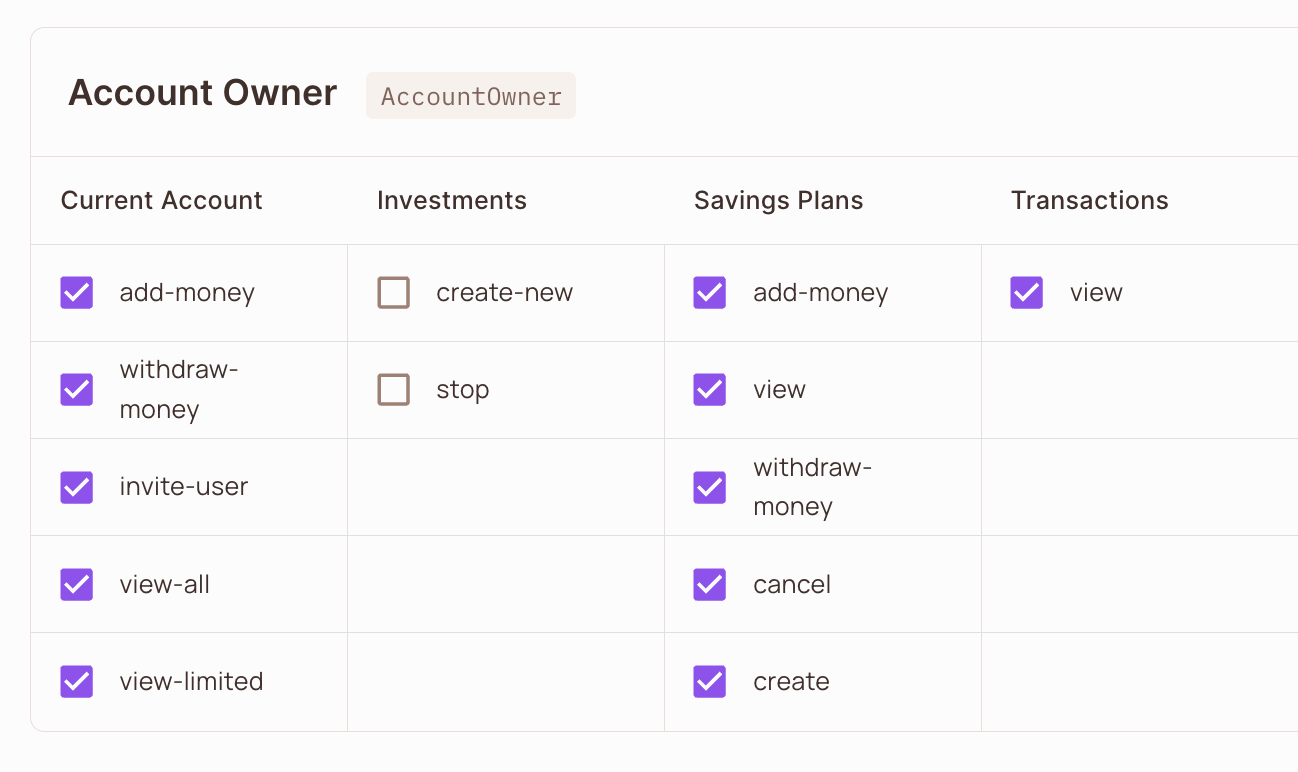
Resource keys and role keys are case-sensitive, and the SDK takes keys, not display names. permit.api.users.assignRole() in 9. Sync the user at the handoff point passes the role key AccountOwner, and permit.check() in 10. Verify the integration passes the resource key Account. Replace both with the keys of your own role and resource.
8. Initialize the Permit SDK
Run Permit calls on the backend, where your API key stays secret. In the backend file that runs the handoff, import the Permit SDK and create the client:
import { Permit } from "permitio";

const permit = new Permit({
  // The Environment API Key
  token: process.env.PERMIT_API_KEY,
  // The URL for the deployed PDP. Usually runs on port 7766.
  pdp: process.env.PERMIT_PDP_HOSTNAME,
});
| Environment variable | Value |
|---|---|
PERMIT_API_KEY | Your Permit environment API key |
PERMIT_PDP_HOSTNAME | The URL of your policy decision point (PDP). A container PDP usually listens on port 7766, for example http://localhost:7766. For the Cloud PDP, use https://cloudpdp.api.permit.io. |
9. Sync the user at the handoff point
Run the Permit calls in the same getServerSideProps function as the Stytch session check, after authenticateJwt() returns. authenticateJwt() throws when the JWT signature is invalid or the underlying Stytch session is no longer active, so code that runs after it runs only for an authenticated user. A JWT that is past its exp claim while its session is still active doesn't throw: Stytch verifies it remotely and returns a refreshed JWT.
The complete server-side handoff
This version of the pages/profile.js server-side function from 6. Protect server-side routes adds the three Permit calls. It reads the Stytch user ID and email, creates the user's tenant when it is missing, syncs the user, and assigns the role.
The top of pages/profile.js creates the Stytch client, creates the Permit client, and defines the ensureTenant() helper that the function calls:
// pages/profile.js
import stytch from "stytch";
import { Permit, PermitApiError } from "permitio";

let client;

const loadStytch = () => {
  if (!client) {
    client = new stytch.Client({
      project_id: process.env.STYTCH_PROJECT_ID || "",
      secret: process.env.STYTCH_SECRET || "",
      env: process.env.STYTCH_PROJECT_ENV === "live" ? stytch.envs.live : stytch.envs.test,
    });
  }
  return client;
};

const permit = new Permit({
  token: process.env.PERMIT_API_KEY,
  pdp: process.env.PERMIT_PDP_HOSTNAME,
});

// Returns the tenant, and creates it on this user's first sign-in.
async function ensureTenant(tenantKey, tenantName) {
  try {
    return await permit.api.tenants.get(tenantKey);
  } catch (error) {
    if (error instanceof PermitApiError && error.response?.status === 404) {
      return await permit.api.tenants.create({ key: tenantKey, name: tenantName });
    }
    throw error;
  }
}
The same file exports getServerSideProps, which authenticates the Stytch session and then runs the three Permit calls:
// pages/profile.js
export async function getServerSideProps({ req }) {
  const redirectRes = {
    redirect: {
      destination: "/",
      permanent: false,
    },
  };

  const sessionJWT = req.cookies["stytch_session_jwt"];

  if (!sessionJWT) {
    return redirectRes;
  }

  const stytchClient = loadStytch();

  let session;
  try {
    // authenticateJwt throws if the signature is invalid or the session is no longer active
    ({ session } = await stytchClient.sessions.authenticateJwt({ session_jwt: sessionJWT }));
  } catch (e) {
    return redirectRes;
  }

  // The session is authenticated from here on.
  const userId = session.user_id;
  const { emails } = await stytchClient.users.get({ user_id: userId });
  const userEmail = emails[0]?.email;

  const tenantKey = userId; // one tenant per user
  await ensureTenant(tenantKey, userEmail);

  await permit.api.syncUser({
    key: userId,
    email: userEmail,
  });

  await permit.api.users.assignRole({
    role: "AccountOwner",
    tenant: tenantKey,
    user: userId,
  });

  return { props: { userId } };
}
The Permit calls sit outside the catch that redirects to /. If they shared it, a Permit API error would send the user to the home page as if the session had expired, and you would have no sign that the sync failed.
What each Permit call does
| Call | What it does |
|---|---|
permit.api.tenants.get() and permit.api.tenants.create(), through ensureTenant() | Returns the user's tenant, and creates it on the first sign-in |
permit.api.syncUser() | Creates or updates the Permit user, with the Stytch user ID as the user key |
permit.api.users.assignRole() | Gives the user the AccountOwner role in that tenant, which also places the user in the tenant |
The calls run in that order because a role assignment names both a tenant and a user, so both have to exist first.
Create the tenant only when it is missing
Each user in this example gets a tenant, so the user's data and role assignments stay separate from other users. The tenant key is the Stytch user ID.
permit.api.tenants.create() fails when the tenant already exists, so calling it on every sign-in throws a PermitApiError on the second sign-in of the same user, and the sync stops before it syncs the user. ensureTenant() calls permit.api.tenants.get() first and creates the tenant only when the Permit API answers 404. Any other error status rethrows, so a wrong API key or a network failure still surfaces.
Sync the user
permit.api.syncUser() creates the Permit user on the first sign-in and updates it on later sign-ins, so it is safe to call every time. Pass the Stytch user ID as key, because permit.check() and every role assignment identify the user by that key. See Sync users for the full parameter list.
Assign a role to the user
permit.api.users.assignRole() gives the user the AccountOwner role in the user's own tenant. Assigning a role in a tenant also adds the user to that tenant, so no separate call adds the user to the tenant. Repeating the same assignment on a later sign-in leaves the existing assignment in place. See Assign a role to a user with the Node.js SDK.
10. Verify the integration
- Sign in to your app with a Stytch user who has never signed in before.
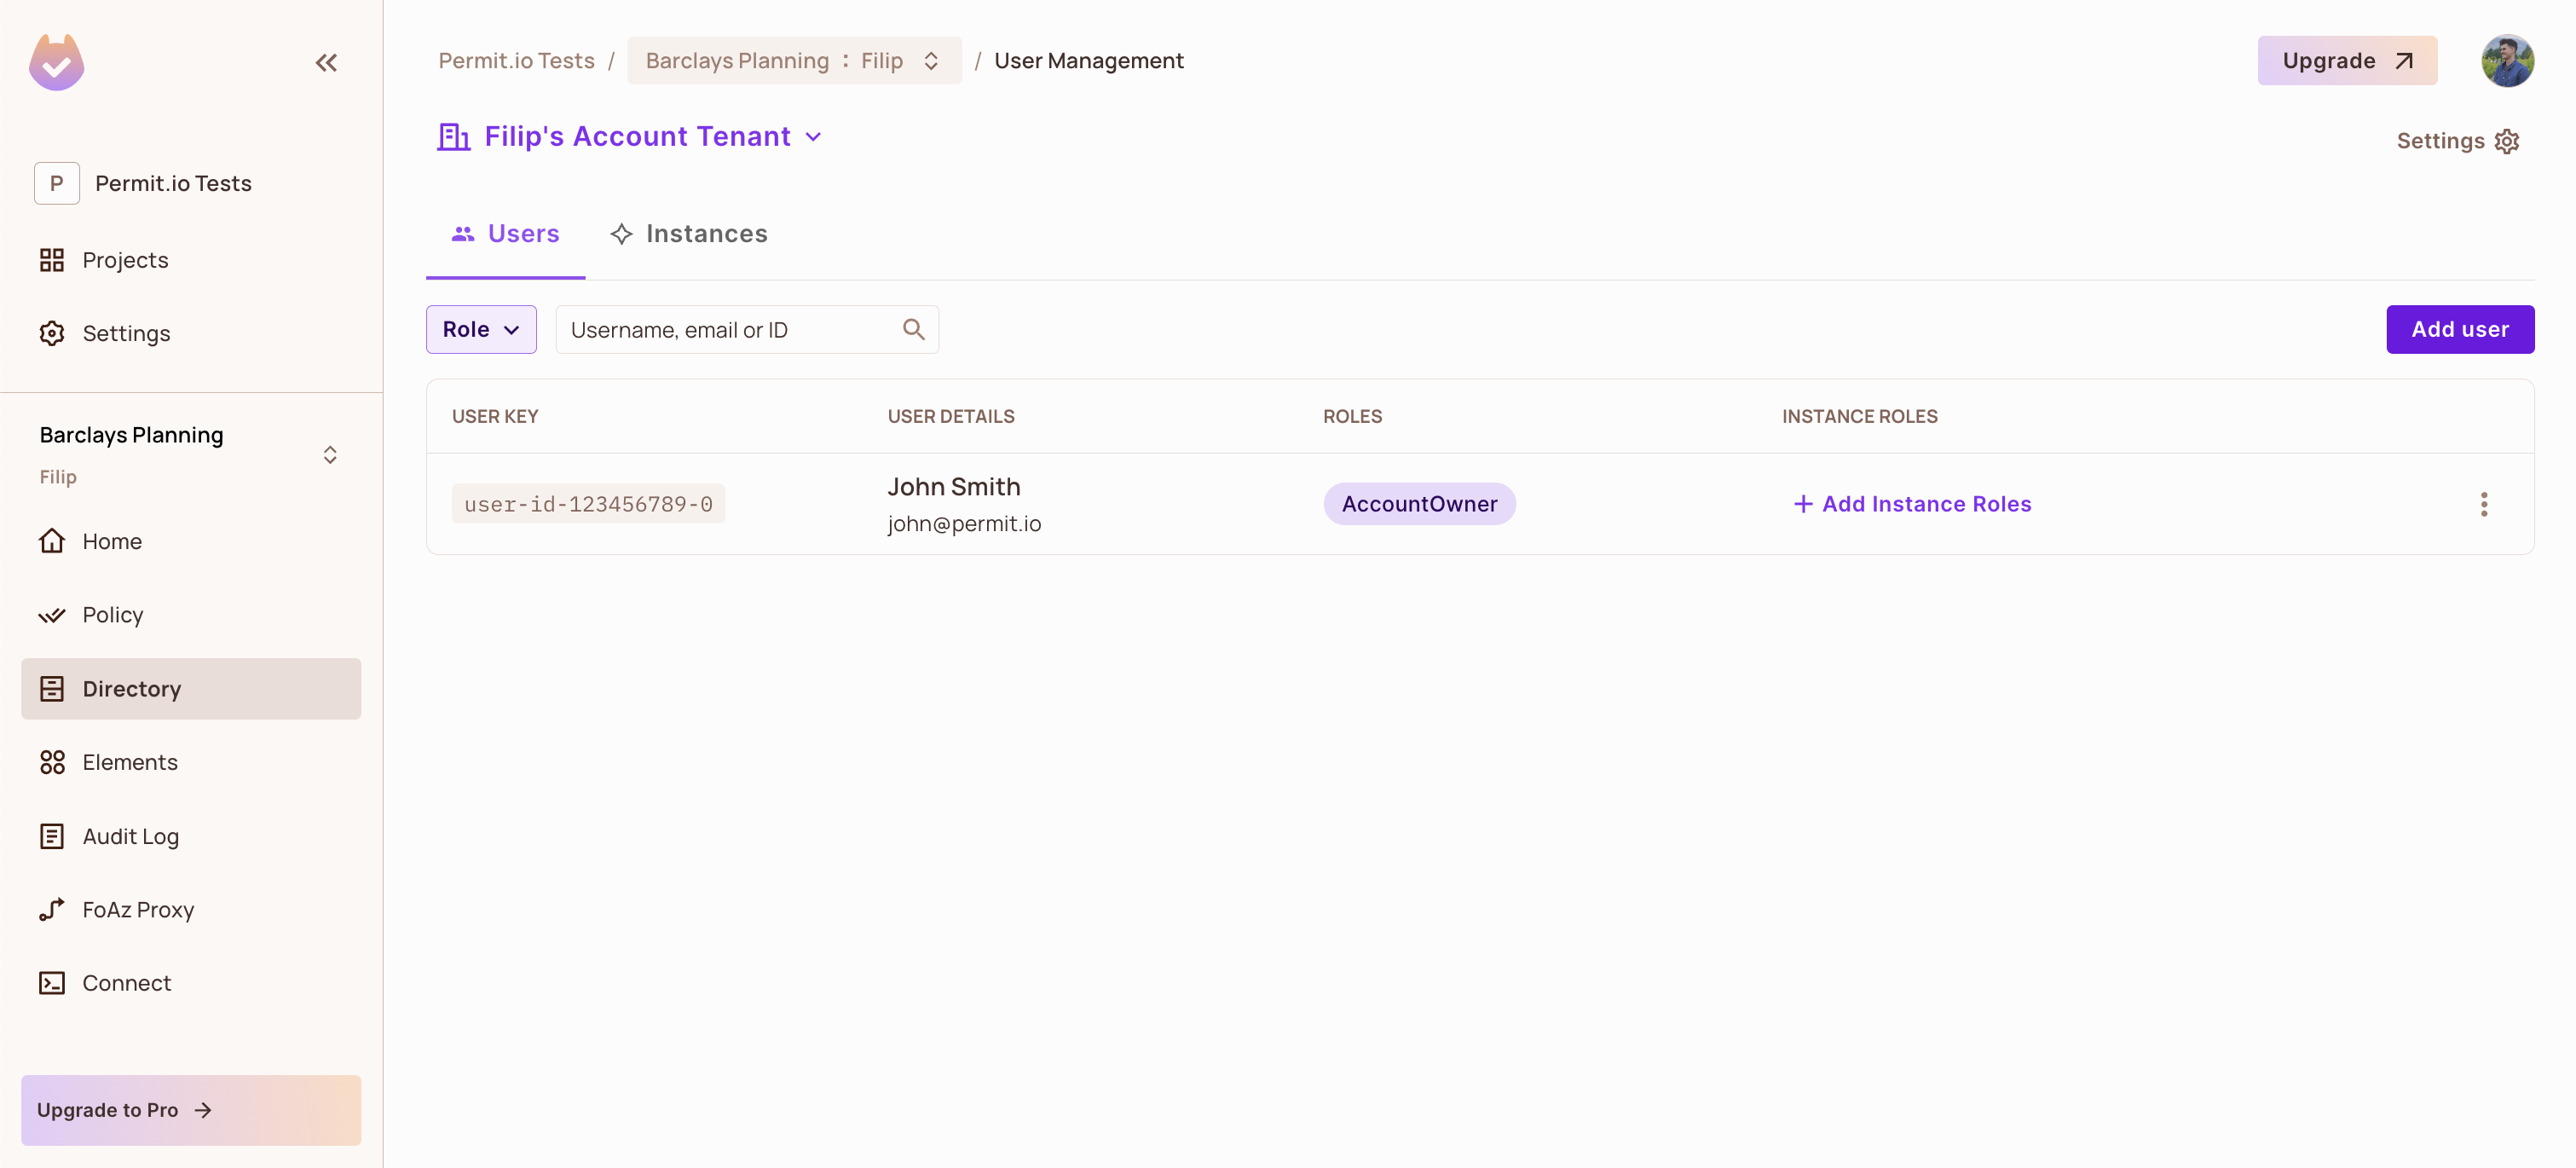
- In the Permit dashboard, open Directory. The tenant list holds a tenant whose key is that user's Stytch user ID and whose name is the user's email address. Select that tenant. One user appears in it, with the Stytch user ID as its user key and the
AccountOwnerrole:
- Check a permission in your backend. This check asks whether the user can take the
view-allaction on the resource with the keyAccountin the user's tenant:
const isPermitted = await permit.check(userId, "view-all", {
  type: "Account",
  tenant: tenantKey,
});
Log the result. The check returns true, because the AccountOwner role allows view-all on the Account resource:
console.log(isPermitted);
// true
- Sign out and sign in again as the same user. The second sign-in succeeds and the Directory shows one user and one tenant, because
ensureTenant()reuses the existing tenant instead of creating it again. - Open the Audit Log screen in the Permit dashboard. The check from step 3 appears with the user key, the
view-allaction, the resource, the tenant, andAllowas the decision.
Next steps
- How authentication connects to Permit.io: the handoff point, the user key, and where to manage roles.
- Check permissions: pass tenants, resource instances, and attributes to
permit.check(). - Sync users: the
syncUser()parameters. - Ask questions in the Permit Slack community.