Permit and Cognito Demo
Run a demo app that signs users in with Amazon Cognito and uses Permit.io to decide which of two actions each user can take. This page is for developers who want a working example before they add Permit to their own Cognito app. To add the integration to your own application, follow Cognito and Permit integration.
The POST /api/sync route in standalone_be/index.mjs of the permitio/cognito-integration repository declares payload with const inside its try block and reads it after the block, so the call to permit.api.syncUser() throws a ReferenceError and no user reaches Permit. The route also reads name and email from a Cognito access token, which carries neither claim. Apply the corrected route in 2. Run the demo application before you start the server, or the demo signs users in and then fails every permission check, because a user who doesn't exist in Permit has no roles.
The demo is based on the cognito-auth-example repository and the article How to add Cognito login to a website. The full code is in the permitio/cognito-integration repository.
What the demo app contains
| Folder | What it runs |
|---|---|
frontend/ | A vanilla JavaScript page with a Login button and two action buttons. It signs the user in with the Cognito hosted login page and calls the backend. |
standalone_be/ | An Express server on port 8000. It verifies Cognito tokens, syncs users to Permit, and protects the POST /say_hello and POST /wave_hello routes with permit.check(). |
The demo needs no policy decision point (PDP) of your own. standalone_be/index.mjs creates the Permit client with the address of the managed Cloud PDP, https://cloudpdp.api.permit.io.
Prerequisites
- An AWS account with an Amazon Cognito user pool and an app client. The app client needs the hosted login page enabled, no client secret (the browser exchanges the code without one), and
http://localhost:8181as an allowed callback URL. - A Permit.io account and your environment API key. See Get your API key.
- Node.js and npm.
1. Create the policy in Permit
Create the policy in the Permit dashboard, with the Permit API, or with an SDK (Python, Node.js, or another SDK):
- Create a resource with the key
helloand the actionssayandwave. - Create the roles
adminandviewer. - Allow
sayandwaveforadmin. Allow onlywaveforviewer. You can also use the assign permissions API.
2. Run the demo application
- Clone the demo application:
git clone https://github.com/permitio/cognito-integration
- Open
standalone_be/index.mjsand replace thePOST /api/syncroute with this corrected version, which keepspayloadin scope after thetryblock, stops on an invalid token, and syncs only thesubclaim that a Cognito access token carries:
// /standalone_be/index.mjs

app.post("/api/sync", async (req, res) => {
  // payload is declared outside the try block, so it is still in scope below
  let payload;
  try {
    payload = await verifier.verify(
      req.headers.authorization?.split(" ")[1] // the JWT as string
    );
  } catch (error) {
    res.status(403).send("Token not valid!");
    return;
  }
  // the Cognito access token carries sub, but no name or email claim
  const syncUser = await permit.api.syncUser({
    key: payload.sub,
  });
  // To assign a role here, map Cognito groups to Permit roles and call:
  // await permit.api.users.assignRole({
  //     user: payload.sub,
  //     role: caseSensitiveRoleKey,
  //     tenant: caseSensitiveTenantKey, // if you don't use tenants, use 'default'
  // });
  res.status(200).send(syncUser);
});
- In the
standalone_befolder, create a.envfile based on.env.example, with your Cognito and Permit values:
| Variable | Value |
|---|---|
USER_POOL_ID | The ID of your Cognito user pool |
CLIENT_ID | The ID of your Cognito app client |
PERMIT_TOKEN | Your Permit environment API key |
USER_POOL_ID=<your_user_pool_id>
CLIENT_ID=<your_app_client_id>
PERMIT_TOKEN=<permit_api_key>
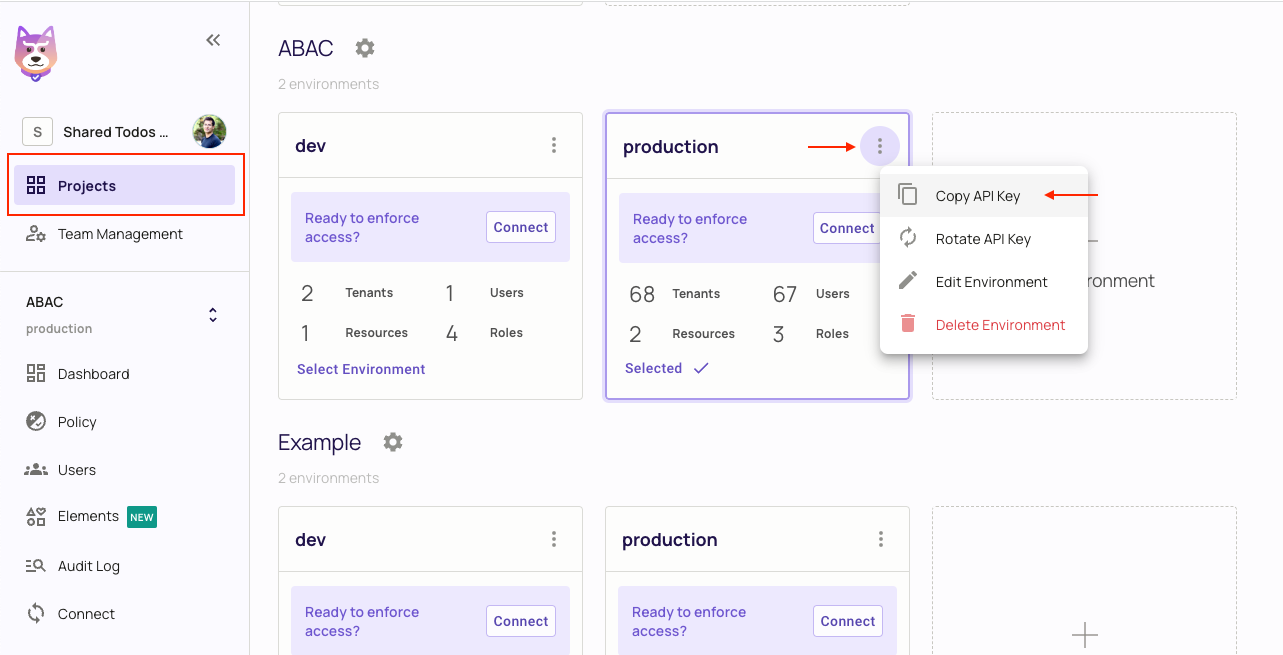
To copy your Permit API key, open the Projects page, click the three dots on your environment, and select Copy API Key.
-
In the
standalone_befolder, runnpm install, thennode index.mjs. The server logsServer listening on port 8000. -
In the
frontendfolder, copyconfig.example.jstoconfig.js. SetcognitoLoginUrlto your Cognito domain, in the formhttps://<cognito-name>.auth.<region>.amazoncognito.com, andclientIdto your app client ID. -
Serve the
frontendfolder on port 8181 with any static file server, for examplenpx http-server -p 8181. The backend allows browser requests only fromhttp://localhost:8181.
3. Verify the demo
- Open
http://localhost:8181. With no Cognito tokens in the browser's local storage,frontend/app.mjssends the browser to the Cognito hosted login page without waiting for a click on Login. Sign up or sign in there. Cognito returns the browser tohttp://localhost:8181with acodequery parameter, the page exchanges the code for tokens, and it callsPOST /api/sync. - In the Permit dashboard, open Directory. A user appears whose key is the Cognito
subvalue of the account you signed in with. Assign theviewerrole in thedefaulttenant. - In the demo app, click the first Say hello (if you have permission) button, which calls
POST /say_hello. The browser shows an alert withFailed to say hello, becauseviewercan'tsay. - Click the second button, which carries the same label and calls
POST /wave_hello. The alert showsWaved hello. - In Permit, assign the
adminrole to the user. Click the first button again. The alert showsSaid hello.
frontend/index.html labels both action buttons Say hello (if you have permission). The first button in the page calls /say_hello and the second calls /wave_hello, so go by position, not by label.
A successful sync logs one line in the browser console:
User synced
If no user appears in step 2, open the browser console. A 403 response from /api/sync means the Cognito access token didn't verify, so check USER_POOL_ID and CLIENT_ID in standalone_be/.env. If the request to /api/sync never completes, the route still holds the unpatched code: the server runs Express 4, which doesn't turn a rejected async handler into a response, so the ReferenceError leaves the request open and prints an unhandled rejection in the server terminal.
4. How the demo app works
Cognito sign-in with the authorization code flow
On the frontend, the Login button calls redirectToLogin. The function sends the user to the Cognito hosted login page with the authorization code flow and PKCE (Proof Key for Code Exchange), which lets a browser app exchange the code without a client secret:
// app.mjs
const redirectToLogin = async () => {
  const state = await generateNonce();
  const codeVerifier = await generateNonce();
  sessionStorage.setItem(`codeVerifier-${state}`, codeVerifier);
  const codeChallenge = base64URLEncode(await sha256(codeVerifier));
  window.location = `${cognitoLoginUrl}/login?response_type=code&client_id=${clientId}&state=${state}&code_challenge_method=S256&code_challenge=${codeChallenge}&redirect_uri=${window.location.origin}`;
};

//...
On the backend, the GET /api/id and GET /api/access routes verify the ID token and the access token with CognitoJwtVerifier from the aws-jwt-verify package, and return the token payload. The demo uses them to show the decoded tokens in its token table:
// standalone_be/index.mjs
// init CognitoJwtVerifier
const verifierIdToken = CognitoJwtVerifier.create({
  userPoolId: userPoolId,
  tokenUse: "id",
  clientId: clientId,
});

app.get("/api/id", async (req, res) => {
  try {
    const payload = await verifierIdToken.verify(
      req.headers.authorization?.split(" ")[1] // the JWT as string
    );
    res.status(200).send(payload);
  } catch {
    res.status(403).send("Token not valid!");
  }
});
//...
When the demo syncs users to Permit
Permit can only match a user to roles after the user exists in Permit. After Cognito redirects back with a code query parameter, the frontend exchanges the code for tokens and calls the backend sync route with the access token:
// /frontend/app.mjs
//...
if (searchParams.get("code") !== null) {
  //... get the tokens from Cognito
  const syncUser = await fetch("http://localhost:8000/api/sync", {
    method: "POST",
    headers: new Headers({ Authorization: `Bearer ${tokens.access_token}` }),
  });
  //...
}
The backend route verifies the access token and calls permit.api.syncUser() with the Cognito sub claim as the user key. It assigns no roles, so assign them in the Permit dashboard, or add a permit.api.users.assignRole() call as the comment in the corrected route shows. For the general pattern and where to run it in your own app, see Sync Cognito users with Permit after login.
How the demo checks permissions
Authorization runs only on the backend. The POST /say_hello and POST /wave_hello routes verify the ID token, then call permit.check() with the user's sub as the user key, the action (say or wave), and hello as the resource. A route answers HTTP 200 only when the token verifies and Permit allows the action, and HTTP 403 otherwise. For the same pattern written for your own routes, see Check permissions on the backend.
Next steps
- Cognito and Permit integration: add the integration to your own application.
- Check permissions: learn the full
permit.check()signature. - How authentication connects to Permit.io: the handoff point and the user key.