Log users in to Permit Elements
Sign a user in to Permit Elements before your application shows an element. This page is for developers who embed Permit Elements, the embeddable UI components, and need to pick and implement a login method. To create an element and get its iframe code first, see Embed Permit Elements.
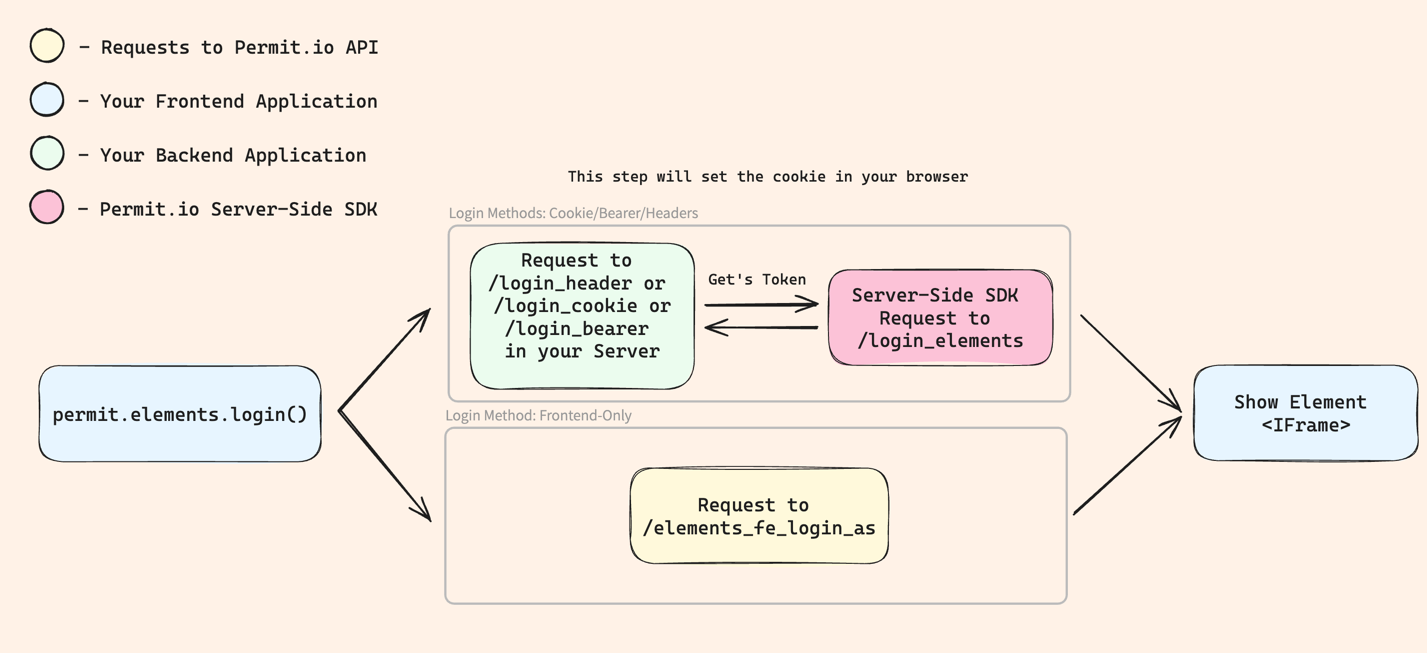
Every login method ends the same way: your frontend calls permit.elements.login() from the @permitio/permit-js package, and Permit creates an element session for the user in one tenant. Most methods also need a login route in your backend that calls the Permit SDK's loginAs method.
Prerequisites
- An element created in the Permit dashboard, and its iframe code. See Embed Permit Elements.
- The user synced to Permit and assigned a role in the tenant the element shows. See Sync users.
- For methods with a backend route: your environment API key. See Get your API key.
- For the
frontendOnlymethod: a JSON Web Key Set (JWKS) configured for the environment. See Configure JWKS for your environment.
Choose a login method
Pick the method that matches how your frontend authenticates to your backend.
| Method | loginMethod value | Backend route | Use it when |
|---|---|---|---|
| Cookie | LoginMethod.cookie (the default) | Yes. A GET route that redirects to ticket.redirect_url. | Your backend authenticates requests with a session cookie. |
| Bearer token | LoginMethod.bearer | Yes. A POST route that returns ticket.content. | Your backend authenticates requests with an Authorization: Bearer header. |
| Other headers | LoginMethod.header | Yes. A POST route that returns ticket.content. | Your backend authenticates requests with a custom HTTP header. |
| Frontend only | LoginMethod.frontendOnly | No. Permit verifies the user's JWT against the environment JWKS. | You don't want to add a backend route, and your identity provider issues JWTs. |
| Private browsing | LoginMethod.supportsPrivateBrowser | Yes. A POST route that returns an element bearer token. | Your users open the element in a browser that blocks third-party cookies, such as a private window. See Support private browsing. |
The tenant you log in to is the only tenant the element shows. To show a different tenant, call permit.elements.logout() and log the user in again with the other tenant.
1. Add a backend login route
Skip this step if you use the frontendOnly method.
The backend login route identifies the signed-in user from your own authentication, then calls the server-side SDK's loginAs method with the user's key and a tenant key or ID. Both values are required. In Node.js the call takes one object:
permit.elements.loginAs({ userId, tenantId });
Each SDK follows its own naming: loginAs in Node.js, .NET, and Java, and login_as in Python, which takes the two values as positional arguments.
If the user is not a member of the tenant you pass to loginAs, the login fails with USER_NOT_FOUND, and the element doesn't load. See Login errors.
Initialize the Permit SDK
Create a Permit client in your backend with your environment API key. Replace <YOUR_API_KEY> with the key from Get your API key.
- Node.js
- Python
- .NET
- Java
const { Permit } = require("permitio");
const permit = new Permit({ token: "<YOUR_API_KEY>" });
from permit import Permit

permit = Permit(token="<YOUR_API_KEY>")
using PermitSDK;

var permit = new Permit("<YOUR_API_KEY>");
import io.permit.sdk.Permit;
import io.permit.sdk.PermitConfig;

Permit permit = new Permit(
    new PermitConfig.Builder("<YOUR_API_KEY>").build()
);
Call loginAs from the login route
Choose the tab that matches your authentication method, then your backend language. Each example is a complete server with one login route. Replace these placeholders:
| Placeholder | Replace with |
|---|---|
<YOUR_API_KEY> | Your environment API key. Load it from an environment variable in production. |
<USER_KEY> | Code that reads the signed-in user's key from your own session or token. The key must match the user's key in Permit. |
<TENANT_KEY> | The key of the tenant the element shows. |
- Cookies: the route handles a
GETrequest and redirects toticket.redirect_url.permit.elements.login()loads the route in a hidden iframe and appends the tenant as atenantquery parameter. - Bearer token and Other headers: both methods use the same route. The route handles a
POSTrequest and returnsticket.contentas JSON.ticket.contentholds the redirect URL in aurlfield, whichpermit.elements.login()reads. The two methods differ only in how the frontend authenticates the request: anAuthorization: Bearerheader or your custom headers.
- Cookies
- Bearer Token or Other Headers
- FrontendOnly
- Node.js
- Python
- .NET
- Java
const express = require("express");
const { Permit } = require("permitio");

const app = express();
const permit = new Permit({ token: "<YOUR_API_KEY>" });

function getUserKey(req) {
  // Replace with code that reads the signed-in user's key from your session
  return "<USER_KEY>";
}

app.get("/login_cookie", async (req, res) => {
  const ticket = await permit.elements.loginAs({
    userId: getUserKey(req),
    tenantId: "<TENANT_KEY>",
  });
  res.redirect(302, ticket.redirect_url);
});

app.listen(4000, () => {
  console.log("Login route listening at http://localhost:4000/login_cookie");
});
from fastapi import FastAPI, Request
from fastapi.responses import RedirectResponse
from permit import Permit

app = FastAPI()
permit = Permit(token="<YOUR_API_KEY>")


def get_user_key(request: Request) -> str:
    # Replace with code that reads the signed-in user's key from your session
    return "<USER_KEY>"


@app.get("/login_cookie")
async def login_cookie(request: Request):
    ticket = await permit.elements.login_as(get_user_key(request), "<TENANT_KEY>")
    return RedirectResponse(url=ticket.redirect_url, status_code=302)
using System;
using System.Net;
using System.Threading.Tasks;
using PermitSDK;

namespace PermitOnboardingApp
{
    class HttpServer
    {
        public static HttpListener listener;
        public static string url = "http://localhost:4000/login_cookie/";
        static Permit permit = new Permit("<YOUR_API_KEY>");

        public static async Task HandleIncomingConnections()
        {
            while (true)
            {
                HttpListenerContext ctx = await listener.GetContextAsync();
                HttpListenerResponse resp = ctx.Response;
                string userId = "<USER_KEY>"; // read the user key from your own session
                EmbeddedLoginContentRequestOutput ticket = await permit.Elements.LoginAs(userId, "<TENANT_KEY>");
                resp.Redirect(ticket.RedirectUrl);
                resp.OutputStream.Close();
            }
        }

        public static void Main(string[] args)
        {
            listener = new HttpListener();
            listener.Prefixes.Add(url);
            listener.Start();
            Console.WriteLine("Listening for connections on {0}", url);
            HandleIncomingConnections().GetAwaiter().GetResult();
            listener.Close();
        }
    }
}
package com.example.myproject;

import io.permit.sdk.Permit;
import io.permit.sdk.PermitConfig;
import io.permit.sdk.api.PermitApiError;
import io.permit.sdk.api.PermitContextError;
import io.permit.sdk.api.models.ElementsLoginResult;
import org.springframework.boot.SpringApplication;
import org.springframework.boot.autoconfigure.SpringBootApplication;
import org.springframework.http.HttpHeaders;
import org.springframework.http.HttpStatus;
import org.springframework.http.ResponseEntity;
import org.springframework.web.bind.annotation.GetMapping;
import org.springframework.web.bind.annotation.RestController;

import java.io.IOException;

@RestController
@SpringBootApplication
public class DemoApplication {
    Permit permit = new Permit(
        new PermitConfig.Builder("<YOUR_API_KEY>").build()
    );

    @GetMapping("/login_cookie")
    public ResponseEntity<Object> loginWithCookie() throws IOException, PermitApiError, PermitContextError {
        String userId = "<USER_KEY>"; // read the user key from your own session
        String tenantId = "<TENANT_KEY>";
        ElementsLoginResult ticket = (ElementsLoginResult) permit.elements.loginAs(userId, tenantId);
        HttpHeaders headers = new HttpHeaders();
        headers.add("Location", ticket.redirectUrl);
        return new ResponseEntity<>(headers, HttpStatus.FOUND);
    }

    public static void main(String[] args) {
        SpringApplication.run(DemoApplication.class, args);
    }
}
- Node.js
- Python
- .NET
- Java
const express = require("express");
const { Permit } = require("permitio");

const app = express();
const permit = new Permit({ token: "<YOUR_API_KEY>" });

function getUserKey(req) {
  // Replace with code that reads the signed-in user's key from the
  // Authorization header or your custom header
  return "<USER_KEY>";
}

app.post("/login_header", async (req, res) => {
  const ticket = await permit.elements.loginAs({
    userId: getUserKey(req),
    tenantId: "<TENANT_KEY>",
  });
  // ticket.content is { url: ticket.redirect_url }
  res.status(200).json(ticket.content);
});

app.listen(4000, () => {
  console.log("Login route listening at http://localhost:4000/login_header");
});
from fastapi import FastAPI, Request
from fastapi.responses import JSONResponse
from permit import Permit

app = FastAPI()
permit = Permit(token="<YOUR_API_KEY>")


def get_user_key(request: Request) -> str:
    # Replace with code that reads the signed-in user's key from the
    # Authorization header or your custom header
    return "<USER_KEY>"


@app.post("/login_header")
async def login_header(request: Request):
    ticket = await permit.elements.login_as(get_user_key(request), "<TENANT_KEY>")
    # ticket.content is {"url": ticket.redirect_url}
    return JSONResponse(content=ticket.content, status_code=200)
using System;
using System.Net;
using System.Text;
using System.Text.Json;
using System.Threading.Tasks;
using PermitSDK;

namespace PermitOnboardingApp
{
    class HttpServer
    {
        public static HttpListener listener;
        public static string url = "http://localhost:4000/login_header/";
        static Permit permit = new Permit("<YOUR_API_KEY>");

        public static async Task HandleIncomingConnections()
        {
            while (true)
            {
                HttpListenerContext ctx = await listener.GetContextAsync();
                HttpListenerResponse resp = ctx.Response;
                string userId = "<USER_KEY>"; // read the user key from your own session
                EmbeddedLoginContentRequestOutput ticket = await permit.Elements.LoginAs(userId, "<TENANT_KEY>");
                byte[] data = Encoding.UTF8.GetBytes(JsonSerializer.Serialize(ticket.Content));
                resp.StatusCode = 200;
                resp.ContentType = "application/json";
                await resp.OutputStream.WriteAsync(data, 0, data.Length);
                resp.OutputStream.Close();
            }
        }

        public static void Main(string[] args)
        {
            listener = new HttpListener();
            listener.Prefixes.Add(url);
            listener.Start();
            Console.WriteLine("Listening for connections on {0}", url);
            HandleIncomingConnections().GetAwaiter().GetResult();
            listener.Close();
        }
    }
}
package com.example.myproject;

import io.permit.sdk.Permit;
import io.permit.sdk.PermitConfig;
import io.permit.sdk.api.PermitApiError;
import io.permit.sdk.api.PermitContextError;
import io.permit.sdk.api.models.ElementsLoginResult;
import org.springframework.boot.SpringApplication;
import org.springframework.boot.autoconfigure.SpringBootApplication;
import org.springframework.http.HttpStatus;
import org.springframework.http.ResponseEntity;
import org.springframework.web.bind.annotation.PostMapping;
import org.springframework.web.bind.annotation.RestController;

import java.io.IOException;

@RestController
@SpringBootApplication
public class DemoApplication {
    Permit permit = new Permit(
        new PermitConfig.Builder("<YOUR_API_KEY>").build()
    );

    @PostMapping("/login_header")
    public ResponseEntity<Object> loginWithHeader() throws IOException, PermitApiError, PermitContextError {
        String userId = "<USER_KEY>"; // read the user key from your own session
        String tenantId = "<TENANT_KEY>";
        ElementsLoginResult ticket = (ElementsLoginResult) permit.elements.loginAs(userId, tenantId);
        return new ResponseEntity<>(ticket.content, HttpStatus.OK);
    }

    public static void main(String[] args) {
        SpringApplication.run(DemoApplication.class, args);
    }
}
The frontendOnly method doesn't use a backend route. Go to Call permit.elements.login().
2. Call permit.elements.login() in your frontend
Call permit.elements.login() after your identity provider confirms the user's identity, and before your application renders the element iframe. The element iframe reads the permit_session cookie that the login creates, so an iframe that loads first has no session.
Install permit-js
Install the @permitio/permit-js package in your frontend project:
npm install @permitio/permit-js
Set the login parameters
permit.elements.login() takes one object. The required parameters depend on the login method.
| Parameter | Required for | Description |
|---|---|---|
loginMethod | All methods except cookie | One of LoginMethod.cookie (default), LoginMethod.bearer, LoginMethod.header, LoginMethod.frontendOnly, or LoginMethod.supportsPrivateBrowser. Import it with import permit, { LoginMethod } from "@permitio/permit-js". |
loginUrl | Cookie, bearer, header, private browsing | The URL of the backend login route from step 1. Ignored by frontendOnly. |
tenant | frontendOnly (optional for the others) | The key of the tenant to log the user in to. With backend methods, your route can set the tenant instead. |
token | Bearer | The user's token. permit.elements.login() sends it as Authorization: Bearer <token> to loginUrl. |
headers | Header | The authentication headers permit.elements.login() sends to loginUrl. |
userJwt | frontendOnly | The signed-in user's JWT. Permit verifies it against the environment JWKS. |
envId | frontendOnly | The ID of the Permit environment. The Generate Code dialog in the Elements screen shows it in the iframe src. |
userKeyClaim | Optional, frontendOnly only | The JWT claim that holds the user's Permit key, when the key is not in sub. |
elementIframeUrl | Private browsing | The exact src of the element iframe. |
Log in with your method
Choose the tab for your login method. In each example, replace <TENANT_KEY> with the tenant key, and set loginUrl to the URL of your backend login route. The promise that permit.elements.login() returns resolves after the login completes, so render the element iframe in the then callback.
- Cookie
- Bearer Token
- Other Headers
- FrontendOnly
Set loginUrl to your cookie login route. LoginMethod.cookie is the default, so you can omit loginMethod.
import permit from "@permitio/permit-js";

permit.elements
  .login({
    loginUrl: "https://your_app_url.com/login_cookie",
    tenant: "<TENANT_KEY>",
  })
  .then((loggedIn: boolean) => {
    // Render the element iframe here
  })
  .catch((err: unknown) => {
    console.error("Permit Elements login failed", err);
  });
Set loginMethod to LoginMethod.bearer and token to the signed-in user's token.
import permit, { LoginMethod } from "@permitio/permit-js";

permit.elements
  .login({
    loginUrl: "https://your_app_url.com/login_header",
    tenant: "<TENANT_KEY>",
    loginMethod: LoginMethod.bearer,
    token: "<USER_ACCESS_TOKEN>",
  })
  .then((loggedIn: boolean) => {
    // Render the element iframe here
  })
  .catch((err: unknown) => {
    console.error("Permit Elements login failed", err);
  });
Set loginMethod to LoginMethod.header and headers to the signed-in user's authentication headers.
import permit, { LoginMethod } from "@permitio/permit-js";

permit.elements
  .login({
    loginUrl: "https://your_app_url.com/login_header",
    tenant: "<TENANT_KEY>",
    loginMethod: LoginMethod.header,
    headers: { "<AUTH_HEADER_NAME>": "<AUTH_HEADER_VALUE>" },
  })
  .then((loggedIn: boolean) => {
    // Render the element iframe here
  })
  .catch((err: unknown) => {
    console.error("Permit Elements login failed", err);
  });
Set loginMethod to LoginMethod.frontendOnly, and pass the user's JWT, the tenant key, and the environment ID. The environment must have a JWKS configured, and the user's key in Permit must match the JWT sub claim or the claim you pass as userKeyClaim. See Embed Permit Elements for the full frontendOnly walkthrough.
import permit, { LoginMethod } from "@permitio/permit-js";

permit.elements
  .login({
    loginMethod: LoginMethod.frontendOnly,
    userJwt: "<YOUR_USER_JWT>",
    tenant: "<TENANT_KEY>",
    envId: "<YOUR_ENV_ID>",
  })
  .then((loggedIn: boolean) => {
    // Render the element iframe here
  })
  .catch((err: unknown) => {
    console.error("Permit Elements login failed", err);
  });
3. Log the user out of the element
Call permit.elements.logout() in the same code path that signs the user out of your application. If you skip this call, the element session stays active in that browser after the user signs out of your application, and the element still opens as that user.
permit.elements.logout();
Verify the login
- Open your browser's developer tools and select the Network tab.
- Reload the page that runs
permit.elements.login(). - Confirm that the login request succeeds and that the response sets a cookie named
permit_session. - Confirm that the element iframe loads the user's data instead of an error page.
With LoginMethod.frontendOnly, step 3 is a POST to https://api.permit.io/v2/auth/<YOUR_ENV_ID>/elements_fe_login_as whose response holds a redirect_url.
If the login fails, see Login errors for the error codes Permit returns, and Troubleshoot Permit Elements for network and cookie problems.
Support private browsing
Private windows, such as Chrome Incognito, and browsers such as Safari can block the third-party permit_session cookie. With LoginMethod.supportsPrivateBrowser, your backend returns an element bearer token instead of a cookie redirect, and permit.elements.login() passes the token to the element iframe with postMessage. This method needs @permitio/permit-js version 0.5.2 or later.
Return the element bearer token from the backend
In the backend route, return ticket.element_bearer_token in a JSON field named url. permit.elements.login() reads the token from the url field of the response.
const express = require("express");
const { Permit } = require("permitio");

const app = express();
const permit = new Permit({ token: "<YOUR_API_KEY>" });

function getUserKey(req) {
  // Replace with code that reads the signed-in user's key from your session
  return "<USER_KEY>";
}

app.post("/login_private_browser", async (req, res) => {
  const ticket = await permit.elements.loginAs({
    userId: getUserKey(req),
    tenantId: "<TENANT_KEY>",
  });
  // Return the element bearer token, not the redirect URL
  res.status(200).json({ url: ticket.element_bearer_token });
});

app.listen(4000, () => {
  console.log("Login route listening at http://localhost:4000/login_private_browser");
});
Pass the iframe URL to the frontend login
Set loginMethod to LoginMethod.supportsPrivateBrowser, and set elementIframeUrl to the exact src of the element iframe. If your backend route expects a bearer token or custom headers, pass token or headers as well.
import permit, { LoginMethod } from "@permitio/permit-js";

permit.elements
  .login({
    loginUrl: "https://your_app_url.com/login_private_browser",
    tenant: "<TENANT_KEY>",
    loginMethod: LoginMethod.supportsPrivateBrowser,
    // If your backend route expects a bearer token, add: token: "<USER_ACCESS_TOKEN>",
    // If your backend route expects custom headers, add: headers: { "<AUTH_HEADER_NAME>": "<AUTH_HEADER_VALUE>" },
    // The exact src of the element iframe
    elementIframeUrl:
      "https://embed.permit.io/<ELEMENT_NAME>?envId=<ENV_ID>&darkMode=false&tenantKey=<TENANT_KEY>&elementsToken=true",
  })
  .then((loggedIn: boolean) => {
    // The element iframe receives the token
  })
  .catch((err: unknown) => {
    console.error("Permit Elements login failed", err);
  });
Add elementsToken=true to the iframe URL
Append &elementsToken=true to the iframe src, and use the same URL in elementIframeUrl:
<iframe
    src="https://embed.permit.io/<ELEMENT_NAME>?envId=<ENV_ID>&darkMode=false&tenantKey=<TENANT_KEY>&elementsToken=true"
    width="100%"
    height="100%"
    frameborder="0"
></iframe>
Match the iframe URL exactly
permit.elements.login() finds the iframe whose src equals elementIframeUrl and posts the token to it. If the two URLs differ by any character, including the elementsToken=true parameter, the token never reaches the element, and the browser console logs that the iframe was not found.
Login errors
When a login fails, Permit returns one of these errors.
| Error | Cause | Fix |
|---|---|---|
USER_NOT_FOUND | The user doesn't exist in Permit, or the user is not a member of the tenant you logged in to. | Sync the user to Permit and assign the user a role in that tenant. |
TENANT_NOT_FOUND | The tenant passed to permit.elements.login() or loginAs doesn't exist in the environment. | Check the tenant key, or create the tenant. |
INVALID_PERMISSION_LEVEL | The user's role has no access to the part of the element being opened. A role left in Hidden Roles is the usual cause. | Drag the role to a permission level. See Permission levels. |
FORBIDDEN_ACCESS | The API key that the backend login route uses is not an environment API key. A project-level or organization-level key is refused here. | Use the environment API key of the environment the element belongs to. See Get your API key. |
A role left in Hidden Roles doesn't stop the login itself. The login creates the session for any user who is a member of the tenant, and the element then loads and asks Permit for its data. Those data requests return HTTP 403 for a hidden role, so the element renders an error instead of the user list. Assign the role a permission level to fix it.
Next steps
- Troubleshoot Permit Elements when the login or the element fails to load.
- Assign roles to permission levels to control what each user sees in an element.
- Call the Access Request API as a signed-in element user.